These are six of the most common mistakes I see photographers make in their editing process regardless of skill level. This section will cover how heavy the edit can be, control saturation, and correct the halos in your images.
I’ve written about many different editing techniques over the years, but never discussed what you should avoid in your editing workflow. This is mainly because I hesitate to ever advise someone on what is “right” or “wrong” when it comes to their art style and editing choices. Everything here is my personal opinion, but I think it is especially important in the context of this particular article. What I like can be very different from what you like for your style.
I encourage anyone reading this to approach suggestions with an open mind and remember that you are free to do whatever you want with your art. My goal is to try to recommend things that stand out to me as bad editing practice.
Light editing
Trying to stand out in a sea of beautiful images isn’t easy and the biggest mistake I see when editing is pushing my edits too far, whether it’s too much saturation, contrast, sharpness. or any adjustments you may make during the editing process. This happens, especially when you first start editing your images because you want our work to stand out. MKBHD made a blind camera test each year with phones in their respective time periods, and on average, brighter, more saturated images win year after year.
I personally experienced this when posting my work on social media. On average, the brighter and more saturated images I produced were better than my muted or subtle ones. It makes sense in today’s world, as we’re all vying for attention, and featured images have a higher chance of getting someone to stop scrolling and interacting. This doesn’t mean you can’t create eye-catching works, it’s about pushing images so much that they don’t look believable anymore.
This is an image from very early on in my work, circa 2016. It’s hard to look back on me these days, but I worked hard on this image just a few years ago. Now, it feels too vibrant, too contrasting, too obvious, and not as natural as I’d like. If I had to edit this again, which I have done for other images, I would approach things with a softer light. I won’t push those clouds to become dark or nearly vibrant in color.


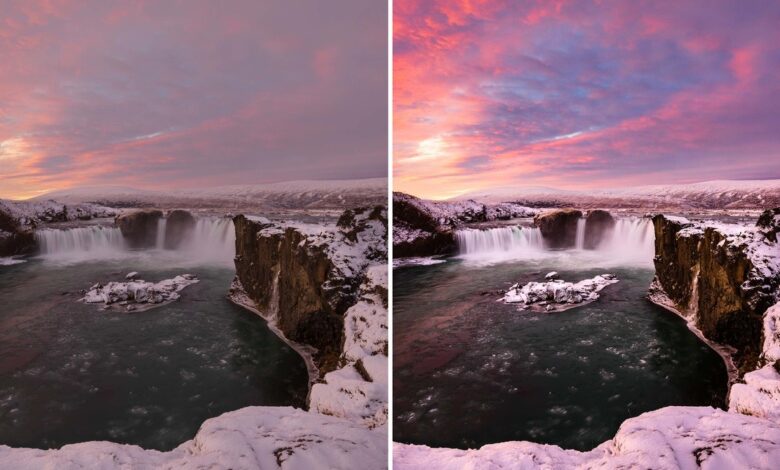
Sometimes you’ll come across an image that wants to be pushed in certain ways. Take the photo above as an example: the image on the left has my initial clarity set to -10 and on the right, clarity set to +50. For me, both of these work and I will decide which one I prefer for my work. It’s important to ask yourself: “Can I say I pushed the sliders that far? Does it look natural?”
The big takeaway from this is: make an edit and then bring a few sliders back to an aspect. If adding clarity +20 looks good to you, try setting it to just +10. Don’t hesitate to experiment, but just remind yourself that more is not always better.
Saturation Control
One reason saturation tends to get out of control is that it can change drastically without you needing to edit the actual saturation or vibrance properties. Adding contrast, adjusting the tone curve, changing white balance, clarity, reducing brightness, or even making local adjustments can affect the saturation of your image.
The best thing you can do to solve this problem is to simply step away from your computer and give your eyes a rest. This can be for 10 minutes or a few days. Sometimes, I sit for months editing when something goes wrong. I did exactly this in the photo above. I clearly remember making the edit and not thinking about it. However, when I came back a few days later, I asked myself, “what the hell am I thinking?” Obviously I overdid it and left the sky looking a bit too pushy.
Of course, fixing this is easy. Start with the saturation sliders in the HSL panel to adjust your specific colors. In my case, I tend to reduce the blue saturation in most of my edits because things like dehaze add a blue tint to the image. The last adjustment you want to make is the global saturation slider, and even after doing that, you might want to leave your image out again. This is something I do constantly, make quick edits and go back to see what my new eyes see. That’s what you should do for many elements in your editing process.
Halo
This is a common problem I have when people are trying local adjustment or mask for the first time. Typically, the term “haloing” refers to the glow over an area of your image where you combine two different exposures. In this case, I’m using it to describe similar effects, but it’s basically anywhere someone applies an all-too-obvious local adjustment.


Above is an example of applying local adjustment and making it too obvious. I was going to apply it so that the small island stands out more in the center of the image, but in doing so I pushed the adjustment too much and you can see a “halo” in the place of the adjustment. This can also happen when you cover up the brightness or dodge and burn when you push an area too much.
One way to test your edits is the same as before, is to step out of your image and reset your eyes, but even that may not be enough. I’ve found the best way to check for halos is to zoom out until your image is essentially the size of a thumbnail. It’s much easier to see these types of errors when you scale down your image. If you’re editing smaller points, you can simply zoom out in part to start seeing your adjustments. To zoom out in Lightroom: while holding down the shift key, your cursor will turn into a magnifying glass, then drag it to the left side of the screen. You can also minimize the navigation panel located on the left side.
To prevent this, follow the steps of the first theme and simply reduce the effects you apply. Instead of increasing the brightness by half, try only localizing the whites of your skin, which may give you a more natural brightening effect. You can also increase your adjustment size. This is something you will have to learn over time and will change editing to editing. The most important thing is to just know what to look for and always scale down your images before publishing.
That’s it for part one. Pay close attention to part two, which will cover your white balance, histogram, and cropping correctly.