Bride portraits are an important part of the wedding day. So make them epic. This article is part two of a series where I go through a series of my favorite images from the bridal shoot.
In the first part, I showed you how to get epic bride preparation images. But now that the bride is ready, it’s time to take some portraits. So to start things off, when it comes to the portrait time of the day, whether it’s at a real wedding or in a bridal shoot like this, I want to start the day off without a hitch. I don’t know exactly what the plan is. In the past, when I was searching for places, something would always go wrong or change, causing me to either give up on an idea I’m really interested in, or I’d end up trying to create an image that would work for me. fit its purpose. no longer viable or not as good as when I first scouted the location. So for now, I simply try and get an idea of where we’re going to start, and then I just allow myself to be inspired by the current lighting and composition I see.
It’s also important to reiterate that although I always take pictures during the shoot and try things out, not all of the pictures I take are the ones I really love. Sometimes I’ll take simple pictures I can take in my sleep to give me time to think about what I really want to do next. And although I will still provide these images, in this article, I really just want to talk about the best images. Things I want to share on social media, add to my website, or create content for things like this.
Next I want to talk about equipment. For this part, I will be shooting on sony a9 combined with either 24mm f/1.4 GM lens, the Sony 35mm f/1.4 CZ lens, the Sony 85mm f/1.8 lens, or Sony 70-200 f/2.8 GM II . Lens. For lighting, I’m using Stella Pro Reflex WILL mounted on top of my page Auto stand C8 from Cheetah Stands. While this light can do a similar digital blast to a traditional flash, around this time of day I’ll be using it mostly in constant mode. I really love the constant light’s ability to see what you’re getting and it saved me a bit of setup time as I didn’t need to take any test images just to fine-tune the light position. its brightness or wattage.
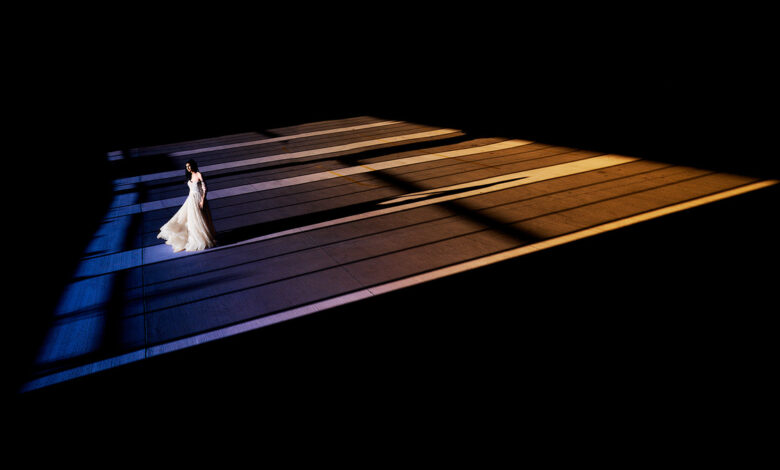
Now for the first location, we are taking pictures downstairs of a garage. I’ve never actually been inside this garage before, but I always drive past it and notice it’s usually empty and the setting sun shines directly on one side of the garage. So grateful that when we first showed up, I wasn’t disappointed in what we had to work with. And although I already have the Reflex S ready, I am very confident that if the light is great there is no need to complicate things with additional lights. So working with this amazing light model on the ground, I wanted to backlit the bride and frame her in the dark space below the window. The problem is that even with the camera overhead, I couldn’t capture her completely in that space. So trash parking to the rescue. I just moved the trash can to the area I wanted, being careful not to seriously injure myself standing on top of it, and able to position the camera high enough for what I was after.


From here, I see that areas of this garage window have some round holes cut into them to let light through. So I know if I get a nice and close shot of the bride, you’ll be able to see all those circles projected onto the bride. Now with her illuminated by the sun, the shadowy part of the image is like sinking into darkness. So here I brought my Reflex S to use as a border light. This helps to separate her from the background more, but the key point of this lighting arrangement is to increase the brightness high enough. If the lighting is lower, you will miss the light detail on the bride’s collarbone and neckline.


Now before we leave for the next location, I would like to use this amazing light on the floor again and I would like to try showing the entire light section. But I need to be taller than the trash can reach me. So I found an area on another wall where I could stand on a higher ledge. This extra height, coupled with blind shooting with the camera raised as high as I could reach, and I was able to capture all of the light.


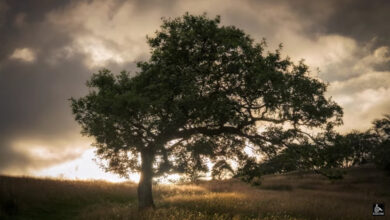
Now on to the next location, as I was pulling into the prep area, I noticed a very cool cherry blossom tree in the parking lot. What I’ve noticed is that this tree is a little too tall for the parking lot, so if I go down low enough, I know I can get an all-sky composition with just the tree and the bride. So we went back to the parking lot at sunset and I just placed the bride next to the tree, shot from a low angle and exposed the image so she and the tree became a shadow. And I had enough time to play around with the composition a bit so I put the sun directly behind her for one shot, and then I put the sun just outside the frame for the other. I know which one I like better, but I’m curious to know what you all think. Let me know in the comments which one you prefer.


Next, I wanted to really show off the cherry blossoms, so I planned to have the bride crouched low while I took a peek through the tree. And while I was preparing everything, the lighting was perfect. It’s an angle where the sun hits the tree trunk and cuts across the hill to light up the bride. The problem was that by the time I was done setting everything up, the sun was already below the horizon and I lost all light. So the Stella Pro Reflex S is the rescue. But this time, I need two of them. One I have on a C8 Cheetah stand with a viewfinder. This allowed me to take a small streak of light on the bride’s face and then it fades out. For the second light, I used this with no dimmer attached. So only the bare LED gives me maximum light spread as well as makes the light even more special on the flowers.


So while taking pictures with my camera with one hand, I moved this reflector around until I found the right space where it could light up as many flowers as possible. This is a perfect example of when continuous light is really ideal. If I needed to do this with flash, it would take a lot of work and experimentation with the image to really put the light in the perfect position, especially when holding the light in hand. But with the LED, I just move it around and visually see everything align.

From here, I was ready to move inside for the creative low-light photography I had in mind, but I noticed a sign that had been blown away by the storm the night before. I thought it would make a fun way to frame the bride. So I pose for the bride in that frame and then light her up with Stella Pro Reflex S. And for this image I’m using a focal lens so I can have a kiss of light. it’s on her face. Then I went very low so all you could see was the broken sign and the bride.


It is done. Hope you found this useful and if you missed part one as I go through Get ready for part of today, make sure to check that. And if you have any questions, make sure to post them in the comments.