Ever since Lightroom and Photoshop introduced automatic sky selections, it has become very easy to change the sky in landscape and architectural photos. But, how good are those automatic selections? If you’re just editing photos for web presentations, most of them are good enough. But if you’re going to print your photos, you might want to improve them, which is what I cover in this article.
While those automatic selections are doable in both Lightroom and Photoshop, I focused on the latter because Lightroom lacks the necessary fine-tuning tools.
Automatic Sky Selection in Photoshop
To make a selection of the sky in Photoshop, go to “Select – Sky.” Photoshop will analyze the image to find areas it thinks belong in the sky. Once done, you will see marching ants highlighting the selection.
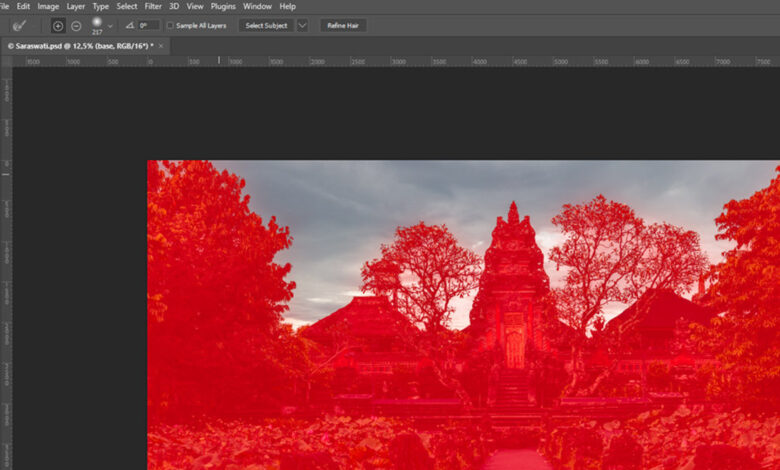
Press “q” to enter quick mask mode or press quick mask button. In this mode, unselected parts are highlighted with a red overlay, allowing you to better evaluate selections and find areas for improvement. As you can see in the example below, the mask is pretty good. But there are areas of the sky that are not fully selected. For some images and retouching, having such gradual selections may work better than hard selections. But if you apply strong adjustments to the sky, they can result in halos and other artifacts. That’s why I prefer to make more precise selections.
Selection screening
Based on the automatic selection that Photoshop provides, you can perform additional refinements.
Selection Tool and Mask
If you have any selection tools – for example, “Rectangular Marquee Tool” – active, you will see a “Select and Mask…” button in the upper toolbar. You can also find this function in “Select – Select and Mask…” or by pressing “ALT + CTRL/CMD + R”.
For this button to work, you must exit the quick masking mode if you still see the red overlay. Press the “q” or quick mask button again.
After you press the “Select and Mask…” button, Photoshop shows you a new set of panels that you can use to refine the currently active selection. On the right side, you should first put View mode. I like to use “Overlay” to make the selection look like in quick mask mode.
There are more settings in the right panel that you can use to refine the selection. I just adjusted the “Feather” setting to a value of 0.5 or 1 and left the other settings alone for the sky selections.
The fine-tuning brush on the left side is much more important. Using it, you can scan over areas where Photoshop isn’t precise enough. Photoshop will then adjust the mask for that area. The results will rarely be perfect, but are already an improvement over the automatic selection.
Refine and mask tools are also available for masks. If you create an adjustment layer for the sky, you’ll find a “Refine and mask…” button below the mask properties, as I show in the featured video.
Dodge and Burn
Once you’re done with the selection palette and the mask, you can optimize the results with the “Dodge and Burn” tool. It can be done inside the quick mask mode or on the mask after creating an adjustment layer. The idea is to avoid selected or white areas in the mask and burn out unselected or black areas in the mask.
Let’s see how to use this technique on the mask of an adjustment layer. With the selection still active, create a curve adjustment layer that you can use to give the sky more contrast. The activity mask will be automatically applied to that layer. Hold “ALT”, click the adjustment layer’s mask icon to enter mask view.
You will notice that the image is now black and white. The black areas are the areas that will not be affected by the adjustment and the white areas are the areas that will be affected. To fine tune the mask, first select the burn tool and focus on the dark gray areas. Set “Range” to “Shadow” and start with “Exposure” between 20 and 30%.
If you paint over the gray areas, they will get darker and eventually black. Bright parts will not be affected. That’s why you should use this tool; You’ve got to make a subtle choice.
After hitting the ball with the burn tool, switch to the dodge tool. Set “Range” to “Highlights” and then paint over the lighter areas of the mask to make them completely white.
You’ll get the best results by seamlessly switching between the two tools to create the effect. In this way, you can gradually improve the mask. When you’re satisfied, “ALT-click” the mask icon again. Now you see the image and can change the adjustment layer. Those will be correctly applied to the sky.
Save selected sky
Usually, you’ll want to reuse this selection for additional sky adjustments during your editing. One way is to create a group and apply a mask to this group. You can then place multiple adjustment layers in the group to create complex sky edits.
What I want to do, after I have the perfect sky mask, is to save it as a channel. Since you worked directly on the mask in the previous section, the selection for the sky is gone. Press and hold “CTRL/CMD” and click the mask icon to reload the sky selection. Then go to the “Channels” panel and click the little mask button. An additional channel will appear. I usually name it “Sky Selection”. To use it again, hold down “CTRL/CMD” and click it.
Inference
While it may seem like a lot of work, refining the selections the way I show you here can be done in minutes with some practice. And those are the minutes that are used judiciously, because the right choices are the foundation for further edits in your post-production workflow. That’s why you shouldn’t stop with the sky. Other objects in your photo may need special attention. So let’s start work from the beginning and make the necessary selections. It will make the creative part of your editing process much more fluid and enjoyable.