An ecommerce image represents a product on the web to provide potential customers with an accurate representation of the product. Therefore, an efficient workflow that allows you to get an image of a product in full focus is of utmost importance. Check out this article to learn how easy focus stacking could be the answer for you if you find yourself struggling with focus issues.
Focal stacking is a common technique used in photography to achieve a greater depth of field or, in colloquial terms, a “sharper” image, especially for close-up or close-up photography. close. It may feel overwhelming at first to do focus stacking, but follow along as we break it down into easy step-by-step focus stacking techniques and procedures so you can follow.
Planning
Like every other commercial job, it’s extremely important to start the entire process with solid planning. This will eventually be the foundation for you to start working on. From visualization to project execution, write down as much of your notebook or document as possible so you can refer to it from time to time whenever you need it, during preparation or during filming. By completing detailed planning, you can certainly anticipate and overcome possible challenges during shooting even before you’ve actually shot the shot. For example, strategically place the subject at a certain angle to potentially reduce the number of shots required to perform superposition. Or to create a studio environment to minimize variations in the exposure of the image.
Photography technique
Essentially, focus stacking is taking a series of consistently exposed images that cover a wide focal range. A step-by-step workflow is listed below to help guide you through the process.
- Set up your shot: Arrange your subject, background, lighting, and camera setup on a tripod while fine-tuning your composition.
- When setting exposure settings, I recommend choosing an aperture value first, and then choosing the appropriate shutter speed and ISO setting. That way, you can fix your depth of field first and take the rest of the settings to compensate for the exposure. Recommended aperture values are usually around f/8 to f/16, that way you can maximize depth of field for easier stacking while minimizing possible diffraction.
- Set your focus. I strongly recommend using manual focus at this stage and starting with the closest point of the subject to the camera.
- Take your photo. By keeping the camera settings and position fixed, take a series of shots while gradually moving the focus point from the closest focus points towards the furthest point of the subject after each frame. Since the number of photos taken will depend on the overlap of the depth of field, take as many shots as you deem necessary to cover the entire focal plane of the subject.
- Once you’re confident you’ve got all the images you need, it’s time to get into our computers and do the post-processing to put the puzzles together.
Advice
Before moving on to post-processing, here are some practical tips to ensure a higher success rate when it comes to photography.
- Use a tripod! A good sturdy tripod will keep the camera stationary while you complete your series of shots.
- Use the remote control or shutter button to minimize camera shake. Since you are taking a close-up photo, a small movement can ruin your entire image alignment.
- Use mirror lock if you are still using a DSLR camera.
- Shoot the link to a larger screen. Any form of tethering is fine, be it using the WiFi connection in your camera, Camranger, or a cable connected to your workstation. The goal here is to view your image on a larger screen to check that you’re getting the right amount of depth-of-field overlap for your series of images.
- Consider breathing in the focal length of your lens before setting up your shot. Focus breathing is the change of field of view as the lens moves through the focus range. Composition your image and move the focus point from the closest point to the point farther away and make sure your subject stays in the frame.
- Consider the consistency of the light. Since the series of images will take some time to complete, it is extremely important to ensure that the lighting of the product is consistent throughout the series of images. Use a studio setting whenever possible as ambient light can change within minutes of shooting.
- Consider using automation when possible. There are many advanced cameras that offer in-camera focus-switching shooting option. Please check your camera’s manual if your camera supports this function. This function will eliminate any human error and ensure consistency in your exposure by setting the size of the focus range and the number of images.
- Remember this is a game of millimeters. Be subtle with your surrounding movements and be patient when shooting your series of shots. Remember to double- or triple-check as you complete your series.
post-processing
This is where the easy part comes in without having to mess around with any other software; all you need is Adobe Photoshop and basic knowledge of using brush and masking tools.
- Import all the series of images you have received into any raw processing tool if you are taking raw images to do some minor extraction and editing to the files. In my case I use Adobe Lightroom/Adobe Camera Raw. If you are taking a jpeg image then importing it directly into Photoshop should work fine.
- Align all the layers that you have captured. In my case I got a bunch of 8 images.
- You should arrange the sequence of images in order to easily see what you are doing.
- Create a black layer mask to hide all the layers and, using a white brush, reveal the focused parts of the next image. (It’s important to make sure your brush is at 100% opacity and 100% flow to make sure you don’t leave parts of the image blurry.)
- Repeat the process until you have focused on the entire product. (You can use Photoshop’s auto-stack function, but I find it easier to do it this way because Photoshop’s auto-stack creates unwanted artifacts, which then require some You can also use other external software like Helicon Focus to stack the images, but personally I find it troublesome to use additional software for a simple task like like this.)
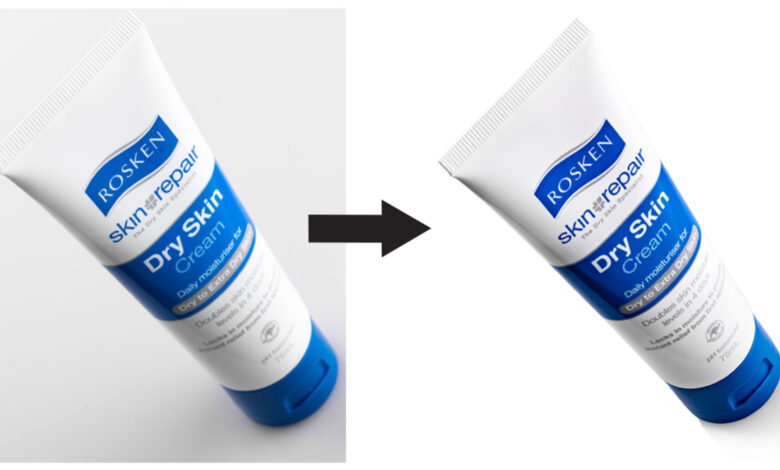
- Continue with whatever editing process you normally do. In my case, I cut out the product on the white background with the pen tool to get a cleaner background.
- Export the image to your desired settings and you should now have a fully centered image.


Conclusion
This easy focus-aligning process and technique opens up possibilities by producing dramatic results when you’re photographing your next e-commerce project. As in every e-commerce photo shoot, our goal is to stay as efficient as possible to deliver high quality and bulk products in the shortest amount of time. By keeping this workflow in mind, it will allow us to bring more value to our clients and in return for higher profits in our photography business.