Portrait retouching is a process that requires consistent, well-practiced technique and an efficient, well-organized workflow to produce professional results in a reasonable amount of time. In this review, we look at Pratik Naik’s Infinite Editing Panel and how it can help you produce better results in less time.
You don’t know Pratik Naik, he’s one of the most talented educators and editors on the planet, and he’s also one of the nicest people I’ve ever had the pleasure of knowing. Unsatisfied with editing and education, he’s also an innovator, constantly creating new tools to improve the quality and efficiency of working in Photoshop. His latest are the Photoshop Infinite Tools Plugins, which make editing easier and expand your creativity in ways you never expected. In this review we are looking at Infinite edit panelDesigned for portrait photo editing.
Dashboard
The Infinite Editing panel comes with five tabs: Setup, Editing, Tools, Users, and Export, plus a settings icon. Let’s take a look at each.
Establish

The center of the Infinite Edit Panel is the Create button. Hitting it automatically sets up the entire workflow, creating healing, dodging and burn layers, color correction, and multiple helper layers that make it easy to visualize what you need to tackle. However, if you want more customization, you can still create your own.
Edit
 In the Edit tab, you’ll find multiple layers of healing, frequency separation, dodging, and burning. You can also automatically select a layer and brush for each frequency separation step.
Tools

The Tools tab comes with a variety of color correction tools, a custom built sharpening algorithm, and grain options. One particularly neat aspect is the “Holy Particle”, which utilizes a collection of high-resolution film scans with grain for realistic results. You can choose film type, grain size, quantity, lens artifacts, and flaws to add to that realism.
User

The Users tab allows you to save different workflows, which can include a set of classes and actions, making it easy to have multiple workflows for different situations at your fingertips can be created with the click of a button.
Export Tab

Here you can include all of your most common output settings for quick and consistent visuals.
Bottom and Customization
 At the bottom, you can quickly toggle different commonly used helper classes on and off, saving you the hassle of finding them in a collapsed group. Right-clicking on the function buttons will take you to options, of which there are a lot of options. For example, you can choose the method used to separate the frequencies and the Photoshop tool to load when it’s done, or even let Photoshop run whatever action you want once it’s done.
Using the Control Panel
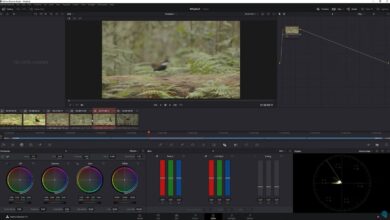
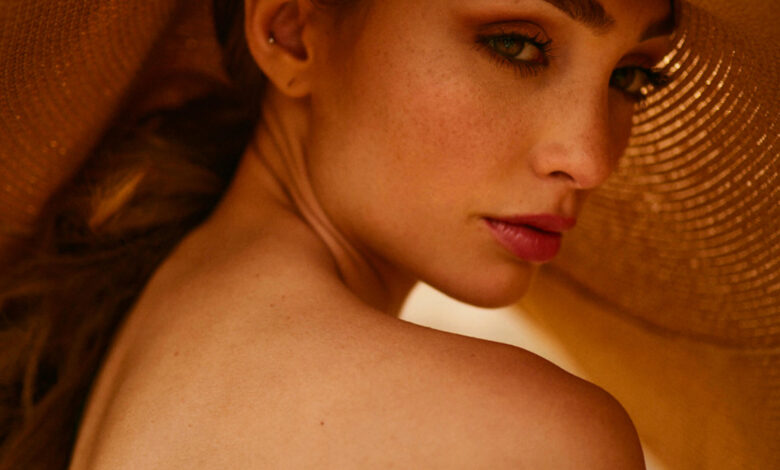
Using the control panel in practice is a real pleasure. It does exactly what an editing tool should do: it gives you professional results while helping you be more productive than if you did everything manually. On top of that, its setup keeps you more consistent, which, in turn, leads to a more unified portfolio. Here is an edit:
 The first time I did this edit a few years ago, I ran the frequency separation manually, did dodge and burn, a custom eye retouch group, and a bunch of tonal layers, including balance. in color for my personal style, global contrast boost, and global dodge and burn for a quick custom texture. Overall, the first time I edited the photo took about 20 minutes in total.
I reloaded the raw file and edited it with the Infinite Edit Editing panel, which includes healing, frequency separation, dodge and burn, some light color correction and sharpening. This time, it took about 7 minutes. I manually added my eye correction and skin lightening groups. However, the beauty of the console is that I don’t have to do this every time. First, I saved both the eye groups and tones in the Users tab, allowing me to instantly add them to any image I’m working on. However, since I use them on every portrait I edit, that’s what I use Photoshop most of the time, then I right click the Create button and save my entire layers panel , which means now, whenever I click on it, not only do I get Infinite Retouch’s built-in layers and groups, I also get mine, giving me an efficient overall workflow. one-click consistency. Furthermore, I switch between working on my laptop and desktop a lot, so I simply use the built-in settings backup feature to export my custom settings to Dropbox and was able to stream them instantly on my desktop.
The special help classes are good, helpful and make sure you don’t miss anything in your edits and make it easier and quicker to deal with any issues. Overall, there are 11: Invert, Brightness, Multiply Curve, Levels, Contrast Curve, Sun Curve, Hue, Tint, Saturation, Shadow Warning, and Highlight Alert. Generally I find myself using Brightness parallel to Multiply Curve or Contrast Curve and Sun Curve. The former combination tends to make any imperfections appear lighter, making it easy to catch them all. The latter is great for catching small imperfections like dust marks.
Overall, I was able to produce similar or better-than-normal editing quality using the Infinity Retouch panel manually. That’s perhaps not surprising, since that’s not the driving force for the console, although little assistants like help classes will help you make sure you don’t miss anything.
Instead, what the Infinite Retouch panel does best is help you edit more efficiently and consistently. With one click, all 26 layers that I use for portrait retouching are created, labeled, and grouped each time, including custom layers and my specific settings. That alone is great. However, the panel is designed to be efficient down to the details, with every layer and group following a natural editing order. You’ll find yourself quickly developing a consistent workflow, which brings me to my next point. One of the hallmarks of a good photographer is consistency, that is, a unified style in their portfolio, and it starts with a streamlined, repeatable editing process that is why the Infinite Retouch board delivers.
Inference
There’s a lot to like about the Infinite Retouch control panel. It was designed by a world-class editor, and it shows. Its easy-to-understand design and streamlined layout make it possible to get started right away and get to work. Powerful built-in tools and customization options let it grow with you. And finally, thoughtful features like multiple help layers ensure that you’re always doing your best work. That’s an easy proposition. You can get your copy here.