For those who’ve ever questioned learn how to enrich your 3D fashions with hair and fur, you’re in the suitable place! Right here’s how . .
As 3D artists, you’ve in all probability heard of a number of grooming options whereas working with 3D characters. Think about a monster coated in fur, a person with a beard, or just a wool coat with random hair scattered in every single place. These are widespread conditions the place you should use a specialised software program.
In Autodesk Maya, for example, there’s an answer known as XGen, which consists of a number of instruments akin to brushes, modifiers, sculpting layers, and extra. I’ve experimented with XGen for a while and located it actually highly effective.
Nonetheless, there are different equally legitimate decisions in the marketplace and I wished to discover extra choices for grooming.
Enter Yeti.
Yeti
Yeti by Peregrine Labs is an incredible toolset for creating hair/fur, feathers, and procedural geometry.
What makes Yeti totally different from XGen is it’s primarily based on nodes. Which means, in easy phrases, a non-destructive workflow, the place each change is native and doesn’t affect the remainder of the nodes.
I typically really feel snug working with node-based instruments akin to Substance Designer or Houdini, as a result of they provide me extra flexibility whereas revising and tweaking my nodes by holding my work organized.
On this article, I’ll train you learn how to create fur on a customized character. (Notice: We’ll cowl shading in depth in a future tutorial.)
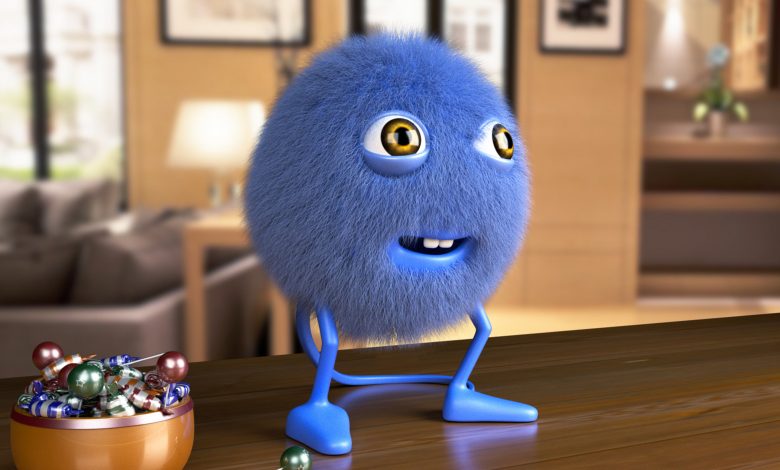
The Character

Right here’s a personality that I rapidly modeled and rendered. I wished to concentrate on a easy, cartoony creature that’ll be partially coated in fur. Together with the character, I merely created some render scenes, simply to check just a few common lighting conditions.
I deliberately tried to make use of complementary colours—on this case blue and orange—to strengthen the composition and create concord.

On this final instance, I completed with a very orange backdrop to higher emphasize the distinction between heat and funky tones. Discover the presence of subsurface scattering on the character’s pores and skin, to be able to make him extra natural and attention-grabbing.
We’ll begin from this character and construct our Yeti nodes. You’ll see that Yeti is a mix of a node-based graph and brushes.

Fundamental Setup for Yeti
Let’s open the file with our character. The Yeti menu seems on the prime of the display screen and comprises two important gadgets:
- Create Groom on Mesh
- Create Yeti Node on Mesh
The primary one is said to the sequence of brushes you should utilize to sculpt your hair. Whereas the second means that you can handle a graph and add nodes, which act like modifiers to your hair/fur and have a number of built-in capabilities.
The very first thing it’s important to do whereas beginning with Yeti is to apply these two actions to your character.
Choose the character and click on on Create Groom on Mesh. This motion creates an entry within the Maya Outliner. For simplicity’s sake, let’s name it Grooming controller for the remainder of the article.
Do the identical factor for the Create Yeti Node on Mesh motion. Let’s name the brand new entry the Yeti controller.
Now you’re able to sculpt your fur!
The Instruments
Within the outliner, choose the Grooming controller and, within the form tab of the attribute editor, click on on the Edit Groom button. This motion opens the Grooming editor with the next instruments.

Grooming Instruments permit you to sculpt your fur. We have now the add, take away, scatter, comb, lower software, and so forth.
Attribute Paint Instruments are helpful when you should create particular attributes to make use of in your node graph, for example.
Lastly, Workflow comprises utility instruments like flood fill, choice, deselection, mirror, and so forth.
Sculpting the Fur
Let’s begin with the third Grooming Instrument within the listing: the Scatter software.
Notice: When utilizing the Sculpting software in Yeti, you create objects known as Strands. Each strand controls a number of hairs known as Fibers.
With the Scatter software, you randomly instantiate strands on the character. Below the Strands tab of our Grooming controller, there’s the parameter known as Minimal Strand Distance. Enhance it to round 0.29 to create the minimal area between one strand and one other.
-

Scatter software in motion. -

Character coated in strands.
On the finish, it is best to have the character coated in strands.
If you wish to differ the worldwide size of your strands:
- Choose the size attribute beneath the Attribute Paint tab of our Grooming controller
- Choose the arrow up within the Attribute Paint Instruments part of the Grooming editor
- Once more, within the Grooming editor, click on on the Flood Fill software (the bucket) a number of occasions to extend the size
-

Deciding on the size attribute. -

Rising the size. -

Ultimate end result.
Stress-free the Strands
Now that your strands are in, it’s time to comb. From the Grooming editor, choose the comb (fourth software) and provides your strands the suitable course. Observe how just a few strands have some random orientation. To realize that, click on on the penultimate icon within the Grooming Instruments part (the Sculpting software) and modify the only strands.
Whenever you’re glad with the strands, you may go on constructing your node graph.

The Yeti Graph Editor
This editor considers the geometry and our earlier grooming to construct and manipulate the actual fibers.
Entry Yeti from the Maya menu bar on the prime of the display screen and click on on Open Graph Editor.
What you get is an empty graph. It’s essential to create nodes from the Create menu. Whenever you get used to this software, you may immediately use the higher icons.
On the finish, it is best to have one thing like this—a primary graph with some nodes.
-

Graph Editor. -

Graph Editor with nodes.
Let’s dig into the fundamental nodes.
Import Nodes
They merely import the geometry and the grooming we’ve simply created within the earlier half. Whenever you double-click on a node, a Node Inspector pops up, exhibiting the associated choices.
Notice: Earlier than configuring the import nodes, we have to choose the Yeti controller (see the fundamental setup part) and, within the Enter Grooms possibility, add the Groom controller. This makes the grooming obtainable for one of many import nodes.

Let’s get again to our graph. Double-click on the primary import node. Give it a reputation and choose Geometry within the Kind possibility. The Choice possibility means that you can choose your precise geometry form (BodyShape).
For the second import node, the Kind possibility is Groom. For Choice, you should load the Groom controller form (Groom_ControllerShape).
That’s it! Now you’ve informed the graph that the geometry and the grooming exist.


Scatter Node
This node scatters factors on the mesh, which corresponds to the place the place the longer term fibers will develop, and permits controlling the density, in addition to different attention-grabbing parameters.
-

The scattered factors. -

The Node inspector.
I set the density to 100, nevertheless, the issue is that the factors seem all through the mannequin, which isn’t what we would like. Regardless of having the strands simply on the pinnacle, the scattering seems on the entire geometry.
We’d like a density map to inform Yeti the place to place the longer term fibers. So, paint in your UVs to create the map. The portray will be carried out inside Maya by the 3D Paint Instrument or (if you happen to want) by exterior instruments—we wish to shade the pinnacle with white and the remaining with black.

On the finish, it is best to have a shade map saved. We now want to make use of it in our node graph.
We introduce a Texture node the place we load the colour map we’ve simply created. Together with the map, we point out a reputation for the Attribute area and, lastly, we copy that attribute title to the Groom/Texture Attribute of the scatter node.
Let’s sum it up with some photos.
That is the best way we inform Yeti to make the fiber develop in white areas:
-

Including a Texture node. -

Managing the density map from one node to a different.
Develop Node
This node creates the precise fibers from the earlier scattered factors and has a second enter, which is our preliminary import node (the grooming with the strands). We have now to inform Yeti to think about our earlier sculpted strands to construct the fibers. As an example, the strand size can be thought of whereas constructing the fibers.
The develop node additionally has different further parameters to set a min/max size and make the fibers random in size.

Comb Node
This node considers the fibers created by the develop node and takes the grooming as second enter. Now, Yeti is aware of learn how to chill out and orient the fibers primarily based on the strands—giving form to our fibers!
I haven’t touched the node inspector for the comb node. By default, it has all you want!

Width Node
Final, however not least, is the width node. It takes the results of the comb node and adjustments the bottom and the tip of the fibers. I often scale back the tip width to have extra convincing outcomes.
Within the node inspector, I solely modified the Width Multiplier, the Base, and the Tip Width. You may strive a number of values to be able to obtain thinner fibers.

Able to Render!
At this level, we’re virtually achieved with our primary fur, however we positively want to extend the variety of fibers.
Within the Attribute editor of our Yeti controller, there are two menus coping with some fur properties within the viewport and at render time.

I modified the Render Density to 5 and the Viewport Density to 4.470 (virtually the identical). I anticipate to have extra fibers now!

In a subsequent article, we’ll be speaking about extra superior methods for sculpting the hair. For now, keep in mind this easy however efficient setup—excellent for conditions coping with fur. Once more, the shading is kind of an necessary step too, which we’ll additionally current it in a future article.
For this render, I utilized a shader in Arnold, which seems to be attention-grabbing and good whereas presenting the character. It has the diffuse contribution, in addition to some delicate specular reflections. The aim is to make the composition cartoony and enjoyable to take a look at.
Right here’s the ultimate render:


As you understand, Yeti works with a non-destructive workflow, so we will add new functionalities with out affecting the opposite nodes.
On this final instance, I used a node known as Scraggle to mess up the hair a bit. Right here’s a preview now, however we’ll focus on it extra within the subsequent article:


Conclusions
Now that you’ve got the fundamental abilities to supply a hairdo to your character, we will bounce straight to different cool options and methods . . . within the subsequent episode!!
For those who discover this text attention-grabbing, take a look at my works on my Artstation page.
On the lookout for 3D property? TurboSquid by Shutterstock has over a million 3D fashions utilized by recreation builders, information companies, architects, visible results studios, advertisers, and artistic professionals world wide.
Visit TurboSquid by Shutterstock
Construct some extra cool initiatives with these property: