Believe it or not, headshot cropping and orientation is a controversial topic in the photography community. In this article and the accompanying video, I give you five reasons to crop horizontally and trim just the top of your head.
Although horizontal headshot cropping has become more common, it is still the exception, not the rule. I learned this technique from the mentor and founder of Headshot Crew who is great Peter Hurleyand decided to reach out to him while writing this to ask him why he cropped the image horizontally and slightly off the head. Here’s what he said:
Open any magazine and you’ll see a bunch of cropped ends. Visually, I like the eyes to be on the center line, focusing all the attention on the face. I think there is power in composition and how close your subject is to the lens, so the top of the head will have a backrest in many cases. I’ve lowered my camera angle for years, so the head clipping depends on a combination of camera height and the angle of the person’s head relative to the camera.
I think Peter gets to the heart of the matter with his comment. Cropping a close-up horizontal, close-up shot focuses attention on the subject’s face and removes any and all distracting elements. To further explain what Peter had to say to me, I want to give you five reasons why I love to cut and cut my subject’s head.
1. It eliminates distractions and demands the viewer’s attention
Close-cropping eliminates distractions and forces the viewer to focus on the face, especially facial expressions. Undoubtedly, expression is the most important part of a great shot and ultimately what attracts the viewer. By clipping the top of the head and just below the shoulders, the viewer is forced to pay attention to the subject’s face and not so much to their clothes or hairstyle. And, while hair and clothes are important, as Peter says, they give you the unique expression of a human face in front of your camera. In contrast, a wide crop, which includes a lot of headroom and much of the subject’s body, has the opposite effect and adds a lot of busyness and distraction to the image. In my book, hair, makeup, and clothes are the things that depend on the face you want the viewer to connect with.
2. Head Cutting Combined with Shoulder Trim is Better
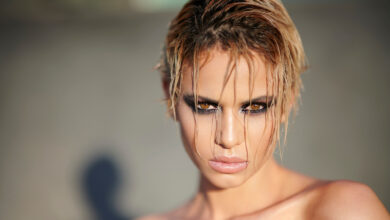
You may have noticed that in addition to clipping the top of the head, I also clipped one shoulder and intentionally placed the subject on the left or right side of the frame. I also learned this technique from Peter, and the reason for doing it is the same as cutting the head, with some additional benefits. First, by intentionally placing your subject on the left or right side of the frame, you force the viewer’s eye to move past the negative space created by the background and toward the subject’s facial expression. Using a simple background also enhances this effect, as the negative space of a gray or white background gives the viewer no reason to focus their gaze anywhere but the face. Second, the off-center cropping gives the subject a sense of movement, especially when the subject is positioned at an angle. Take this photo of Dana, for example. The close, off-centre cut, combined with the tilt of her head and torso, not only makes her face the most important element, but also gives a sense of movement, as if I just called her name and she just turned around and smiled. I love this head shot!
3. It stands out in a sea of vertical shots
Another reason to love the close crop is that it stands out from the crowd, which is filled with vertical shots and textured backgrounds. Remember that the goal of a professional shoot, especially for actors, is to help them catch the eye of the casting director. Even your company’s headshot should stand out, as you want your customers to make a strong visual impression as quickly as possible. While most photographers use the same loose, vertical crop, where the subject is tilted toward the camera and placed in front of a busy textured background, those of us cropped close and kept the background. Simple scenes will provide our clients with instantly striking photos with a sea of faces, especially since it is cropped horizontally instead of vertically. Think of it this way: if you’re a casting director looking at hundreds or thousands of head shots, tight cross-sectional shots with great lighting and simple backgrounds won’t fail to catch your eye. If you combine this with an attractive expression, it’s hard to beat.
4. I never cut my head in camera
I’ll let you in on a little secret: I never cut my head or shoulders in front of the camera. In fact, I shoot using a fairly loose cross-section so that I can give my clients the best possible variety. This is extremely important, especially when working with corporate clients, as many marketing departments will require the exact shot to be cropped vertically to fit the pre-made template on the company’s website. . When I provide images, I provide the uncropped version as well as the cropped versions, because each client has their own specific needs and I want to go above and beyond for them. I believe this is best practice for headshot photographers, so save the crop for the post. Having said that, I always encourage my clients to use a close cross section and show them how it looks in their session. Their feedback is always fun as they see on my screen firsthand how a plant can create a beautiful image and make it look great.
5. Not every shot should be cut this way
Although most of my head shots are cropped according to what I’ve learned from Peter and demonstrated in this article, the reality is that I don’t crop every head and many times will leave the entire head intact if I feel it fits. strongest ingredient. I’ve noticed that when I put my head and shoulders in the frame, usually with a head-on shot, where the subject’s shoulders are perpendicular to the camera. Take this photo of Regina, an actress. Since her body has great symmetry, I wanted to keep both her shoulders in the frame, as well as her entire head. Her expression was also part of the reason why I did it. Here, she looks a bit aloof or troubled (an expression she needs to find specific roles), and seems very aloof, so having her far in the frame helps add to that. photo effect.
What about Portraits?
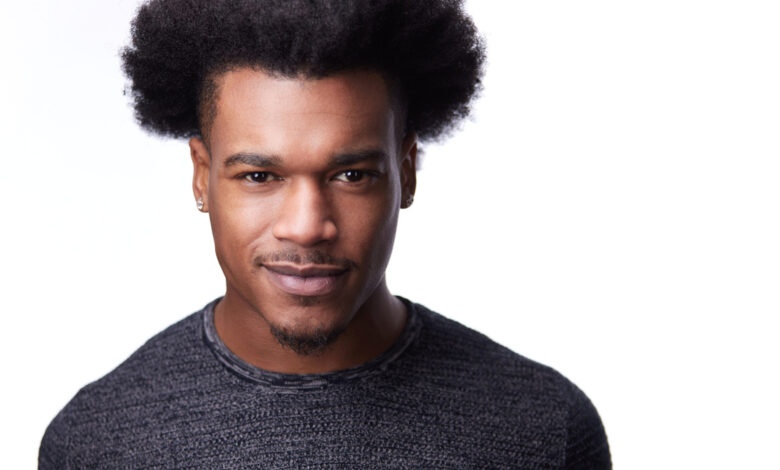
The cropping guidelines I’ve covered in this article are mainly used for head and shoulder shots, not portraits. While I sometimes like to crop portraits very carefully, more often I leave the entire head in the frame and use a variety of crops. For example, this image of Chris, a model. Even though I’m touching the top of his hair with the clipper, his whole head is still intact. Plus, you can see here that sometimes, I’ll actually shoot in the vertical position! 
Inference
I hope that this article and video has given you a reason why you should give the cut-off a try. To my mind, there is no stronger way to crop a head shot than to crop the close-up, crop the top of the head and shoulders, and frame it horizontally. Finally, keep in mind that I don’t consider these to be rules I need to follow religiously, but principles that work well for the majority of head shots. I’ll leave you with another quote that Peter Hurley gave me. Peter quips: “I’m fine with head mutilation; Everyone knows it’s intact up there! “