A few days ago, I found myself in a group of wedding photographers discussing how far they fell with their retouching. The answers vary, as does the attitude. Some feel that they are just eight weeks behind, which is fine. Other photographers seem nervous, with 17 or 18 weddings in a months-long backlog. When it was my turn, I gulped. I said, “Two weeks. The wedding I’m going to have today was filmed two weeks ago.”
Now, I almost feel guilty saying that. I was asked why I didn’t fall too far behind; I do not know the answer. One person suggested that I shoot only a few weddings, and I informed them that I would be filming over 60 years old this year. What is my secret? The truth is I don’t have a bomb to drop. I just work with my editing pile like everyone else, but I do something different with some photographers to make my workflow more efficient.
And so, wonderful readers of Fstoppers, an article was born! Originally, I wanted to write my entire selection, editing, and distribution process to explain in depth why I did each step in that particular way. However, this workflow has worked for me over the years and is great for the way I work at weddings. Many people can shoot differently.
And so the answer is to break the article down into a few tips that can save you time with your workflow. You can agree or disagree with each and make changes to your workflow wherever you see fit.
The whole wedding workflow
I was editing a wedding as I write this and decided to share the lead time to deliver the entire gallery.
- I start at 1:35 pm. That’s when I opened the selection software and selected the folder containing 3,130 raw images.
- I finished selecting at 2:38 pm, down to 646 photos.
- I leave my computer to import the photos. I play with my cat and eat some lunch.
- At 3:35 pm I went back to my computer and the images were ready for me with a preset applied.
- By 4:34 pm, all the photos were edited and I hit export.
- I want to select my featured photos while the export is in progress and export the high resolution and web resolution pictures. My computer hates me for this, because I make it work hard.
- After about 40 minutes and more time playing with cats, my pictures are ready. Featured images are also ready for customer slideshows. A private publication for my website is also done if I go public with the wedding.
- Entire library uploaded Pic-TimeSlideshows are built using their great platform and the gallery is delivered to the customer.
Customers have their showrooms by 6:10 pm. This whole process took about 4.5 hours. Some days, I’ll sit at my computer and finish two whole weddings.
I also put this wedding and the slideshow on my website. The images have been selected and exported, ready to use. My blog posts follow a pattern, so the process takes 15-20 minutes. You can see this exactly wedding here!
This timeline emphasizes that effective editing is possible. Weddings don’t have to be a chore. 
1. Shoot thoughtfully
My first tip has nothing to do with editing, computers, or fancy software. We can easily assume that we will fix everything in the article. Heck, most of the time, we can. But does that mean we should? Those small changes can be amplified when we have hundreds of photos to edit.
Cropping 200 photos can take about 10 seconds for each photo. That’s 2,000 seconds or just over half an hour.
Overloading can also be a problem. Cropping twice as many photos means twice the time taken to do so. Do yourself a favor and change the 12fps burst mode to 5fps. I can’t imagine needing more than that.
Being aware of these things when we take pictures will greatly help when batch editing photos later. Most of it will also become second nature. You can read more about how I like to shoot here article.
2. Cull before entering
I like to sift through my photos before importing them into my editing software for some reason.
The main thing is speed. While many photographers would argue that Lightroom can be set up to skim through images quickly, those images still need to be imported in the first place. Building all the previews takes time, I’d rather spend my time working on the photos. We can set up Lightroom in a variety of ways, and I’ve tried many of them, but I haven’t found any faster than sifting outside.
I won’t go through every program here, but there’s a popular selection and one I love to use. For many wedding photographers, the tried and tested program is Photographer. This has been the industry standard for curating thousands of photos over the years. It works using an embedded preview (even for raw files) on the screen, which means it can help you easily sift through thousands of photos.
The program I use is a bit different, with some added features: Narrative selection. Almost everyone I refer to this has converted. Unless you use a PC (Select only for Mac), this is probably just the fastest way to process photos. The software uses the same approach as Photo Mechanic, using embedded previews. However, we also found some other tools useful, including face and eye assessments and detail panels. It will even give you a discreet warning icon when an image is the worst of the bunch.
We simply send the selected photos to our editing software, making the process a lot faster.

3. Lightroom Optimization
I followed some instructions to get Lightroom working the way I wanted it to. You should make sure that you work from your fastest computer’s drive. The SSD inside my MacBook is snappy, so this is where I keep my pictures and catalogs when I edit them. Everything is then moved to slower drives for long-term storage.
4. Presets for everything
I want to save every repeatable setting as a preset. This started when I imported photos into Lightroom, where I could set import presets. Briefly, I know my preferred preview settings and sizes will be applied by Lightroom.
I’ve gone through a lot of development of presets and purchased packages from other photographers. My current master preset has been made over time to work for most images. Then I have the indoor and night versions with slightly different tweaks. Applying this base preset to all photos as they are imported gets the photo close to where I want it to be. They usually need a small exposure correction and possibly a white balance adjustment. Some don’t, and I can smugly move on to the next photo.
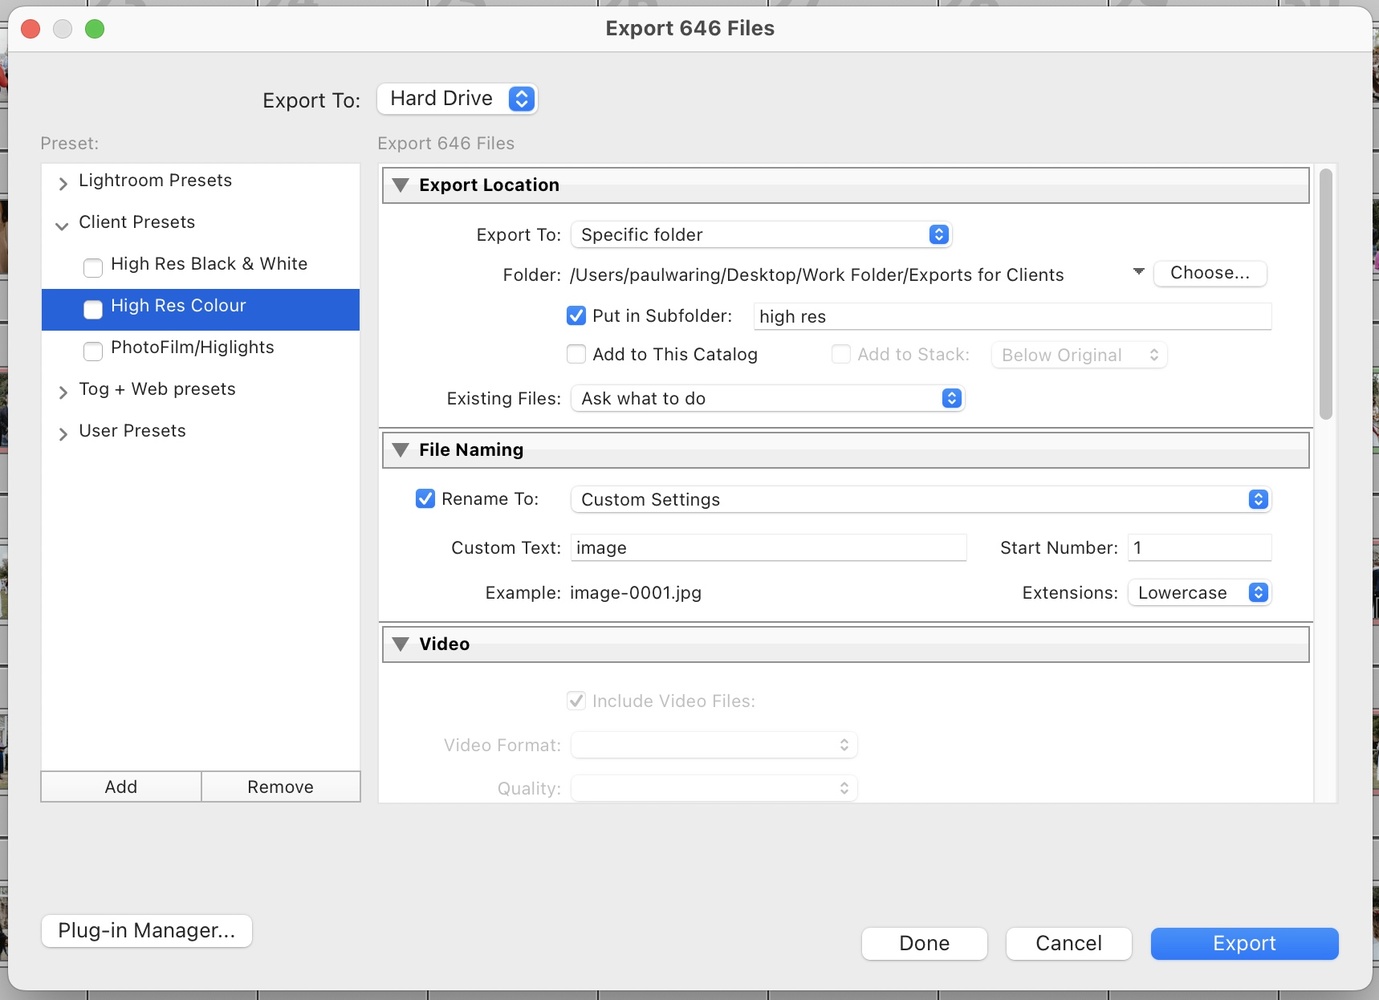
Settings can also be saved when exporting our photos, and I found this much faster than flipping through the individual tick boxes every time I wanted to publish several photos.
Whenever I need to change settings, I ask myself if I will use those new settings in the future and create a suitable preset.
5. Using Loupedeck
Needless to say, Loupedeck’s products have sped up my work faster than anything I could have imagined. I have started using a Loupedeck + Photo & Video Editing Panel before upgrading to Loupedeck Live Console. I also know about Loupedeck CT, but I don’t need the extra functionality it brings. I love how small and neat Loupedeck Live is.
If you don’t mind the functionality, the different Loupedeck control panels allow you to control the computer more sensitively, using the dials and buttons. I find this to be a very intuitive way of doing things.
I have a simple setup and probably only partially used the functionality. However, this allowed me to quickly make the necessary adjustments without taking my eyes off the image or messing with confusing Lightroom sliders. I can also load my development presets into it and quickly apply them as needed.

6. Who Is Your Friend
I almost didn’t include this tip, as I didn’t use the program for this particular wedding. However, I have no problem using it Imagen AI when I want an even faster set of images. It’s quick and reasonably easy to set up, giving you at least 5,000 photos you’ve edited. It learns how you edit and builds your profile.
I quite enjoy editing my work. I liked zoning and got lost in the project for a while. However, ImagenAI works its magic when you’re against the clock. I can use it with about 20% of my weddings.
7. Instant Blog
This tip won’t apply to everyone, and it doesn’t even apply to all of my weddings. However, if you include your photo in a post on your website, I recommend doing this right after you deliver the photo to the client. The project will always be fresh in your mind, and your energy is currently being invested in those photos.
This is also not a task that takes all day. I have a simple template (a favorite of mine for presets) and can stitch a post together in no time. The images were selected when selecting the client highlights, and I used the client slideshow on the page.
If I don’t post the wedding right away, I most likely won’t make it there.

8. Don’t think too much
Ultimately, I find that when we start overthinking, we slow down. Every time an image appears on my screen, there is a chance that I can edit, change, manipulate, or repair. The trick is to make changes quickly and naturally without consciously thinking about them. As soon as your gut feels good, move on. It is probably equally perfect if we spend an hour on it, especially for the eyes of the casual customer.
And that’s it, my tip for faster and more efficient editing. I feel like everyone can find a different way to improve their workflow. There’s no one big secret that will make you faster, but lots of small changes will eventually help speed you up.
My wedding photography has never been so manipulative. Your workflow may be different, so my workflow may not be right for you. However, most of us can improve our efficiency a bit, so spend more time with family, holidays, and possibly more weddings.