With the latest update of both Adobe Lightroom and Photoshop, the editing curve is getting smaller and smaller for both. Here’s how to make better use of Lightroom.
Even in its early days, Lightroom had some really useful keyboard shortcuts that it continues to use and has mapped to Camera Raw. One of my personal favorites that I find invaluable in some cases is the Alt (PC) or Option (Mac) key for visualizing adjustments. Holding down the Alt or Option key when using some of the sliders gives you visual feedback for your edits. Hold down the Alt/Option key when sharpening you probably already know, but just in case you don’t, I’ll add that below.
The important part of using the Alt/Option key is that it gives you visual feedback to see what’s going on with your image. Showing in black or white (showing white, hiding black) allows you to see at a glance where the cropping is happening, and I personally find this more useful than the histogram’s cropping indicators.
Basic Control Panel
I don’t usually use it for the exposure slider, but you can, and it will show any areas of your image that are overexposed. In the example below, I have overstated the results for demonstration purposes, indicated by the navigator, histogram, and exposure slider.
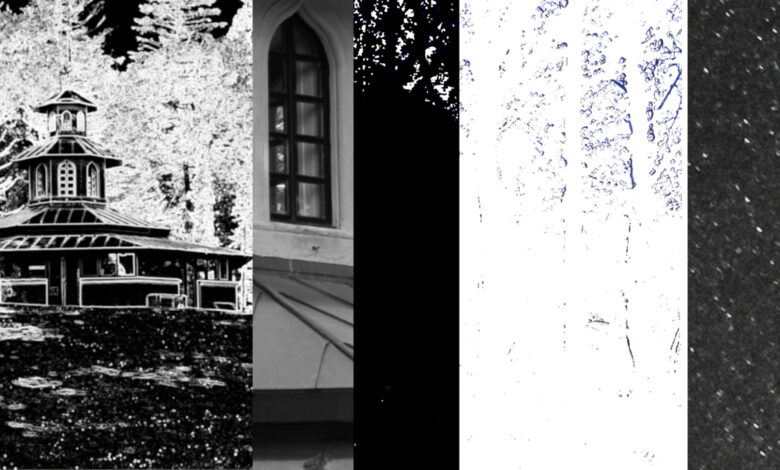
Holding down the Alt/Option key while adjusting any of the following sliders will allow you to highlight cropped areas in your image and adjust them a little more subtly than the red or blue indicators shown. displayed in the chart.
Highlights

Shadows
The example image used has very little black spot clipping in the shadows as shown below.
Black people
While using the black slider, I adjusted it to the left, increasing the black as an example. For this type of image, it won’t be visible, but this allows you to see how the Alt/Option key works.

This isn’t a particularly good image, but it helps to illustrate how much control you can have over the crop simply using the Alt/Option key when editing this way. 
honed
When adjusting the sharpness level to the right while pressing the Alt / Option key, the image will be out of tone and lose all color information. The reason for this is that we can interpret the level of sharpness as a black and white image more easily than in color. I recommend zooming in 100% when sharpening is applied, as this will yield better viewing results.
Once you’re satisfied with the level of sharpness and still holding down the Alt/Option key, adjust the Mask slider. At first, everything will be displayed as white, indicating that the entire image is being sharpened as a global edit. Black shows the areas that are not sharpened, while the remaining white areas are sharpened.
Noise reduction
An intuitive monochrome tone indicator similar to that of sharpness, is used here to allow you to see how much the effect is reduced. Too much and the image will be too soft, so again, I will zoom in 100% when adjusting. 
Lens correction
This one I rarely use, but it’s good to know it’s there to show you the areas affected by the border and let you identify them more precisely. I mostly use this to see them quickly like in the example below, then zoom in and use the dropper tool to edit them, but you can also use the sliders to adjust them. Adjust while holding Alt / Option.
Thoughts of breaking up
If you’re new to Lightroom editing, I hope you found this brief tutorial helpful in some way. There are many different ways to edit your images, so choose and use the methods that fit your workflow.