Aside from landscapes, cities and architecture have always been my favorite subjects for photography. Moreover, they provide the perfect balance in my travels. If conditions aren’t ideal for landscape photography, I can usually find something to shoot in the city. And in this article, I share the techniques that I use to achieve amazing results.
Below, I start with general principles before moving on to the more technical area of cityscape photography. And to provide a more hands-on experience, I also shot a video in Venice where I give examples of different tips.
Explore the city
Proper scouting bridges the gap between planning my travels and actual photo shoots. Google Earth and Google Street View can allow me to cover many virtual lands before I even reach a city. But I still scoured all the places on my list before taking pictures of them.
Even when I’ve seen photos of a place online, I’m still exploring it and trying to find new angles. There’s nothing wrong with capturing a popular scene similar to how others have done it before. But often, there are better angles up close. It just requires some curiosity and time to find those things.
So use the time of day when the light is not the best to take pictures and visit different photo spots. If you have a chance, walk there. This way, you may encounter additional topics that aren’t on your list yet. For me, it’s normal to walk 10 to 20 kilometers every day when I visit a new city.
And if something interesting happens, be open-minded and ready to turn such a scouting tour into an actual photo session. You may even come across subjects that perform surprisingly well in harsh daylight, so take advantage of it.
The photo above of an old tram in Lisbon is an example of how extensive surveillance has paid off. I didn’t take it from one of the typical photo spots. When I visit LisbonI spent hours walking around the city looking for unique angles like this one, which I later captured early in the morning.
Wake up early
There is a saying: Birds soon catch worms. For me, it was a reminder to get up early and use those morning hours for my photography. I may not be able to capture worms, but I can photograph a subject that at other times of the day is surrounded by many people. Take for example Fisherman’s Bastion that I photographed in Budapest. This place is crowded throughout the day until late afternoon. My only chance of getting a picture without anyone in the frame is to be there at sunrise.
In addition to less people and less traffic, you also have – similar to evening – to work with much better light than during the day. Even on clear days, the light is soft as it shines through the gaps between the buildings. There are also plenty of opportunities to include a sun star in the frame. Warm colors bring nice color contrast to shaded areas with shades of blue.
Use Blue Hour
In the introduction to this article, I wrote that cities often provide me with subjects to shoot when conditions are not ideal for landscape photography. While blue hour can also save landscape shots by giving gray skies a blue tint, many landscapes look flat because of the lack of directional light.
With the cityscape, it’s different. When the city lights come on at blue hour, it’s golden hour to take pictures. Scenes that might otherwise look boring during the day come to life when a balance is reached between the warm artificial light of the city and ambient light.
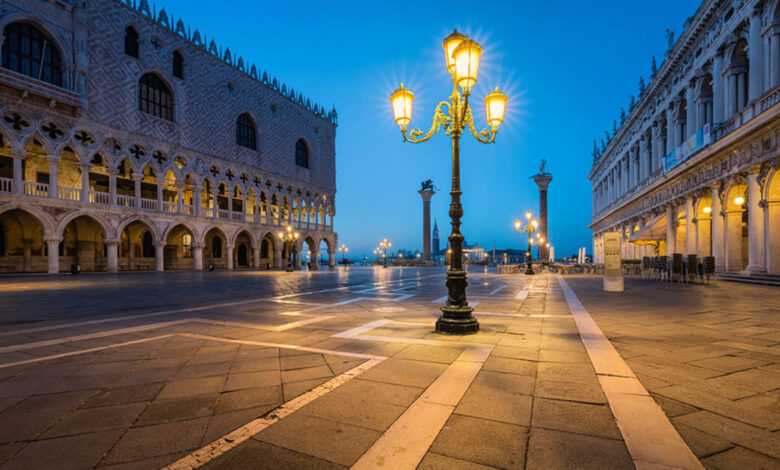
To get the most out of your blue hour photo session, start early. If you want to take photos during blue hour in the evening, start taking photos by shooting around sunset time and then continue into blue time frame. In the morning, arrive at the site while the sky is still black. Take your time to get set up and ready as the sky transitions through different shades of blue.
And take multiple photos and choose the one with the best color and light afterwards. Or blend time as Elia Locardi shows in World photography 1.
What you should avoid is taking pictures of the cityscape when it is too dark. Once the sky turns black, the artificial lights of the city will become too dominant. Your photos will lose size and color as incandescent lights will kill any natural colors in buildings.
Bring a long lens
Not just for cities like Prague, described above, it’s a good idea to carry a long lens. Zooming in can simplify a scene by excluding objects and buildings that don’t add to the image. The compression of perspective due to the use of a long focal length can help emphasize certain aspects of the city. In the picture of Prague, there are countless towers and spiers. Prague is also known as the city of a hundred minarets, and that’s what I wanted to show in this photo.
Experiment with long exposure
If you take a photo during the blue hour, the natural exposure time will be longer. You can use both of these creatively or to clean up photos. One creative use is to capture the motion blur of cars as light trails. For the photo above, which I took in Hanoi’s Old Quarter, I positioned myself at a busy intersection and experimented with exposure times from one to eight seconds to capture the magical flow of traffic.
By using an even longer exposure time of up to a minute, I was able to clean up the busy Charles Bridge in Prague during another photo session a few years earlier. What’s left of the hundreds of people in the frame are soft shadows that look like ghosts moving through the portal in the background.
And if you invest in an extreme neutral density filter like ND1000 from Kase, you can create this type of photo in daylight. If you also have moving clouds in the sky, that’s even better because you can blur them to create a more dynamic photo.
Find the top lines
When I photograph architecture and cities, I usually have a lot of lines to work with. To create a dynamic composition that draws the viewer into the photo, I can position my camera so that the lines appear as diagonals.
I did this in the London photo above. Instead of placing my camera parallel to the balustrade in the foreground, I tilted it to the right for the balustrade to zigzag into the image. It creates tension because it first draws the viewer to the right and then to the left.
With the help of such paths, you can not only lead the viewer through the photo, but you can also create a deeper sense of depth if you find converging lines in the distance. So, looking back at my first scouting tip, I encourage you to include finding strong leads into your exploration.
Keep the directions vertical
In architectural photography, avoid distorting perspective. When I visited Hong Kong four years ago, I rented a tiltable lens from Canon Hong Kong for two days to capture the image above without distortion. And I think this is what sets it apart from a lot of other shots of this scene.
But even if you don’t have a TS lens on hand, you can often avoid key presses. First, try to balance your camera as much as possible. If one of the buildings extends out of the frame, go wider. If you’re already at the widest and moving away from the buildings isn’t an option, you have to live with some distortion, but only until you get your photo into photo editing software where you’ll correct those distortions. in my real estate photography articles I show you how.
There are exceptions and I want to show one below. If I were to shoot facing up, the situation would be different because perspective distortion was my creative choice. In this shot from Quarry Bay, it creates strong leading lines.
If you have more tips on taking photos of cityscapes, feel free to share them in the comments.