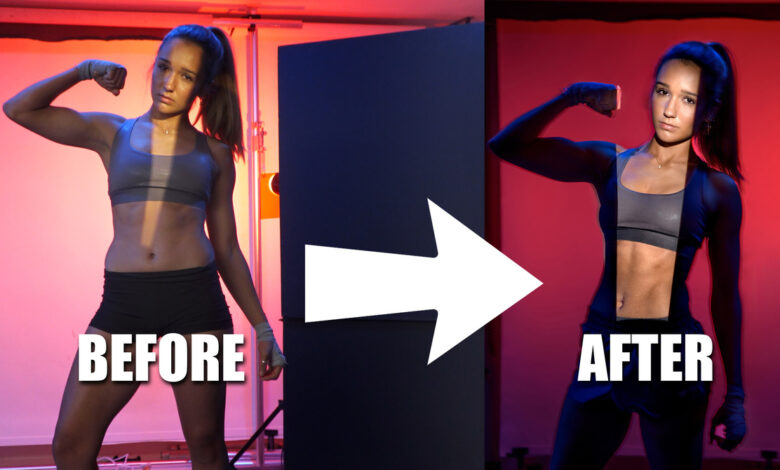
In this behind-the-scenes video, I show you a rather complicated photo that I took in our garage. Using strobe lights, LED lights, crazy light modifiers and ACDSee’s new photo editing software, GemstoneThis final image turned out to be much more interesting than I initially thought.
First of all, one of my favorite genres of photography is definitely sports portraiture. Unlike live sports photography, where you can catch the action as it happens (or doesn’t happen) in front of you, sports portrait photography allows you to create more surreal images in the studio. or off-site. A few weeks ago, I had the pleasure of photographing a great athlete Gabriela Del Mar and experimented with some new light setups with her. Gabby is a very good athlete (watch that video here). We went with boxing, and I think the final image turned out to be pretty awesome.
Light setting
When I created this image, I knew I wanted something colorful and dramatic. Instead of illuminating Gabby like a traditional boxer with strong side lighting and lots of detail in the shadows, I instead opted to fully illuminate her as a silhouette and then add subtle lighting to the side. top of the silhouette.
The backlit image was first created by shooting two Profoto B10s into my seamless white sheet. One of the B10s is equipped with Profoto OCF 1×4 . strip box to help soften the light, and the second light on the right of the camera is shot only with ghosting to create the dimmest spot light effect. Then I made the whole background red by applying red correction gel, colored my white paper. Finally, to prevent the light from bouncing off the white ceiling and walls, I used Flat world V black and white V flat on the right side, where the closet white wall is located. The left side of the staging area has a dark canvas backdrop, which helps reduce the amount of light bouncing off from that direction.

Now that I have Gabby’s backlight with a red glow and her body is a completely black silhouette, it’s time to add a main spotlight. Since I wanted to keep most of her body backlit and completely black, I knew I couldn’t use a large dimmer that would make the light bounce around the set. If I had used a small softbox with fabric mesh or a tight reflector with honeycomb mesh, those dimmers might still produce too much fill light in such a small studio space. I decided to use one of my favorite light modifiers instead, Westcott optical point. Unlike other light modifiers I own, Optic Spot allows you to precisely focus light. It’s still a hard light that looks like sunlight, but it doesn’t spill over the set either. Plus, because it has projection blades, I can create all sorts of shapes and patterns that look really cool on a glossy model.
Below are examples of both the red padded version of this setup and the previous unbuffered version that led me to the final version shown in the video. Remember, Optical Spots have a different shape for white background images and are more like V Wedge shapes on red lubricated images.

Moment of spontaneous discovery
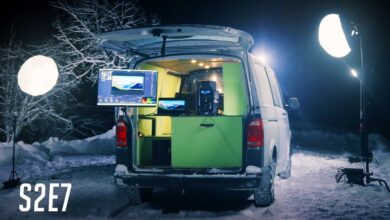
After I took some pictures with the lighting setup above, I started to wonder if I could include some studio overhead LEDs in my images. When I built this garage a few weeks ago, I installed these Lumary Smart LED Lights on the ceiling allows me to control not only the white balance but also the RGB. These are extremely useful when you want to add a bit of fill light to your photo session or create some dramatic light during video production or in a background set. You can see the placement of the overhead lights below.

With the lights set to deep blue, I thought maybe I could slow the camera’s shutter to burn out some of the blue light I was seeing with my natural eyes. When the camera is set at 1/250 of a second, all light in the surrounding room is completely black, leaving only a stronger flash to potentially affect your exposure. An easy way to introduce any ambient light into your flash images is to simply reduce the shutter speed to 1/100, 1/5, or 1/5 second. The longer you leave the shutter open, the more ambient light will enter your photo. The trade-off is, of course, that if the shutter becomes too long, you’ll end up with a lot of motion blur since you won’t be able to hold the camera perfectly still. Blur can also be introduced if your subject is also moving. I found the sweet spot to be between 1/10 – 1/5 of a second. If you need an even slower shutter speed, you can always use a tripod and ask your subject to be as still as possible.
Final Edit
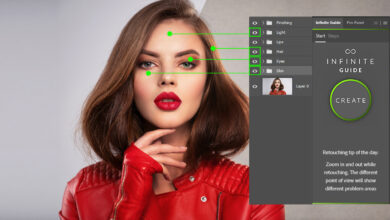
Once I’ve captured some images, some with and without the overhead blue light hitting the exposure, it’s time to edit the raw files. Since this video concept was sponsored by ACDSee, they asked me to try it outaw editing software suite called Gemstone. At first I was a bit hesitant to rely on a new piece of software I had never used before to edit such a complex photo, but they reassured me that if I could navigate my way through Photoshop and Lightoom, Gemstone will be very easy. in comparison.

You can see the post-production steps in the video above, but the basic idea is to clean up the contrast between Gabby’s face and abs, illuminated with Spotlight, while maintaining the darker parts of the image. Her body left in the dark. Since everything was captured almost perfectly on set, I simply made some contrast adjustments using the Light EQ slider and some color adjustments using the Color EQ slider. When the selected frame was finally adjusted in ACDSee Raw, it was then imported into Gemstone, where I edited a few distracting elements in the background. I also adjusted the crop to straighten the background paper. Finally, I used a subtle gradient map to help blend some magenta and blue tones on the shadows and highlights, resulting in the final color grade.
Overall, my experience using Gemstone has been excellent. Recently, Fstoppers writer Gary McIntyre did a complete overview of ACDSee’s Gems software, and his impression is the same as mine. Personally, I don’t mind paying $240+ a year to subscribe to Adobe’s Lightroom and Photoshop subscription model, but now, as I type in that fee, I can see my photo editing throughout the year. how expensive. If you love the layout and functionality of Adobe software, but want to own your favorite photo editing software right away instead of renting it every month, Gemstone could be the perfect software for you. Go Fstoppers gem download page to try the software, and if you like it, you can buy the full unlocked version for a fraction of what Adobe charges each year to use their similar suite.