If you are a Lightroom user, I am sure that you have tested most of the newly updated features. In particular, one feature that I am very interested in is the AI-powered Human Mask Option and how it actually works. AI-powered editing is here to improve our workflow when it comes to editing, it’s here to speed up the process allowing photographers to spend less time in front of the computer and more time to practice photography. Other editing software also uses this technology to great effect allowing countless edits to be made in a fraction of the time, all for the benefit of you, the end user. My raw editing software of choice is Adobe Lightroom, and every time they release a new update, I’m excited about the improvements that have been made and how they can be used to speed up my workflow. I; if they can. Also from a teaching point of view, do these new updates allow students of all abilities to realize the end result quickly and easily?
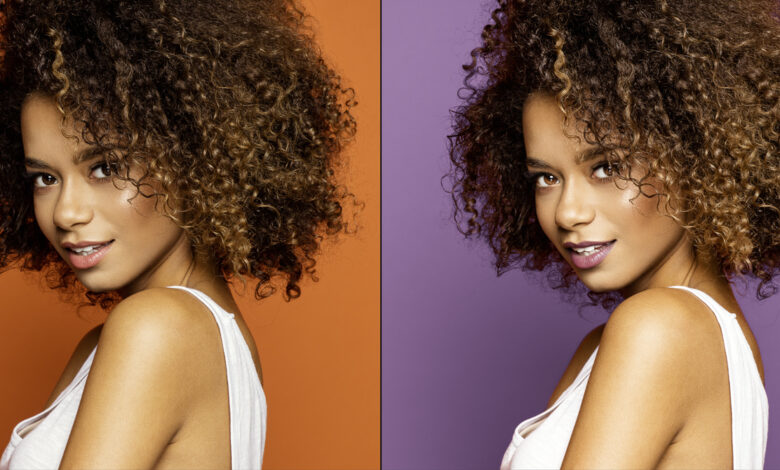
The article is not a step-by-step guide on how to change the background color of an image, as you can find a lot of methods to do this here. Fstoppers or online. I simply wanted to see how quickly it could be achieved and combined with the New Person Mask Option what the end result would look like. I selected what I consider to be a difficult image to choose due to hair type, but Lightroom made the selections quick.
My approach to retouching is formulaic in that I want to see what the end result will look like when I follow and use the selected steps and prompts to edit the image, with prompts in case This is the New Person Mask Option. How easily can new users edit images, and is the end result encouraging?
Super fast processing
 Since this is a relatively simple image, Lightroom doesn’t take long in detecting the person in the image and dividing it into 8 separate masks.
 The default color setting for the mask is red but can be changed via the overlay color box indicated above, to allow for better rendering depending on the colors in your image. Since there is an orange background in this image, I chose blue for the mask color.
 With the first release of the new masking feature in Lightroom last year, we’ve seen how well the AI detects elements in your images, and this is only getting better over time. Even with this image, it detected all the background leaving only the smallest areas inside the hair.
 To select these areas, I first zoomed in and used the gradient mask option which selected the background color surrounded by the hair, resulting in a very believable selection. I used the fine-tuning slider at this point but due to the complexity of the fine hairs it didn’t quite get the color.
 However, it picked up similar tones on the skin that had been erased with the brush after selecting remove.
 Then a second gradient mask is selected to allow the remaining color in the hair to be included in the background selection.
 Again, this picked up a few colors in the skin but these were easily removed with a brush in subtraction mode.
 Changing the background color is a simple method of picking a color from the color box and minimally adjusting the exposure and color until it looks right to the image and any reflections in the hair.
 Earlier, when we created a series of masks for the whole person, I made some subtle adjustments to the lips, eyes, and skin so that I tied the whole retouching process together.
 Elevating the exposure in the pupils helps the eyes stand out more without being overly retouched.


Completed results.
many people
Once it’s done editing, I’d also like to see how it reads multiple people in a single photo, and even with lens flare, it can still detect 3 people and create a total of 16 separate masks. I also considered that given the close proximity of the people in the image, some of the masks would overlap but that’s not the case. Some anomalies are caused by lens flare but this can be easily remedied by correcting the mask through the add or subtract options.
judgment
Truth be told, the entire edit took less than 3 minutes to complete as I merely tried it out to see how much it improved. Admittedly I didn’t time it but the image was edited so quickly with no effort that when I was done I realized I forgot to take a screenshot for this article. The AI selection is better than ever, not that it wasn’t as good as it used to be, it just works and feels more accurate, and generating all the individual masks for a person is a saver. time and is something that I think we all welcome. Are there any flaws in this particular edit? Of course yes, but that’s because I didn’t take the time and tweak the selections.
From a teaching perspective, Lightroom has always prevailed when it comes to the shallow learning curve and new students pick up the software with ease. Tweaking the masking tools last year simply made it easier and now they’ve been enhanced once again that will allow students and novices alike to achieve beautiful images with ease. quickly without having to worry about how I do it? Allows them to focus on the finer details of their photography practice; Less time editing, more time shooting.
So this new feature is just people mask options, not caring about other updates, is it commendable? In my opinion, I completely agree. It will speed up the workflow for experienced retouchers and allow newbies to edit images faster with more controlled results, encouraging them to experiment further with their photography and editing. me. And if anyone on the Adobe Lightroom team is reading this, add focus stacking to the software and you can have it all.
Shutter Stock main image. Multiplayer image provided by Toa Heftiba, Unsplash.