A fundamental lesson in photography is the exposure triangle. Learning about ISO, shutter speed, and aperture is something all photographers should do.
What is the area?
In this article, I will not teach about tangent triangles. Instead, I would like to consider that because these choices are made, either by a photographer or by a complex computational program in a digital camera, a photograph is a kind of copy of the world. real world.
Vision occurs when light bounces off a real-world object and enters our eyes. Finally, our brain processes this light-related visual information and calculates it to produce an image in our minds that has a lot of dynamic range. We can see light, dark, light and dark areas together in a single image.
However, when these decisions are made to take a photograph, they are not fully dynamic but static. That is to say, three factors (ISO, shutter speed, aperture) are decided, and then, the photo is taken. And once it’s taken, there’s almost no room to change the image. So if you overexpose or underexpose part of the image, much of that information will be lost.
For example, imagine it’s a bright sunny day outside and you’re in a room with dim lights. If you look out the window, you can clearly see what’s outside as well as still be able to distinguish what’s in your room. If you take a picture of this scene instead, you might overexpose the inside or the outside and lose the details inside or outside, respectively.
It’s not exactly that an object becomes dark or light, but rather you can make parts of the image appear darker or brighter than it actually is. This concept of image partitioning is detailed by Ansel Adams. Through exposure (and darkroom techniques), Adams has shown that images with greater dynamic range can be captured.
Three-point lighting
The three-point light is just as it sounds. It was a technique used quite a bit in the mid-1900s for portraiture; The brightest light is placed behind and over the subject’s hair, another light from the front but less bright, with a third light from the front but the other side, even less bright. The overall effect creates dimension and separates the subject from the background.

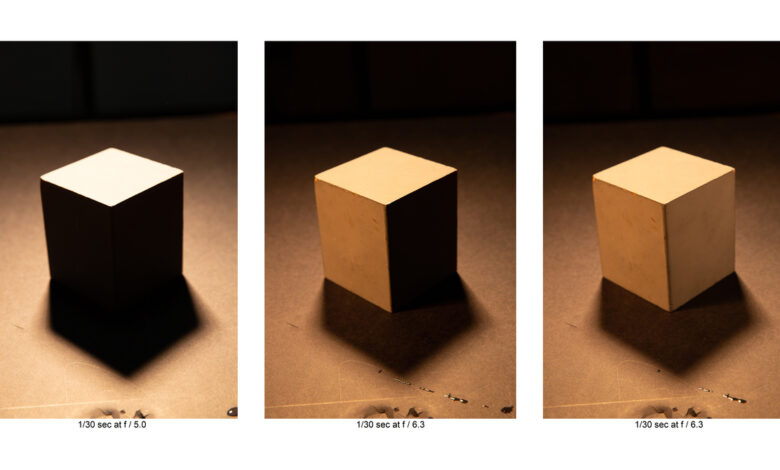
As an exercise, consider the image of the cube above, illuminated with a three-point light. You’ll have to take my word for it, but the actual cube has the same shade on all sides. However, through light and zone systems, the image of the cube has a certain three-dimensionality.
If you’re getting started with studio lighting, this is a great exercise to try with two lights and a reflector. You can also try with other objects or even with one person.

As stated above, start with a single light from behind the subject and set the exposure so that this is the brightest part of the image.

Next, set the light from the left to about 45 degrees and slightly darker.

Finally, position a reflector about 45 degrees to the right to fill the other side of the subject with light.
Conclusion
Please note, other than this exercise, I’ve only used three-point lighting perhaps once in my 10+ years as a photographer. So why am I going back and telling you to give it a try?
Well, it’s not so much about learning three-point lighting. Instead, the point is to show that you can’t just manipulate light to make parts of an image lighter or darker.