Explore the art of Cyanotype. In this article, we look at the cyan printing process step-by-step and its place in the photographic field. It is up to you to decide for yourself whether you agree to this as a photographic medium.
When it comes to alternative photography processes, cyan typography is a popular technique used by photographers and photographic artists. The question of whether printing in cyan is considered photography has caused ongoing debates in the photography community. Its unique blend of photographic elements and chemical alchemy makes cyan an interesting method worth exploring.
Cyanotype printing involves the use of light-sensitive chemicals to produce photographic images. This method was first developed by Sir John Herschel in 1842 as a method of recreating architectural plans, which we still call blueprints today. The process is based on the reaction between ammonium iron(III) citrate and potassium ferricyanide which, when exposed to ultraviolet light, produces a vibrant blue image on a brightly colored paper-based substrate.
One person who has no trouble describing the process of photographing cyan is Anna Atkins, a member of the Botanical Society of London, a pioneer in photography for science. She used cyan prints to publish “Photos of British Algae: Impressions of Cyan” between 1843 and 1853. The process used to make these prints would be better described as a photograph, where the image is created by placing an object directly on the surface of the light. sensitive material and then expose it to light.
Compare the cyan printing process with prints made from photographic film. Chemical baths and light-sensitive paper produce a positive image, where the negative film acts as a barrier between light exposure and the surface of the paper. In the case of traditional film photography, where prints are created in a darkroom through a wet chemical process, no one challenges these as anything other than part of the actual photographic process. .
Cyanotype is also a wet chemical process. Objects placed on chemical-coated paper will mark light, which acts as a barrier between the UV light and the paper surface. I’m sure you can see where I’m going with this comparison.
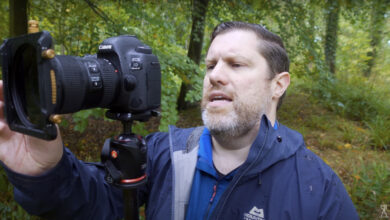
Here, I’ll walk you through the process of creating cyan styles. To make the cyan swatch process more closely resemble the darkroom process, I’m bringing my own images into the cyan swatch medium by first printing them onto an inkjet transparent film. . This technique of “negative” transparency allows to preserve the essence of photography while opening up a world of creative opportunities.

Materials
- Chemicals: potassium ferricyanide and iron ammonium citrate, usually available to buy together as set of cyan
- Paint brushes
- Vessel or jar
- watercolor paper
- Frames
- A4 . inkjet printable transparent film
- Paper or cardboard to protect the surface you work on
Method
Preparation of the Chemical Mix: mix equal parts ammonium iron(III) citrate and potassium ferricyanide. A typical ratio is 10 grams of each chemical mixed with 100 ml of water. Ready-made cyanotropic mixing kits are widely available for purchase: all you have to do is add water to each bottle and shake, and your chemical is ready to use.
Print clear film: Select your photos, convert to black and white, invert colors, then mirror images before printing them onto transparencies. You can buy inkjet-compatible, printable acetate to do this.
Prepare your surfaces and turn off the lights: Protect your workspace from any chemical spills by putting down old newspaper. When both solutions are combined, you will need to work in soft light to ensure that any current UV does not degrade the mixed solution or coated paper. I coated the paper in the evening with a lamp in the far corner of the room.
Coating Paper: Coat the cyan tint on watercolor paper or other suitable material with a brush. I opted to use a sponge brush for an even coat. Let the coated paper dry completely; You can use a hair dryer to speed up the process. Apply a second layer and let dry. Place your coated paper in a dark storage place, such as an airtight bag or light envelope, until ready to use.
Assemble the print frame: Place your coated paper and transparencies inside the clip frame. This ensures proper contact between the transparency and coated paper during exposure and also keeps your paper safe from external contaminants. Place a black canvas or card on top of your frame until you’re ready to start the exposure.

Exposing your cyan patterns: Exposure times for cyan patterns can vary depending on a number of factors, including the strength of the UV light, the density of the negative or your subject, and desired results. As a general guideline, however, exposure times can range from 3 to 20 minutes depending on the weather and UV exposure where you live. For greater accuracy without wasting too much coated paper, consider exposing a test strip – covering part of the strip at different intervals. I created two test strips, the first was exposed for periods of 3, 5, and 8 minutes, and the second was exposed for periods of 10, 12, and 15 minutes. This allows me to make an assessment of the best exposure I would consider 12 to 15 seconds for the lighting conditions. If you are using a UV lamp or other artificial source, the exposure time may need to be longer. No UV bulb is as powerful as the sun.
Rinse and fix prints: After exposure, remove the transparent layer from the frame and immediately rinse the coated paper under running water until the water runs clear. At this stage, you should be able to see details in your image and the colors will have a rather bold tone. Hang the prints to dry and within a few hours the color will deepen to its final shade. To speed up final color rendering, immerse the print in a fixative made of one tablespoon of hydrogen peroxide dissolved in a quart of water for a few minutes. Rinse the printout again under running water.
Dry and show your cyan prints: My neighbors must really wonder about me, but I tie my cyan prints on a clothesline to dry the drips. Once they’re dry, flatten if needed between the pages of a good coffee table book, and then you can proudly display your cyan print.

There is something very appealing about my work being displayed as cyan. I don’t usually consider hanging these images, but the addition process has made me appreciate these images a little more than usual and I think a picture or two might hang on my wall.
Have I convinced you that cyanotype is a legal means of photography? Together we’ve explored the fascinating world of cyan printing, and now it’s your turn! Whether you’re a seasoned cyan mode enthusiast or just discovering this alternative photography method for the first time, we’d love to hear about your experience, experimentation, and creative results. Friend. Share your tips and even your own cyan print in the comments.