ISO can be used as a tool to adjust exposure, and you can even use automatic ISO settings. I will explain how you can use auto ISO in the best possible way.
These days, we take auto ISO for granted and see it as a tool for achieving correct exposure. It is a digital copy of the ASA/°DIN indicating the sensitivity of negatives and slides. While the ISO setting on our digital cameras has nothing to do with sensor sensitivity, it works in a similar way. With a high ISO setting, you need less light than with a low ISO setting.
Compared to film photography, we now have three settings to consider when getting the correct exposure. Aperture controls the amount of light that passes through the lens. The shutter controls how long the sensor is exposed to light and the ISO determines the sensitivity (digital version). Each value can be set differently for each shot.
Auto Aperture and Auto Shutter
I remember my first camera had an automatic shutter setting. This setting has an “A” on the shutter dial. That means the camera can set the correct shutter speed for me, according to the light value it measures with the built-in light meter. Earlier, the “A” could be thought of as an abbreviation for “automatic shutter”, but now it is more commonly referred to as “aperture priority”.
This automatic shutter setting offers the ability to predict changing lighting situations more quickly. Right after that is the auto aperture option, which works the opposite way. With that, I can choose the shutter time and the camera will set the aperture accordingly.
These automatic exposure settings are very common these days, although many amateur photographers have reverted to manual as it is thought to be the only way to operate a professional camera. The funny thing is, people who believe so use it manually with automatic ISO settings.
Limitations of Auto Aperture (Shutter Priority)
I would like to briefly return to the automatic aperture setting, now known as shutter priority, indicated by the letter S on the PASM dial. It allows the photographer to choose a shutter speed and the camera will find the aperture that allows for the correct exposure.
There are some limitations to this setting that you should be aware of. The range of settings the camera can choose depends on the lens and its maximum aperture. The aperture of most popular lenses is limited to f/2.8, which is considered a sensitive lens. Most photographers use even f/4 or f/5.6 lenses.
This has consequences for people who are using shutter priority settings. That means the range of exposure values the camera can choose is limited. Let’s do the math. If you have an f/2.8 lens, the camera can use about 7 stops (f/2.8, f/4, f/5.6, f/8, f/11, f/16 and f/22) to set exposure, with f/2.8 being the largest aperture.
If you choose a slow shutter speed, this won’t be a big deal. But if you need a shutter speed as fast as 1/1000th of a second or faster, the widest aperture is usually not wide enough to allow the necessary amount of light to pass through the lens for the right exposure. Fortunately, there is a possibility to increase the ISO setting.
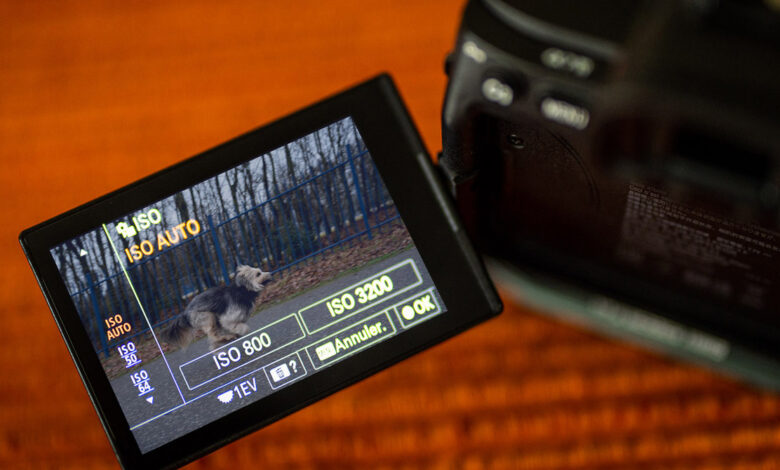
Use automatic ISO settings
If you are using shutter priority and a fast shutter speed, it may be necessary to change the ISO setting to compensate for the limitations of the widest aperture. You often have to choose a high ISO setting if you are shooting fast action.
This way, you need to monitor the lighting situation and only increase the ISO if necessary. After all, we want the ISO to be as low as possible to keep noise levels within limits. That’s when the auto ISO comes in. It allows the camera to increase the ISO setting when proper exposure cannot be achieved with the largest aperture available. This way you can focus on the action without worrying about ISO settings. It will always be on the lowest possible setting.
Another huge benefit from auto ISO is shutter speed protection when shooting with aperture priority. While aperture priority has a much larger stopping range (at least 18 stops if you use the full shutter speed range), there comes a point when you need a tripod to prevent camera movement Photo. Auto ISO can be used to prevent the camera from using the shutter speed for too long for handheld shooting.
How it works is easy. You set the slowest shutter speed that allows steady handheld shooting. If the correct exposure requires a shutter speed lower than this limit, the camera will increase the ISO until an exposure is achieved with that setting. It is also possible to let the camera decide which minimum shutter speed to set. It will take into account the focal length for that.
Auto ISO is the solution to a limited number of stops for shutter priority or the risk of motion blur with longer exposure times with aperture priority. But does it have any use for manual exposure?
Use auto ISO with manual
As mentioned, there are photographers who use automatic ISO settings for manual exposure settings. This way, the photographer will choose the shutter speed and aperture to their liking and rely on the auto ISO to achieve the correct exposure.
In theory, this exposure setting should give you complete freedom to choose any shutter speed and aperture. Auto ISO will ensure the right exposure is set. In fact, there are too many limitations to make it work properly.
For example, you can’t choose 1/2000 second and f/11 and expect the ISO to fill in the gaps. You will probably end up with the highest ISO setting possible to get the right exposure. Or, you can’t even raise the ISO high enough to achieve the right exposure. Also, you can’t choose 1/60 second and f/2.8 in full sunlight and expect the ISO to produce the correct exposure. Even the lowest ISO setting is not enough to avoid overexposure in that situation.
In other words, the combination of shutter speed and aperture must be set close to the correct exposure for auto ISO to work properly. The ISO range of most cameras only allows about seven stops before noise becomes an issue, although higher-end cameras will have a larger ISO setting range available. That’s not enough to make it work with every manual setting you choose.
Best way to use auto ISO
While auto ISO can be used with any setting on the PASM dial, I think it’s most effective when used with shutter priority and aperture priority. Both of these settings allow for the most flexibility and remove the limitations of those settings.
Auto ISO can be used for manual exposure settings in my opinion, but not always the best option. The reason for manual exposure is the ability to keep exposure settings fixed, no matter how the exposure meter is affected by light or darkness. If you add auto ISO to the mix, you will lose this control and it will be similar to aperture priority or shutter priority.
If you believe that manual exposure settings are the only way to have full control over exposure, auto ISO undermines this belief. After all, it will change the ISO according to the exposure measurement. Even using auto ISO to get the right exposure manually doesn’t make much sense. Why use a limited number of stops, when aperture priority, with or without auto ISO, allows for so much more flexibility?
Of course, you must choose the more appropriate automatic ISO usage. Either way, auto ISO is a great feature on every modern digital camera. But it would be wise to use it to its full potential instead of limiting the auto ISO with something like manual exposure. But maybe there’s a reason to auto ISO in the manual that I never thought of.
Do you use your camera’s auto ISO capability? I’d love to know how you use auto ISO, with what exposure settings, and why use that particular way. Please share it in the comments below.