Creating beautiful images doesn’t always require complicated setups. Sometimes, all you need is a flashing light and a little creativity.
Coming to you from Mark Wallace, this insightful video shows how a basic setup can produce great photos. Wallace just used a strobe light with a standard reflector. Many people overlook this simple tool, opting for a softbox or umbrella instead. However, a standard reflector can create dramatic lighting effects that are perfect for certain styles, like the classic style Wallace is aiming for in this section.
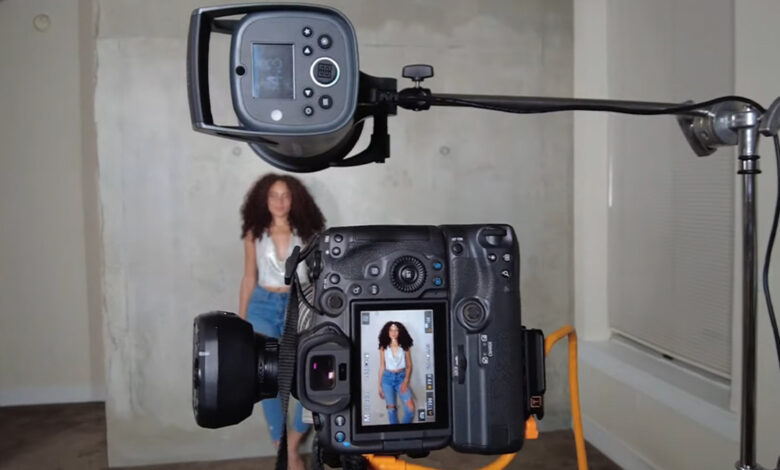
The process begins by placing the strobe directly on the camera. This placement ensures the shadow falls directly under the subject, creating a clean, shadow-free background. Wallace uses a concrete wall as a backdrop, adding texture and interest to the photos. The subject poses against the wall, moves and changes position to add dynamism to the photos.
Using a deeper reflector makes the light more directional, resulting in harder shadows that highlight the subject’s features and clothing. This method is especially useful for creating a moody and intense look. Wallace measures light to about f/9, but notes that small changes in aperture, such as f/8 or f/10, will still work fine.
The real magic happens in post-production. Wallace demonstrates how to enhance photos using Lightroom Classic. He started by adjusting the base color tone, warming the image to about 6,800 K and adjusting the color tone to achieve the desired color balance. Reducing orange saturation helps refine the overall color palette.
Other adjustments include opening up shadows to highlight details in the hair and increasing contrast by adjusting white and black. Wallace also enhanced texture and clarity to highlight details in the background and the subject’s hair. He reduces vibrance to manage color intensity, creating a more polished look.
For more dramatic effects, Wallace uses Lightroom’s AI-powered tools. Applying the “hair texture” preset, he enhanced the subject’s hair, making it stand out. He then focused on the background, increasing texture, clarity, and even adding some dehazing to bring out every detail on the concrete wall.
Wallace also demonstrates how to use the healing brush to remove distractions, such as a back exit. This tool seamlessly replaces unwanted elements with matching textures from the surrounding area, cleaning up images with ease. Watch the video above for Wallace’s full list.
If you want to continue learning about how to light a portrait, be sure to check out »Face lighting: Lighting for portraits and portraits With Peter Hurley!”