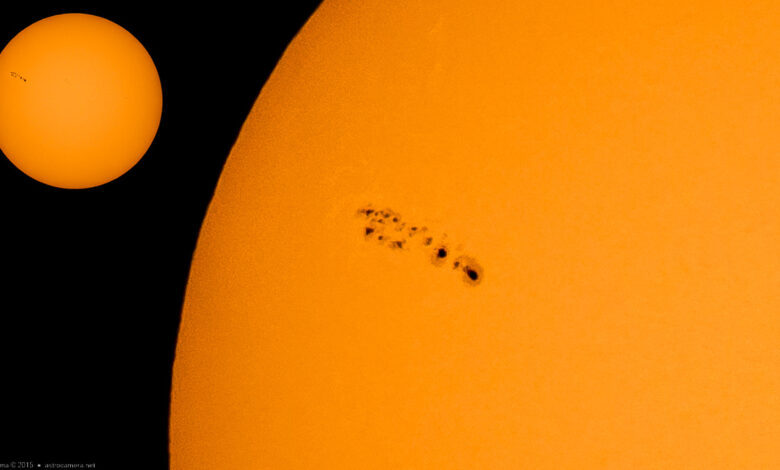
With longer days and shorter nights, summer is a good time to consider getting into solar astrophotography. The Sun is also heading towards the active phase of its 11-year sunspot cycle and promises to make the Sun more interesting than the odd appearance of a minimal sunspot cycle. Astronomers use the number of visible sunspots as a measure of solar activity, and the sunspot period 25, calculated by astronomers, looks likely to be peaking. around 2024.
Sunspots orbit the Sun in an average of 28 days, but because the Sun doesn’t rotate like a solid object, equatorial sunspots can take as little as 25 days to orbit the Sun. Over the course of a day the sunspots will be static features, but although very rare, bright spots (bright areas) on the sun’s disk can be seen if a particularly active eruption occurs. Flares usually only last a few minutes.
Filter (Broadband)
To get started with basic solar astrophotography, getting started is easy and relatively inexpensive as the only additional items you will need besides your camera and long lens are a built-in solar filter. Certified safe for your eyes and camera. These filters are known as broadband or “white light” solar filters, which will simply cut the Sun’s intensity by as little as 100,000 (ND5 or ~16.6 stops). This density is so much thicker than your typical landscape photographer’s neutral density filter, that you won’t be able to see anything but the sun through the filter. In addition, to ensure the safety of your eyes, a solar filter should also cut out as much infrared (IR) and ultraviolet (UV) rays as possible. Buy filters only from trusted sources for your own safety! Also note that these filters must be used at change face finish your optics, before any magnification occurs.
To be more clear, these broadband filters won’t show you some of the dramatic shots you might have seen of fiery clouds of gas hanging over the edge of the sun. Those views are reserved for more expensive and specialized solar filters to be discussed elsewhere.
Broadband filters are also sold with more attenuation (e.g. ND6), but they are generally for the naked eye because the ND5 filter allows enough light to pass through to dazzle people. But in terms of photography, the ND5 filter is more suitable for keeping exposures as short as possible and allows taking pictures close to the horizon where the atmosphere greatly reduces our view of the sun.
Solar filters are available as flexible film or like filter glass. Flex film filters (polymer or mylar substrates) are generally cheaper than glass filters, but are more prone to scratches, so I prefer glass filters. Among glass filters you will find an absorption filter (e.g. black glass) or a reflector filter (coated with metal film). My preference here is to use metal coated filter as they won’t get warm in the sun, although they’re more susceptible to damage, which can lose the reflective film and reduce the safety of the filter. On the other hand, the flexible film solar filter material is also sold as sheets so that the filters can be customized easily.
Most solar filters can also yield a neutral image, resulting in a white sun. I prefer filters with a yellow-orange tint for aesthetic reasons and because the blue end of the spectrum is more atmospherically scattered, reducing contrast in solar images.
As a final note on filters, I recommend using filters that are only attached to the top of a camera or telescope lens like a cap, rather than screwed in like standard camera filters. The reason for this is if you ever go to take pictures total eclipse. Of course, once the filter is in place, it should still be securely attached so that it is not easily removed accidentally.
Note that the filters described above are classified as broadband solar filters. Advanced solar imaging using expensive, ultra-narrow band filters is a topic for another section.
In theory, one solar filter is all you need to get into solar astrophotography, but in practice, additional equipment makes it more convenient to get results. best results…
Lenses and telescopes
While almost any telescopic or long camera lens can be used for broadband solar imaging, internal scattering and reflection can be an issue, so Telescopic telescopes are often preferred because they have fewer lens elements inside. And even with simpler designs of telescopes, these can be problems, so refraction is preferred over reflector or catadioptric range. Regardless of which optics you use, check the internal reflections by placing the sun off-centre and taking some test shots.
As with any telescope or camera, the larger the aperture, the sharper the detail. But the “visible” cells in the atmosphere (including the atmosphere in the optical tube) limit the actual size of the optics to between 100mm and 150mm (diameter). Professional observatories are larger, but they use extreme measures like pumping air out of their telescopes.
Camera
Almost any camera can be used for solar astrophotography, but since a long focal length is required, it is preferable to use a DSLR with a mirror lock or a mirrorless camera that uses a remotely control the shutter so as not to shake the setup. The video mode might be worth a try if it has a high resolution (4K or higher), especially if your camera is capable of recording uncompressed video. In all cases, using a high-speed memory card is best, especially when capturing a lot of full-resolution stills.
Solar finder
Believe it or not, it can actually be difficult to position your camera and sight with the sun. The image through the camera is completely black until you are actually facing the sun. So to get close to the sun you can buy or make solar finder. This usually takes the form of two small screens (coaxially positioned with the main lens) a few inches apart, with the sun screen consisting of a small hole in the center. The sun goes through the hole and can be seen on the rear monitor when aligning and the sun should be within the camera’s field of view.
If you don’t have a solar finder, in times of trouble you can line up with the sun by watching the shadow of your scope on the ground. When the shadows are minimized, you should line up with the Sun.
Tripod or stand
Solar astrophotography can be performed on a simple photographic tripod if low magnification is used (i.e. for full-disc imaging). However, like the stars, the Sun moves across the sky, so an equatorial tracking stand is useful to avoid having to constantly adjust your setup to keep the Sun in view. An equatorial peak is highly recommended when observing the sun for a long time such as during a lunar eclipse or Mercury. Solar scale tracking is not absolutely necessary, and precise polar alignment is not necessary if you don’t mind making occasional pointing adjustments. Even with the correct polar alignment, if the sun is low in the sky you’ll need to make some manual adjustments because atmospheric distortion affects the sun’s image.
Best time and place to observe the sun
The nice thing about solar astrophotography is that it can be done from our backyard. City light pollution or the presence of the moon does not affect solar viewing. But two factors had the effect of hindering our efforts. The first is atmospheric scattering from clouds or haze. Second is the storm. The best sun photography can be done on top of a mountain with a smooth steady stream of air, but backyard solar astrophotography can still be useful.
For solar astrophotography, the best time to observe the sun is in the morning, before the Sun heats up the landscape much. Of course, this has to be traded off with the fact that the more atmosphere you shoot through, the worse the distortion and noise. So mid-morning is usually best.
Even at the optimal time of day, (visible) noise is the real challenge of solar astrophotography, so very short exposures are required. In order to get the best possible picture, modern astrophotography cameras take a large number of short exposures (video speed or faster), so that the best frames can be selected in the moments captured. minimal noise in post-processing. This is called a “lucky image”. Luckily we don’t have to manually sort through all the frames! Very capable (and free) software is available, but that’s the subject of another section.