If you want to take your editing skills to the next level, you should familiarize yourself with frequency separation and how it can assist you in various photo editing tasks. One of these can appear in architecture and cityscape photography. Especially during blue hour and night, you may get unwanted shadows in your photos. In this article, I explain how to remove those with frequency separation.
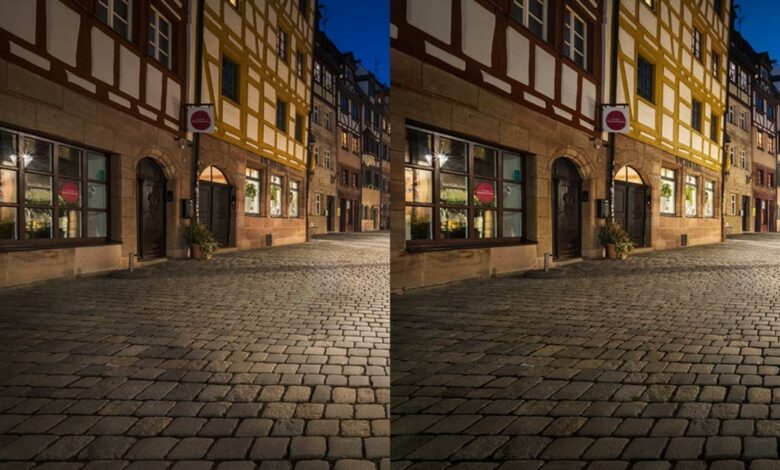
The before and after comparison photo may look familiar to you. I recently published an article about how to improve blue hour photo by introducing textures in the sky. I also had to deal with a shadow in this photo created by one of the street lights behind me. This shadow unbalances the composition, and the first attempt to hide it by including a texture in the foreground failed miserably, as I explain in the featured video.


A better way to handle it is to remove the shadow altogether through smart editing. One way to do so is to use curves and luminosity masks to lighten only the shadow areas. The problem is that this technique will also lighten some of the texture so it stays dark, if you’re not careful. Multiple adjustments targeting different tonal ranges can be helpful, but I prefer a different approach.
Frequency separation to eliminate shadows
In a recent article, I have shared one use of frequency separation. I used it to remove footprints from the sand in a desert photo. The same principle applies to shadow editing. First, separate the fine details from the details you want to edit. The shadow in my example looks fuzzy to it. It resides at low frequencies. On the other hand, the fine structures of the pebbles on the street, have a high frequency of occurrence.
Whenever you use frequency separation in your editing, the first task is to separate the details you want to edit from those you want to keep. The steps to create the frequency separation layers are the same as in my post on desert image retouching:
-
Make a merged copy of your edit by holding down Ctrl / Cmd + Alt + Shift + E and renamed it to “Short”.
-
Duplicate this layer and rename the copy to “tall”.
-
Select the lower class and go to Filter – Blur – Gaussian Blur… . Use a radius large enough to blur the details you want to separate from the shadow. This opacity still shows the shadow but doesn’t show the hidden structures in the shadow.
-
With the upper class selected, go to Image – Apply Image… and dial in the following settings: Set low class as source; activated Reverse check box; the set Mix arrive add, Opacity to 100%, Ratio to 2, and Compensate to 0. These settings only work for 16-Bit images. For 8-bit images, uncheck Reverse box, set Mix arrive Minusand insert a Compensate out of 128. The Ratio still in 2.
-
Set the blend mode of high class to Linear light.
In the featured video, I show you how to use a combination of cloning, dodging and burning, and a color layer to remove shadows and some lens flare introduced by city lights. I also talk about the mistake I made with the texture the first time I tried to cover the shadows.
Replication
To apply cloning in a non-destructive way, create a new layer above the low frequency layer and use Stamp copy tool template setting Present & Below to remove the ball. By holding down Alt you can sample details from an adjacent area by clicking on it. Then release Alt key and paint over the shadow area. You can hide the high frequency layer while performing this task.
Typically, the low-frequency layer will still contain structures and contours. Try to align the sampled parts with the parts you are editing before you start drawing. You don’t have to be 100% perfect with alignment like I show in the featured video. The blur layer you’re working with is pretty forgiving. You also don’t need to paint with 100%. Using a low opacity of 50% or less and enhancing the effect can help you achieve optimal results.
Dodge and Burn
To create one Soft light layer above the low frequency layer and use it to brighten the shadows by painting with a soft, white brush with low opacity. With a black brush, darken the areas around the shadow for smoother transitions. It helps to combine this technique with the cloning layer.
An alternative to the dodge-and-burn layer are the Curve adjustment layers, which you can use to lighten and darken certain areas. And if you want to be super precise, use a luminosity mask to only target the shadows.
Color correction
One layer is set to blend mode Color can be useful when you have color shifts due to shadows or lens flare in your photos. Color sampling with Teardropper tool from a clean area and paint over the shadow or lens flare inside the color layer. It removes any color shift in those areas. Combine this technique with cloning and dodging and scoring for optimal results.
Inference
As you can see, the right combination of post-processing techniques in Photoshop can help you fix a lot of problems. But if you can, try Avoid such mistakes while on the scene. In my case, there was no place to place the camera where I could avoid the shadows without affecting the composition. But in many cases, moving the camera was able to solve the problem.
You may also be wondering what to do with the high frequency layer. When editing shadows or footprints, there’s no need to work on small details. All adjustments are usually focused on the low frequencies of the image. But there are cases where you will want to target the higher frequencies. An example of that is eliminate chromatic aberration and color fringing.
And there are certainly more ways to use crossovers. Tell us about your favorite use cases in the comments below.