Photo retouching is as much an art as it is a skill, and portrait photographers must understand how to properly edit photos, even if they want to have a retoucher do the work for them. Although there are different ways to edit photos, using frequency separation is the most common method and is considered one of the best. In this article and the accompanying video, I detail the process I use to edit my head shots and portraits.
Notes on this hobby photo and editing method
I would be remiss not to credit London-based portrait photographer Ivan Weiss. Ivan taught me everything I know about photo editing and introduced me to Affinity Photo, so my method is largely based on what I learned from him. You can see his amazing work this.
Affinity Photo is powerful editing software with an interface that will be immediately familiar to anyone who has used Adobe Photoshop. I like Affinity for many reasons, but the main advantages are user-friendliness and price. Working with multiple layers is easy and the interface is well laid out. Best of all, it only costs $54.99 for the full app (as of the time of this writing). However, keep in mind that this entire editing process can be done in Photoshop if you don’t have or want to purchase Affinity.
What is frequency separation?
Frequency Separation takes the information in your image and divides it into high and low frequency layers. The high frequency layer keeps all the details of your image, while the low frequency layer is used to apply a series of retouching changes. By using this method, you can preserve details in the image while correcting skin imperfections and the like. Frequency separation prevents the skin from looking plastic or too smooth, so the end result still looks realistic and true to the original shot. It’s also relatively easy to do, especially in Affinity Photo.
Step 1: Use the brush in the picture to remove the greasy hair
Paintbrush (content-aware coloring) is my first step in the editing process, even before separating any layers. I use this brush to remove things like stray brows, nose hairs that might stick out, or hairs that don’t belong on the forehead. The first step of this procedure is to remove small objects that do not cover a large circle or area, and therefore, do not affect the skin much. This is why I use it mainly for stray hairs.
Step 2: Apply the Frequency Separation Filter
Layering high and low frequencies is super easy in Affinity Photo. This can also be done in Photoshop, but it requires more steps. Just go to the menu, select “Filters” and click “Frequency Separation”. A dialog will pop up, as well as side by side of the high and low frequency layers. All you need to do is set the radius and as you move the slider you will see the changes in real time. For head shots, I usually set the radius between 4-7, but mostly, I want to tweak it so that the high frequencies look sharp and the lows are blurry enough that my edits will make a difference. remarkable difference. Think “less is more” when applying the filter’s radius.
Once I’ve got the high and low frequency layers, I’ll create a new layer (called Pixel) and place it in between the high and low frequency layers. This is the layer where I’ll start applying my edits so I can always change or undo what I’ve done without affecting the original image. First, I use the In-Painting brush (Content-Aware fill) to paint over skin spots, age spots, or any kind of discolouration in skin tones. This will make the spots and lines appear more subtle, although it doesn’t remove them completely, and it preserves all the texture.
Step 3: Healing brush for heavy lifting
Most of the retouching will be done on another layer (or two) where I use the Healing Brush. I set the flow to about 30-50% and use a small, soft brush to start blending the skin texture. Instead of trying to get rid of everything completely, I like to combine similar skin tones at close zoom (small areas). I would go over the entire face and even out the tone, as well as sweep through fine lines by selecting a good portion of skin and painting over problem areas. It’s easy to abuse this, which is another reason why it’s so important to use a separate class. This way, if you finish applying the Healing Brush and then zoom out and feel like it’s too much, you can simply adjust the opacity of the layer to make it look natural.


Step 4: Soothe your eyes
Usually I would add another layer and use the History Brush again to go around the eyes. I do this especially when there are dark circles under my eyes. For example, choosing a better skin tone on the cheeks and painting over dark spots, bags, and shadows can be reduced a bit. As before, you can always reduce the effect by adjusting the opacity of the layer if you feel like you’ve gone too far with the edit. The eyeliner around the eyes is extremely important because if you remove all the eyeliner, the eyes will seem to drift in the middle of the head and look unnatural. Always remember that less is more when editing company or actor key shots.
Step 5: Draw in drama with curve layers
While the editing is technically done at this point, I’ll usually add an extra step to make the photo a little more dramatic. Remember that you can skip this step if you want. To do this, I created two new curve layers, one set to “Multiply” and the other set to “Screen”. After inverting them, I painted in shadow and light with a brush about 40%, give or take, then used a Gaussian Blur on the layers, setting their opacity to about 20%. This is much easier to understand in the video, but what it does is add a bit of drama to the photo. I also use it for things like hair filling or thinning brows. Finally, I set the layers to about 20% opacity, because if you set it too high, the photo will look fake.
Step 6: Make it stand out with levels
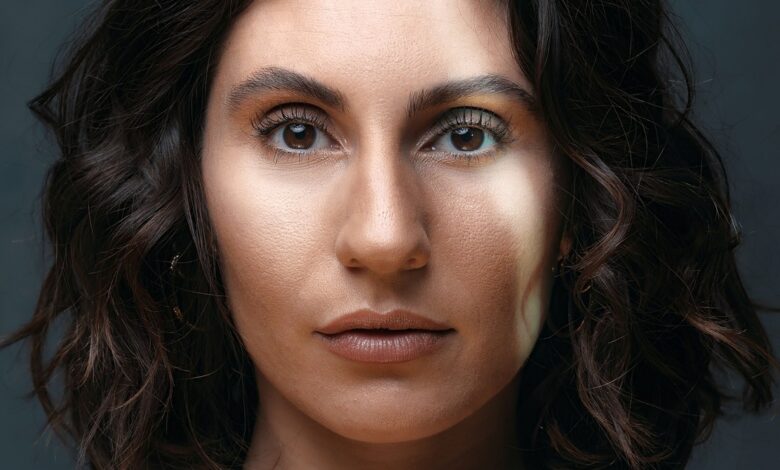
The final step is to create a “Levels” layer and drag the white and black sliders in until they touch the edge of the graph. This will keep you from accidentally ruining the blacks or blurring the highlights, although I recommend using an eye as well as a histogram. For example, in my image used for this tutorial, the blacks were already on top along the edge of the histogram, so I barely moved the slider and the white was pretty far off the other side. , so I don’t carry the slider to the top of the info on the chart. Again, remember that less is more!
Some final thoughts
I realize that this can seem very complicated to those new to editing, but once you get the hang of it, the whole process becomes pretty straightforward. I recommend practicing on a few images and then viewing them after being away from your screen for a few hours or a day. Chances are you will tend to overdo it at first and it takes time to make it look subtle and natural. Even if you want to perfect your editing, it’s still important to know how to do it yourself for a variety of reasons. Firstly, you will be much better at spotting good and bad work, and second, if your retoucher does something you don’t like, you will be able to easily notice and advise them on how to fix the problem. Finally, you’ll be able to quickly edit photos as needed, something quite common among portrait and headshot photographers.