Over the past decade, drones have created a whole new genre of photography for the average consumer. Their biggest hurdle is poor resolution and dynamic range but with a few of these tips you can get more details when taking pictures with your drone. We’ve come a long way since the first drone I owned, the Phantom 2, didn’t even have a camera fitted and you had to build the parts yourself. In a very short time, drones have gone from being a DIY hobby to being so easy to use that grandpa can buy one to play around with in retirement. Jokes aside, many of us use drones to combine our background photography and open up a whole different world of perspectives. I’ve even met a few people who specialize and just take drone photography as if it were a genre like wedding or portrait photography.
Assuming you’re not flying a heavy-duty drone carrying a full-fledged DSLR or mirrorless camera, you’ll likely struggle to be completely satisfied with the image quality from the plane’s camera. its driverless. Recent drones take great images, certainly good enough for social media, but when you want to print those images or edit as much detail as possible, you may find yourself struggling shuffle to get the desired result. Here are some quick and easy solutions that will completely improve the image quality on your next flight.
Exposure Bracketing
Exposure bracketing is an advanced technique used in landscape photography that allows you to capture multiple images at different exposures to enhance the dynamic range of your final image. I wrote up a Full article on why and how to use exposure marketing in landscape photography which I highly recommend reading if this is new to you. I go deeper to explain what dynamic range is and why you might want to frame your images.
Dynamic range is the amount of light measured between the darkest and brightest parts of the scene. Therefore, the higher the dynamic range, the wider the number of luminance values you can retain in the image.
All cameras have limited dynamic range, especially the one placed on your drone. This means that when you take a photo, there may be parts of the image that are too bright or too dark to have any information in it.
Notice in the image above that we have all the detail we could want in the darker areas of the photo, but to do so we have to completely overexpose the brightest parts of the photo. It is the dynamic range of the camera that limits what we can capture and to help with this we can increase the exposure of our images. All of this means we’ll be taking multiple images instead of just one to add a few stops of dynamic range to our final image, and the best part is it’s built right into most. the drones!
I will use one Mavic 2 Pro and DJI GO 4 for all the explanations here will cover the majority of drone users. Once you’ve connected to your drone, open the photo settings.
Select the camera icon at the top. Also, make sure your image format is set to raw. Tap “Photo” to open the photo mode selection.

Select AEB (Auto Exposure Bracketing) and select 5 photos. If you select 3 photos, you will only lose 2 more stops of dynamic range instead of 4. Now every time you take a photo, it will take 5 photos: -2EV, -1EV, 0EV, +1EV and +2EV . Keep this in mind because those images add up quickly. Technically we don’t really need -1 and +1 exposures but currently there is no way to just take exposures -2EV and +2EV so we have to use this and end with a few additional photos.
Make sure not to use HDR settings on your drone if it has it, as processing these settings automatically can be detrimental to your image quality. If your drone doesn’t have AEB installed, you can do this manually. Simply take pictures at 0EV, -2EV, and +2EV by changing the shutter speed between shots as quickly as possible.
Panoramic photo

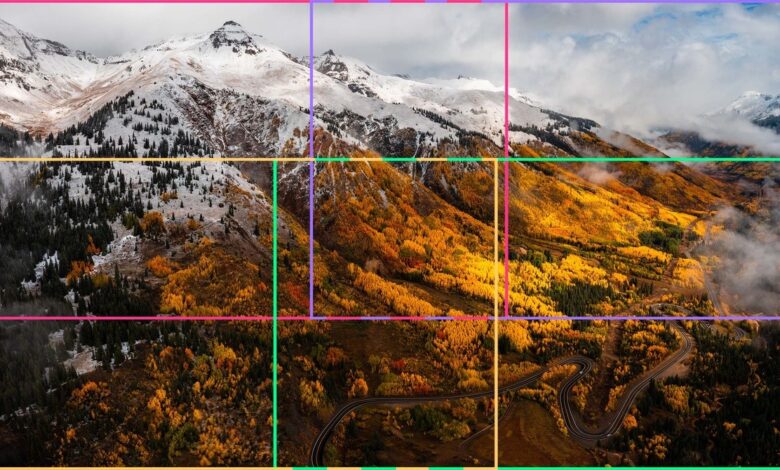
Okay, now that you know how to get more dynamic range in your drone shots, how do we get a higher resolution? The answer is much simpler: panoramas. But we are not limited to just taking pictures from side to side, we can take pictures in a grid depending on our composition. Panoramic photos are a little bit different in the implementation compared to exposure frames because you will need specific scenes or change the position of the drone so that you can take multiple photos, usually, this just means getting closer to your subject. If you are not familiar with panoramas, please get up to speed herebut it’s easy to follow if you haven’t taken a shot!

The rule is very simple when taking panoramic photos, just make sure the images overlap by about 30-40%. So you will take your first image, rotate your drone right or left and keep going through until you tilt the gimbal down and then back. I’ve created a few examples above of panoramas you can take. Obviously, you can shoot as much as you want in any pattern needed, but just make sure you snap so that the moving subjects in your photo blend in more easily.
Many times you will fly so far that you capture the entire scene in one image but if you want more resolution all you need to do is fly closer to your subject and take a full shot. scene to record the entire scene.
Magic
Now that you know how to frame exposure and take a panorama, it’s time to combine both techniques into a single scene. All you have to do is make sure the AEB setting is on when you go to take a panorama photo – that’s it. This means you’ll have 5 images for every part of your panorama, so even though hard drive space is cheap these days, don’t go overboard with all the images you take.
It’s time to take all of our images and combine them. We’ll be using Lightroom Classic for this example, but Photoshop and Lightroom CC can also do this. I’m sure other programs can do it too but these are the ones I’m familiar with. Once you’ve imported all of your images, you’ll need to find the start and end points for a sequence of images in your library. I do this by adding a star to the first image and 5 stars to the last image, just to help me know where to start and end a composition.
Select the first image in the sequence and while holding the shift key select the last image. Right click and go to photo collage, HDR Panorama. Depending on the number of images in your photo and your computer, this process may take a while.
This will show you a full preview that I in-depth analysis in my article for all settings. The first thing you need to do is make sure that all your images are processed in the top right corner. To keep things simple I’ll try spherical and cylindrical projects, usually the cylinder gives me the best results on the grid-style panoramas from my drone and then the amplitude curve to 100. You may have noticed that I used a spherical projection for this particular image. A great reminder to not follow these things blindly and try to see what looks best for your photo,

And voila, we’re done! Now you have an image with much higher resolution and dynamic range that matches or beats today’s mirrorless cameras. Would love to see your results or any advice you may have from your experience in the comments section below! As always, thanks for reading and hopefully this sheds some new light on your photography journey.