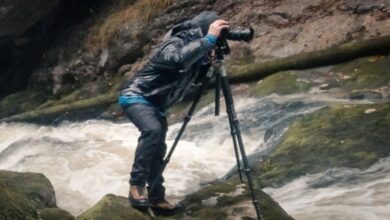
Walking photography should be a genre of its own; it is the most common form. There are simple things you can do to make sure you come home from a walk with better photos than before. This is the first of two articles that seek to improve those images.
Years ago, someone at my workplace said to me, “Why does the sun always shine in my eyes when I go to work and again when I walk home?” They will never win an award in astrophysics, but their observability is something the photographers don’t see as a disadvantage.
There is something to learn from seasoned landscape photographers who plan to shoot around the sun. They look at the weather, look at the position of the sun at that time of year and during the day, and decide what gear to bring. As a result, they get some great shots. We can think about this before going for a walk with our cameras.
Consider what the sun will do before you go out. Where I live now, winter is fast approaching and the sun is always low in the sky. Furthermore, it does not rise above the horizon to the southeast until about 8 am. It went down again southwest at about 4 p.m. Since my house is far to the north, the sunlight (if clouds don’t block it) throughout the day is quite special.
Planning a photography walk at this time of year, I know the light will be attractive, the shadows are long and I know which direction they will go and those affect the photos I will try. However, in the middle of summer, the sun was already far from the horizon, even when I rode my bike early in the morning. My camera remained in my saddlebag, that is, until I started cycling through the woods. Then the light is diffused, shadows and rays flare up among the leaves. So, planning where to hike and what photos to take depends on the season and time of day.
When we do the art of photography, we are trying to share our unique perspective, interpreting the world in a way that most people don’t see. We can do this by selecting objects that most people don’t see and trying to capture them beyond the usual parameters.
For example, being aware of how changing the camera’s position changes the look of a photo helps us make our composition choices. With the camera held at eye level, the world appears to be observed by most people. As a result, the resulting image may lack a special element that can easily be achieved simply by changing its height.
If we had lowered the camera to knee level, we would have shot a completely different scene. Most people haven’t watched the world since they were knee-high. If your knee joint doesn’t make it easy to bend over, most good cameras have a tilting or fully articulated screen that allows you to use live view images without squatting down or lying on your back. ground to take low-level photos.
In the following images, the low angle of the first photo has a more intimate feel than the second.


Likewise, we rarely see the world from a higher vantage point, so raising the camera can also make a difference to your photos.
Different heights change the amount of ground visible in the image; The lower you are, the shorter it is. Up high, you see more land between you and the horizon. Height also affects the angle at which parallel lines run away from you and converge to a vanishing point. If you go low, the angle is obtuse, if you go up, the angle is sharp.
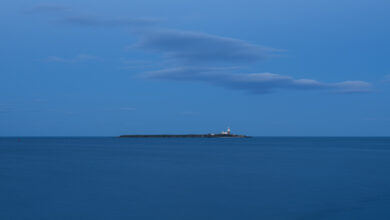
In the following two photos, taken at different times from the same location but at different heights, note the bottom edge of the frame where the path meets it. In the second photo, shot lower, the road appears to be much wider. Both were shot with a 12mm lens.


The height of the camera also changes the distance of the horizon. Reducing the height of the camera brings the horizon closer to the camera, making the image appear flatter. The distance from the camera to both the pier end and the horizon is also shortened in the second photo.
However, reflections appear longer when viewed from below if shooting on the water and shorter when viewed from above. The following two pictures of the same bird illustrate this. The first photo was taken from above and the cheetah’s reflection is short. In the second photo, taken close to the waterline, the bird’s reflection is longer.


Not all, but many landscape shots are sharp from front to back. If you study a lot of famous images, there is usually a subject in the foreground and lines leading towards the subject that the landscape photographer wants to draw your attention to. It’s not the only formula; that approach can sometimes become cliché if overused. However, it works.
Of course, you can intentionally blur what’s close to the camera in landscape shots. There’s a lot of nonsense about needing a fast lens and full frame camera to achieve a shallow depth of field. Having a well-blurred background and sharp subject doesn’t require a combination of a large, heavy camera and lens. A shallow depth of field can be easily achieved with kit lenses and even small sensor phone cameras. The combination of close proximity and selective focus on distant subjects will blur the foreground.
Similarly, getting up close and focused on a subject while ensuring there’s plenty of distance from what’s behind the subject will give you a nice background blur.
It accidentally blurs part of the image when some people fail. Many novices want front-to-back sharpness and focus on a feature at the back of the image or even on the horizon. However, this means that most of the foreground will be out of focus. It doesn’t matter too much if, like me, you’re shooting some minimalist, long-exposure seascape where the foreground has as little visual weight as possible. However, as I mentioned earlier, many landscapes include the foreground, and the photographer will want both that and the distance in focus.
The solution is to use the superfocal distance. This is the distance that the maximum depth of field can be achieved. It varies depending on various factors, including the camera’s sensor, lens, and aperture. There are many phone apps that will solve this problem for you; perhaps the best known is Photo drug.
While there are many settings, you probably only need to remember a measurement or two. When I want front-to-back sharpness with my camera, I shoot at 7mm or 12mm at f/8. So if I focus at about 16.5 inches with my 7mm lens, everything from 8 inches to infinity will be in focus. At 12mm, I only need to focus around 48 inches and everything from 24 inches to infinity will be sharp.
You note I use the words “around” and “about”. I don’t have a measuring tape; I estimate it. It’s even easier these days to achieve maximum depth of field with focus assist, where the edges of the area in focus are highlighted in the viewfinder.
I hope you find that useful. Seeing some of your walking pictures in the comments would be great. In the second part, we will discuss capturing vivid subjects, whether we should walk with a telephoto lens, and why walking with the camera is good for the soul.