Getting new modifiers is fun. My first one was a simple diffuser umbrella. As I progressed my career, I invested more and more in different light shaping tools. The tool I least wanted to try turned out to be my current favorite modifier. And here’s why.
It could be said that I own several dozen lighting controls to create different effects in the studio and on the venue. Some, such as the softbox, stay away, while others, such as the optical snoot show up on most of the footage. I love all light, but for my working style, hard light is usually not the first choice. To create my work, I can use Fresnel, reflector or just a simple bare shadow flash. Until recently, when I decided to try the Lindsay Adler optical viewfinder. And I wish I had an optical camera from day one because using it opened up endless creative possibilities that I didn’t have before. I think optical snoots are seen as a specialized tool, but I assure you, you can use them to create everything from sunlight to diffracted light to fine patterns of light. . 
Instead of being a review of the product, I’ll focus on all the fun I’ve had with it on editorials, ads and just test shots. I’ll deconstruct each image I created with snoot to show you how you can use it in slightly unusual ways.
Valentine’s Day
You may have seen these pictures on my Instagram. While fairly simple to create from a technical standpoint, they turned out great in the end. With the theme around Valentine’s Day, this photo session was all about red. I created it with just two lights, one of which is lit and reflected in the background.
The optical image was directly above me and I focused to make it as sharp as possible. That way the light is at its hardest and the edges of the shadows are fine. The second light is a single light Small ray of light reflex with some red gel on it. I also use the barn door to reduce the light coming in. The red rim on the model’s right shoulder is just a fluke bouncing off the walls of the studio. I didn’t mean it, but when I saw it, I liked it. 
If you’re going to recreate this image, I have a few tricks up my sleeve. One helpful tip I can share is to use your border light both as a background and as a border. Just put some foil to reflect the rim onto the background. Not only do you get a cool looking base, but you also get a set of rims that stand out. And you can trick others by asking how many lights were used, as I did in my story.
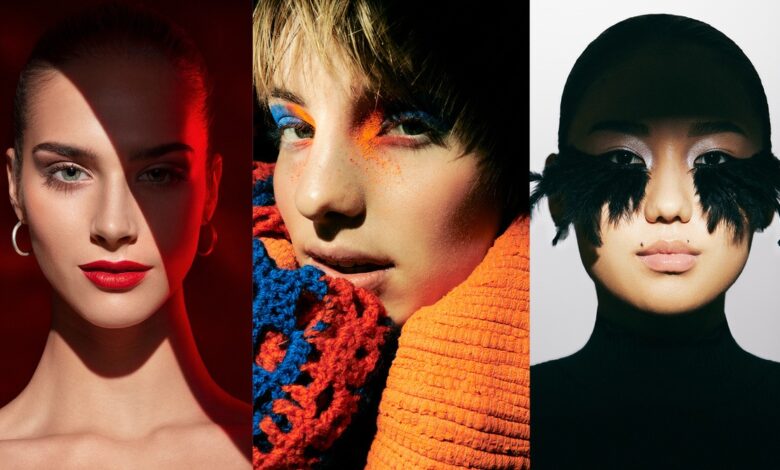
Feathers and Color Off
For this project, the goal was to take the color out and make it as subtle as possible. It was also decided that there would be exposure levels on the face and the background. For some images, I used Fresnel, while for others, I opted for optical photography.
The reason I chose optical photography is that it allows me to create areas of light, while also providing an opportunity to soften shadow edges. The reason I say fake is not just because it sounds fancy and “fashionable”, but because it’s actually the truth. The softness of the light is determined by the width of the shadow edges. The problem with optics is that it upsets the physics of light. With optical snoots, you can make the shadow edges softer, but not the light itself.
By making the beam out of focus, the edge of the shadow will widen, but it will still shift as you move the metal shutters. This will create a pretty cool light pattern that can be used to create artistic images. I used mine to precisely highlight parts of the model’s face. This image was again created using two lights. One is an OCF magnum reflector with a diffuser at the top to evenly disperse the light, while the other is an optical illuminator. 
The gradient on the background is created by placing the Magnum fairly close to the background to utilize the power of light attenuation. The same effect can be achieved with narrow beam reflectors and barn doors; however, the gradient will be horizontal, not circular, as you see in the image.
You could say I could have used a small mesh light to create a similar light pattern on the face. Exactly! But using an optical viewfinder gave me more space to play with the model itself, as it allowed me to get the right shadow edge width and light shape itself.
 Being able to change the shape of the light was crucial to this macro image. I only want a small part of the eye to be visible. Closing the shutters as much as possible, I was able to get this result. The light itself is triangular in shape, which would be quite difficult to achieve using a simple grid and reflector. Therefore, a snore is perfectly suited to do this job.
Sunlight
How do you actually create sunlight? Using a Magnum reflector of course! Of course not. Why bother with it when you can just use an optical camcorder? I like to use mine to brighten the background in a way that reproduces sunlight. Sometimes I think I’m a flash vampire because I make sunlight with my flash, even when there’s real sunlight in the studio. The beauty of optical snoot is that it can be used to create different patterns on your images. Furthermore, customers like how it looks, because there is full control over how it looks. 
Final Notes
These are just some of the ways you can use an optical spy device. This is one of those modifiers that seems niche, but once you get the hang of it, you’ll realize its full potential as a great way to create images. One use, which will be a separate article, is to generate sunlight. Yes, that’s right, the Magnum reflector produces sunlight as good as a knife in a gunfight.
Overall, I strongly encourage you to get on with it optical snoot and start playing with what is the Swiss Army Light Shaping Instrument.