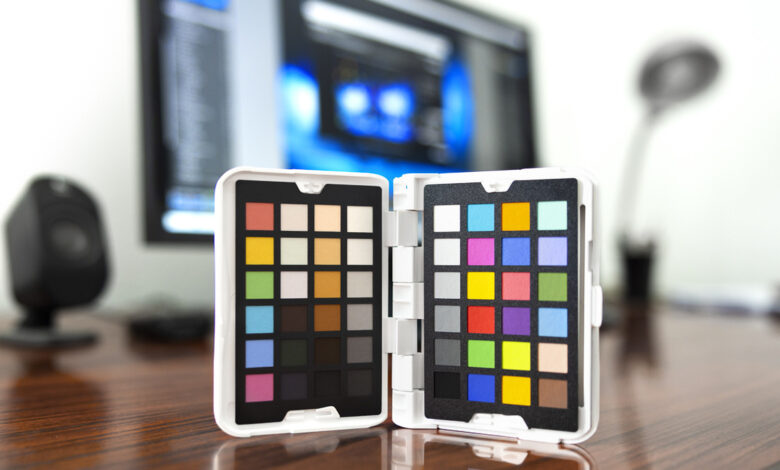
New Datacolor’s Spyder Checkr’s photo is a scaled-down version of the original Spyder Checkr professional color reference tool and a major improvement over the previous smaller version, Spyder Checkr 24.
Consisting of a mobile-sized hinged plastic box containing two color reference cards totaling 48 squares and two gray scale cards with another 14 squares, this new product closely resembles the reference tool. Datacolor’s original professional projection of features, more affordable at $99, and significantly scaled down for easier portability. I think both its smaller size and affordable price will make it easier to use for more photographers.

What is it
The primary purpose of any color reference tool is to ensure color accuracy, whether across multiple cameras, lenses or even lighting, while streamlining the production process by reducing the number of the amount of editing that needs to be done. To achieve this precision, Datacolor used a new process that combines fast inks with museum-quality paper so they can achieve long-lasting ultra-matte colors and deeper black squares. It really is an impressive deep matte black.
Datacolor’s commitment to color accuracy is key in every aspect of Spyder Checkr Photo’s development, from selecting premium paper in compliance with ISO 9706 to meeting precise requirements for reproducibility. anti-aging, to high-quality inks that provide long-lasting color integrity.

What is included
- Spyder Checkr Photo Case
- Four interchangeable cards with 62 color targets
- Software download link and serial number
- Lanyards can be attached
The two color cards include the right card made up of 24 standard colors, all in the sRGB color gamut, and the left card made up of a variety of use-specific colors. This card on the left includes six medium saturated colors, RGBCMY. Three-tone near-white and three-tone near-black improve tone and tone correction over a wider dynamic range. Also included are six additional skin tones, making up a total of eight tones on both cards. This is especially useful for portrait and event photography.

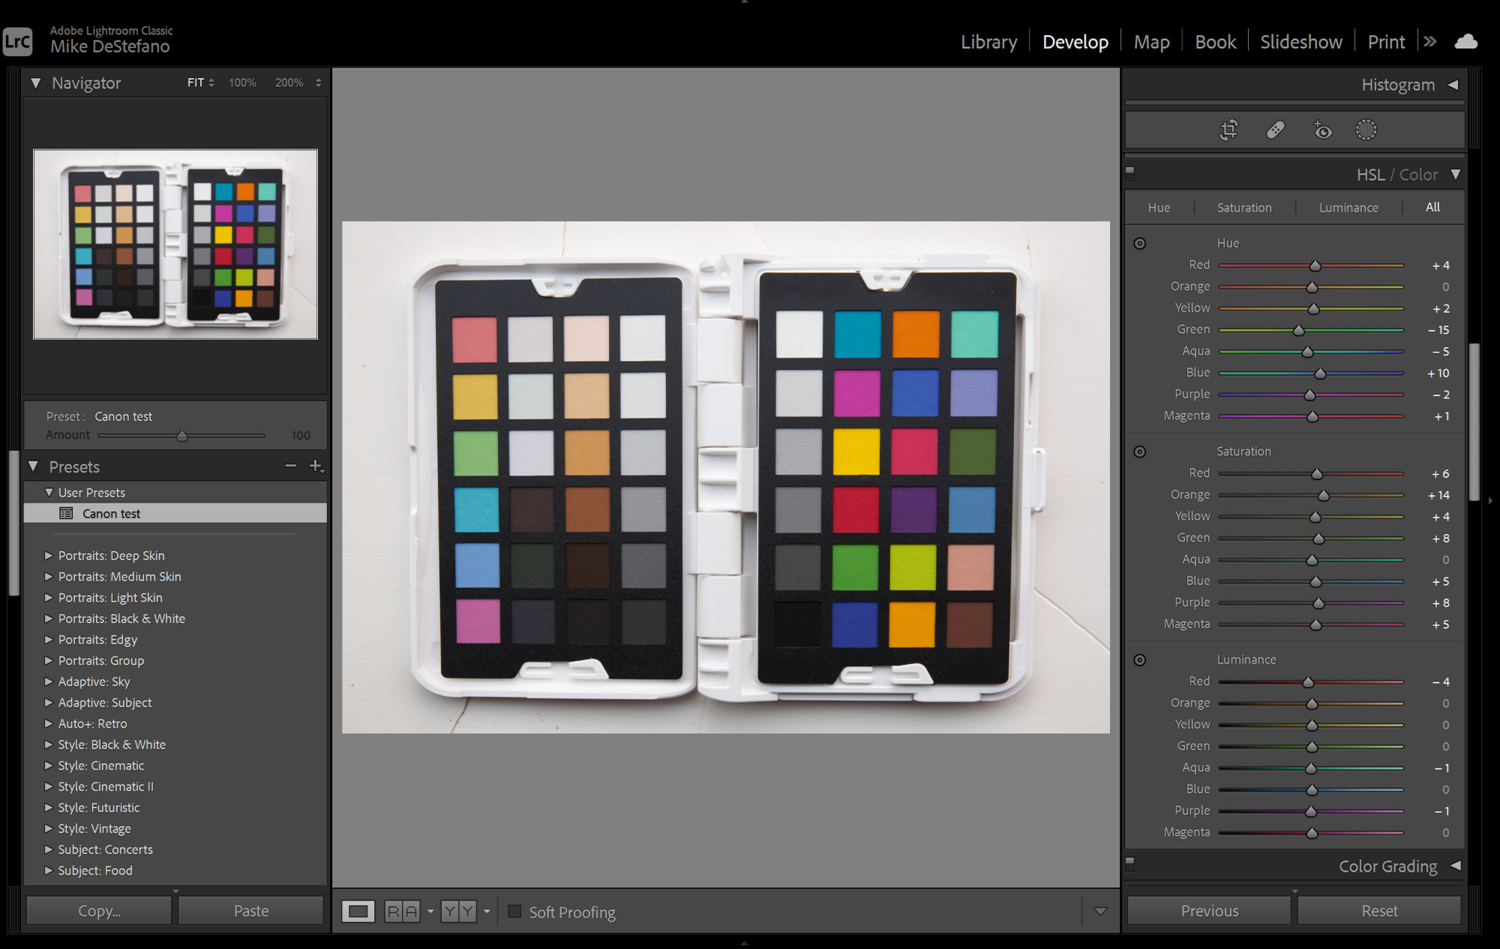
As you can see in the image above, each card also has six grayscale squares, each with a different gain. The standard color card on the right goes from a white card to a black card in step 20%, while the card on the left consists of a 5% gray square and 5 squares in step 10% that are aligned with the card on the right by zigzag pattern.
Two grayscale cards including one with an almost full-size 50% gray pattern, with six white to black squares in 20% steps, and a second card with a large 18% gray pattern with six cells the same black and white square again in 20% steps.
All four cards are well made with media sandwiched between stiffer materials for durability. They can be easily removed from the case, meaning it will be simple to replace any cards that may be damaged but are also interchangeable in any other cards that may be released at a later date. There’s been no official announcement, but it looks like Datacolor is looking into producing other sets of cards for things like video-specific uses. Most photographers won’t need all four cards all the time, and it would be nice to arrange a second set of cards based on personal needs. Also, a lot of photographers are doing both stills and video, so the ability to buy more cards for more flexibility will appeal to more people, myself included. So, Datacolor, let’s make this happen.
The plastic case itself is a double design roughly the size of a standard index card. It opens like a book with a push of a button along the side. In its delivered configuration, opening it to the left opens two color cards, while opening it to the right reveals two grayscale tabs. The hinge opens smoothly but closes with a click, allowing it to hold different positions. This makes sense from a usage standpoint but feels uncomfortable and sounds almost like broken plastic. Once you realize it’s not broken, it’s okay. It will probably loosen over time, but I wish it would be smoother in general.

Overall, it feels well made and durable. I wouldn’t worry about having it in my pocket or sometimes dropping it during use. It comes with a lanyard to help prevent said drops. Its smaller size makes casual photographers on the go more likely to keep it in their pocket and use it as needed. The double-fold design, while making it smaller, also helps keep the card protected and clean, a necessity for good color accuracy, so much so that when you open the package, the first thing you look at The card reminds you not to touch the printed squares so as not to leave fingerprints. They should have taped it on the back so that when I give it to my assistant or model, I don’t have to remind them.
How to use it
The reference chart is pretty simple: put it in your photo and take a picture of it. Datacolor recommends not filling the frame but cropping later in the post to take advantage of the lens’ sweet spot. They also make notes to keep the camera parallel to the histogram, but if you’re a bit off, you can easily correct it in the article.
Upon release, the Checkr software works with Adobe Lightroom, Adobe Photoshop, Adobe Camera Raw, and Hasselblad Phocus. Datacolor says each editing program uses different profiles and presets that must be developed in conjunction with the software company. So I hope this means they are looking at or working on adding more options like Capture One in the future.
When you’re ready to calibrate, you have several options depending on the software you choose. This will largely depend on your own personal workflow and what makes the most sense to integrate this into it. The Checkr software will launch from within Lightroom but needs to be launched manually if you use Photoshop or ACR.

After opening or importing the image into your editing software, you’ll want to rotate and crop it so that Spyder Checkr fills the frame and is squared. Using the Eyeropper tool, you must sample one of the light to medium gray squares to get a white balance measurement. Again, Datacolor recommends the 20% gray square below the card’s white square as a starting point.
Next, you adjust the overall exposure of the photo. In Lightroom, adjust the exposure slider until the white square on the card reads about 90%, then adjust the black slider until the black square on the card reads about 4%. The process is pretty much the same if you’re using ACR, except you’ll want to get the white values to RGB 230, 230, 230, and the black values to be around RGB 10, 10, 10.
From there, you can launch the Checkr software from within Lightroom by going to the “Edit Menu”, selecting “Edit in”, then “Edit Spyder Inspector”. My preferred way is simply right clicking, “Edit In”, “Edit Spy Checker”. Make sure to select “Edit a copy with Lightroom presets” to create a TIFF file with your adjustments.
If using Photoshop or ACR, all you have to do is save the file as a 16-bit TIFF file, then manually launch the Checkr software and open the file you just saved.

When you have an image in the Checkr software, there will be a set of smaller colored squares superimposed on top of the image. By dragging the corners or edges, you need to arrange the smaller squares so that they align with your image and near the center of each square.

There are three rendering modes to choose from in the drop-down menu on the left: Colorimeter, Saturation, and Portrait. Datacolor lists Colorimetric as the most accurate reproduction when color accuracy is most important. Saturation has a small increase to saturation for general and landscape photography. Portraits reduce saturation, giving skin tones a more natural look.
The final step is to save for Lightroom, ACR or Phocus and click “Save correction”. The software will do its calculations and create a new preset that you can name later.

The Test software creates an HSL profile for color correction and adjustment. To use this new preset in Lightroom, simply go to the presets panel in the development tab, click “New Preset” and select “Import Preset”. You can also close Lightroom, and when you reopen it, Lightroom will automatically import any new presets found in your “User Presets” folder. This method can be useful if you create several new presets so that you don’t have to enter them all at once.
The color adjustment done in the HSL panel is great as this gives you the best possible adjustment to the colors of your image. You can easily tweak the presets to personal taste or tweak the colors further, which is what I usually do when there are mixed lighting conditions in the same image.

Who is it for?
Not every photographer needs to use a color reference tool, and I’m sure many have gone through their entire careers without ever having to. Of course, this doesn’t change the fact that for many other photographers, color accuracy is a high priority and essential to their work. Food photographers, product photographers, and most advertising photographers are often asked by clients to get near-perfect color reproduction. In many of my commercial works, I have been provided with specific colors that a product must match to match a client’s advertising campaign or brand.
That being said, once you learn the process and find a good method to incorporate it into your workflow, I believe more photographers could benefit from using a single device. suffers like Spyder Checkr. Creating camera or lens profiles can reduce the amount of color correction on larger shots, even for portrait sessions or events. I usually use one when shooting events to make it easier to correct photos taken in different lighting conditions in post-production.
To really get the most out of an image’s colors, you need to do more than just white balance the image. If that’s all you’re doing, you’re probably missing out on a lot of color depth in those images. Color reference tags give you accurate true color values without any bias from the user. Not all of us see colors the same, and we are inherently inclined towards warmer or cooler colors. When I first started out as a photographer, I did post-production for larger photographers in the Boston area. I quickly learned that some of my clients like their edits warmer and others cooler. If I tweak things based on my own preferences, which have changed over the years, some of my clients won’t be happy.
The Color Reference Engine gives you the truest color base to start with, correcting for any nuances or differences from the sensor, lens, or any lighting situation. From there, you can make your personal adjustments to meet your own photographic style or vision.
What I Like
- Smaller size and compact design
- Flexibility
- Price
What I don’t like
- Hard hinge
- Missing replacement card at launch
New Datacolor’s Spyder Checkr’s photo is now available.