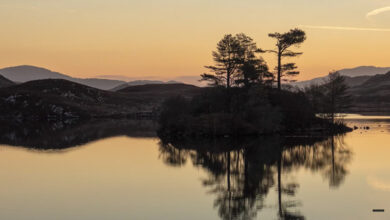
Seascape photography is very different from landscape photography. Its dynamic nature makes it one of our most exciting and challenging subjects. The unique difficulties of capturing the ocean require a different set of skills and learning some of the secrets of the sea.
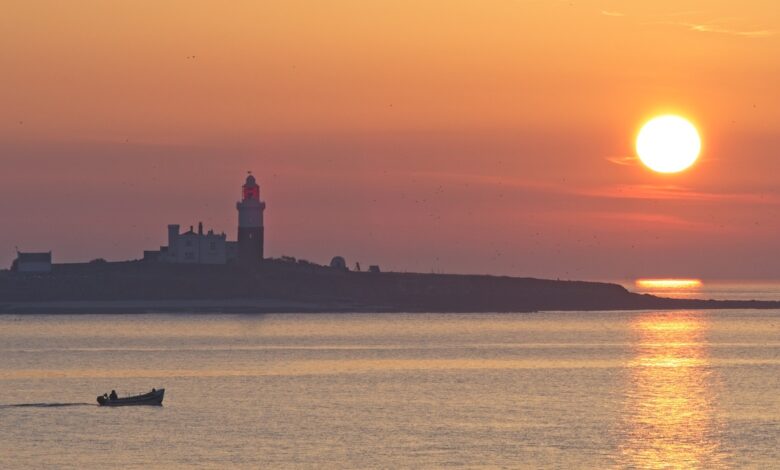
Although I shoot commercially, I derive great pleasure from taking my camera out and photographing the world around me. I live on the beautiful Northumberland Coast in North East England, so I can witness the amazing sunrises we get here. It’s my favorite time of day to take pictures. Taking pictures of the ocean with the sunset on my back can also be great, but the quality of the early light is definitely the best for most of the seascape shots here. However, there are additional advantages of early hours to the marine landscape. Firstly, the beach has been cleared of distracting footprints by the sea. Also, for me, that solitude is good for my soul.

I’m not always on the beach, but I try to get there before the dog walkers. I once had my camera and tripod stooped and dumped in wet sand by an overzealous black labrador untie its leash. Luckily, my camera is properly weather sealed, so I’m confident there was no damage, although it did spoil the morning shoot because the lens was covered in sand. It’s frustrating when dog owners allow their dog the ability to destroy a lot of money’s worth of equipment. However, there are always opportunities for education. So the next conversation goes like this:
Dog Owner: Oh, I’m so sorry about that.
Me: I can get your name and address.
Dog Owner: Why?
Me: Well, the camera costs £2000, and the lenses over £1000, and I won’t know if they’re permanently damaged until I bring them home and clean the wet sand on them. I assume you are covered.
His shocked face was a photograph, but he has now kept his dog under control when he sees photographers.
This is not recommended for all camera models, but with me, a quick wash in the shower to clean the sand when I get home. Then I gently pat it dry with a lint-free cloth and let it rest on some silica gel bags.

When choosing the correct camera for capturing seascapes, one should consider that sand and saltwater are camera killers. Sand is highly abrasive. That’s why I use a high quality UV filter to protect my lenses. I’ve had sand scratch the front element of a professional lens in the past. An acquaintance of mine dropped his camera and smashed a new, expensive lens on the rocks. He said it would have been saved if he had used the sun visor. My answer to the perennial argument for UV filters versus hoods: use both.
In addition, salt water is 5 times more corrosive than fresh water. The humidity of the air at the beach is ten times more corrosive than normal humid air, and seawater also contains bacteria that produce secretions that will accelerate the corrosion process.

Back in 2003, I bought a Nikon Coolpix 5700 bridge camera. In 2005, I shot it on a sandy beach on a windy day, and the sand rose when zoomed in. RIP Coolpix! More recently, I know someone who has Canon 5D Mark IV died shortly after photographing a stormy sea. Jet penetration into the camera through an unsealed lens corroded the electronics. That’s one of the reasons I upgraded my camera to the OM-1, which is IP53 rated for weatherproofing. That’s also why I never change lenses on the beach.

The tide rolls in and out about twice a day. It takes about six hours from low tide to high tide; half of the full range is within the middle two hours. Spring tides occur a day or two after the full moon and new moon. Then the tides go in and out further during those six hours. Therefore, it flows much faster. Some of the beaches near me are rocky and potentially dangerous. Therefore, I try to time my shots with the tide going. I always keep an eye on the world around me, not just at the camera. I don’t want to be cut off by the sea. Furthermore, most of the rocks here are not photogenic so I like to shoot at high tide.

Similarly, I am aware of the sea state. Big waves fighting are fun, but there are also weird waves. I often stop at a memorial bench overlooking the ocean during my morning bike ride. It was placed there in memory of an experienced fisherman who lost his life after being swept out into the sea by big waves. Always seek local advice on safety at sea. According to the Centers for Disease Control and Prevention, drowning is the third leading cause of unintentional injury death worldwide. It claims about 236,000 lives per year.
Waves pose a composition problem for seascape photographers. Looking out to sea, they run across the frame, thus acting as an obstacle for the eye to enter the image. It’s the exact opposite of the leading line. One can solve this problem by looking for foam lines running up the circuit breakers. Otherwise, when the sun is low, use the light shining through the spray to guide the eyes.
You can use ND filter and wave blur. To get a perfectly calm sea, you need to count the time it takes for a wave to start forming until it is completely broken. The shutter value needs to be longer than that. In difficult sunlight conditions, even at f/8, the starting shutter will be at least 1/1000. So with the ND1000 (10-stop) filter I will only get a one second exposure and I may need twenty or more. I therefore used to stack an additional ND32 or ND64 filter, which is not ideal. However, I can now combine my ND1000 filter with the camera’s built-in Live ND filter, which will reduce exposure by up to six stops (ND64) without the need for additional degrading glasses. amount of images.
The sea is usually brighter than the middle gray. Plus, as I usually shoot Contre Jour, it makes the scene brighter. I need to consider exposure compensation because the camera’s meter will want to darken the image. Therefore, I usually add one or two stops of exposure to counter that. This is especially useful if I want a longer shutter value.
The biggest mistake many photographers make is that the horizon isn’t pretty. Even a deviation of one degree will be obvious when viewed on a larger screen. Using the camera’s built-in level meter is a must, but even then, some gauges have a few undesirable offsets. Straightening the horizon using the crop tool in your editing or development software is often necessary.
Another challenge is deciding where to place the camera. Not shooting perpendicular to the horizon can lead to imbalance. If you point the camera to the left along the beach, the right side of the photo will be heavier with more sea in the frame than the left, where the horizon and shoreline converge into a vanishing point.
The height of the camera will also make a difference. A lower camera will see in front of the sea. However, it can allow you to shoot through wave crests. Using a long lens, can look stunning with the sun low behind. Reflections will appear more with a camera in a low position, while a higher vantage point will show more sea but less reflections of things lying on the water. However, you can get a long streak of sunlight or moonlight on the water from a higher vantage point.
You don’t have to stick with seascapes with wide views. Zooming in on cool features and creating abstract photos can work well, too.
Did you find that helpful? If you did, please let me know in the comments how you will photograph the ocean or other large bodies of water next time. Do you have any cautionary tales or disaster stories about beach photography? It would be great to read them.
If you are determined to improve your photography, please read my last post on two major obstacles that photographers face.