Over the past four months, I have stayed at many Airbnbs and hotels while traveling through Portugal, Costa Rica, and Panama. What I noticed when searching for accommodation was the often unprofessional photos that those places used for their listings. Some were so bad that I directly skipped over to the next list, without even seeing the reviews. And it’s easy to create better real estate photos, even with just a mobile phone, which I’ll show in this article.
Now, I’m not saying you should go to a professional real estate photo session with just your cell phone. I use it here for simplicity and to show that equipment is not usually the limiting factor. More important is proper preparation, proper lighting, a good eye and some compositional considerations.
I also prefer cell phones for this type of photography, as the reason I currently take photos of real estate is to document the places I stay. my travel blog. This means that when I get to a place, tired of my travels, I don’t have hours to walk around on a tripod and Canon R5 record it. I usually take those pictures in less than 10 minutes before packing. Consider this as you view the photos in this article – aside from some minor tweaks to color, contrast, and perspective, they’re straight from the Google Pixel 5. I’ll also show what works animation in pictures and what I could have done better. Mistakes are, after all, a great way to learn, if identified.
Composition for a solid interior photo
For example, the photo above shows the porch of one of the places I stayed in Costa Rica. I immediately fell in love with the area as it is very open, bathed in soft light, has a hammock in the back and most importantly lots of greenery and vegetation nearby. Therefore, I wanted to show a lot of this in the photo.
Now, ideally, I would close the doors in the background and shoot a darker exposure for the white sky. The first fix would have been easy if I had just spent a little more time and properly prepared for the shoot. And this is generally what you should do when photographing real estate. Before you start taking pictures, fully tour the place you want to shoot and make the adjustments you need to make right away, so that later when entering other rooms with the camera, you can focus only into photography.
And about the sky: Well, I don’t want to use a tripod in my mobile photography but editing your photos is definitely something you should do for more professional results.
Now, compare this photo with another interior photo I took a few years ago in Vietnam, when I used professional equipment like when I was working. Although the second photo looks more professional due to the preparation of the room and lighting for the shoot as well as the application of post-production, there are similarities. And identifying those will give you the right tools to create solid real estate and interior photos.
Go wide
It may be a bit cliché, but in my opinion, interior photos and many exterior real estate photos look better when taken with a wide-angle lens. While in other genres of photography I usually use a normal focal length and a longer focal length to compress a scene for more excitement, with real estate photography my goal is to create space and make the elements in the photo room breathe. And with a wide-angle lens like Canon RF 15-35 f/2.8 I can do that. There is certainly a place for detailed photos taken at longer focal lengths as well, but you should lay the right foundation for the photos in your series by expanding first.
The great thing is that even with most modern mobile phones, this sense of space can still be achieved, because they often include a wide-angle lens. For example, the widest that my Google Pixel 5 can use is 15mm.
This helped a lot when photographing the bedroom of one of my Airbnbs in Costa Rica. There is usually only limited space to walk around and place the camera in those places, so going wide allowed me to still include important elements in the frame.
With the photo above, I also wanted to directly point out a flaw that could have been easily fixed before the photo was taken. I should have taken a minute to get rid of some of the wrinkles on the pillows on the bed and smooth out the little rug next to the bed. But as I wrote above, those shots happened quickly and I felt tired after a long journey. So for a professional shoot, you definitely want to rest.
What you will also notice in the photo above is that it was not taken from eye level. It often helps for interior photos to choose a perspective somewhere between the waist and bust to create a good balance between the floor and the ceiling in your photo. But make sure to avoid the sight of worms. You still want to see the top of the furniture in the frame.
Stay true to the place
Sometimes I want to go more than 15mm wide, but need to be careful. Although I want the places I shoot to look large, I don’t want to create photos that are completely different from reality. This is a problem I sometimes have with hotel photos, where the photographer has gone a little too far to make a 10 square meter room look like a loft.
Finding the sweet spot is important and for me it’s mostly between 15mm and 18mm. For some rooms, 14mm or even 12mm would be fine to avoid cutting furniture as you see in the photo below. But as I said at the beginning, equipment is usually not the limiting factor. Sometimes it can even boost your creativity, if you have to work within certain limits. You’ll be forced to find different angles so you can work with your device, and this can lead to more interesting photos.
And if you must trim furniture, do so deliberately and avoid cropping a few pixels. With the right cut, you can give the viewer the impression that they are standing in the room instead of looking in from the outside.
Avoid pressing the key
There is one thing that will make most architecture photos look unprofessional and that is the keypress. While there are exceptions where it can be used to create very dynamic perspectives and give photographs a more artistic look, there is no room for perspective distortion in my opinion. in professional real estate photography. So to create professional looking photos, make sure to avoid or correct those.
My main camera has a level meter, so I use this to prevent perspective distortion. On mobile, I use the edges of the frame as well as a 3×3 grid to guide me while composing the photo, making sure that the lines created by the walls, windows, doors, and furniture all line up. In the intro video, I show you how I do this.
Even so, sometimes the perspective I want to capture doesn’t allow me to get everything distortion-free in-camera. If I manage to keep the distortions to a minimum, there’s usually no problem fixing them in post-production.
A side note: There are lenses that give you more flexibility in the perspectives you can create when shooting architecture and real estate photography. And those are Tilt-Shift lenses, such as lenses Canon TS-e 17mm. The shifting mechanism of those lenses can be used to change the angle of view while keeping the camera straight and thus the image free of perspective distortion.
Use the right light
Lighting is a great tool for real estate photographers and I like to use natural light for my shoots or, if I use artificial light, I work with the settings. lighting is available to keep it realistic. You can also paint with light to take it to the next level. But that depends on the type of shooting you’re doing.
For the examples taken with a mobile phone, where I want to keep it simple, this is not an option. Instead, I try to wait for the right natural light as much as possible despite my sometimes packed commute. As a general rule, light in the early morning or late afternoon often provides the best conditions, if the purpose is to create an attractive atmosphere. For a clean, minimalist look, you may not want directional lighting, and overcast skies can provide the right softbox for your shoot.
But once you know what your style is, you should choose your timing accordingly, which is what I did for the following photo. In such lighting situations, you can often see the technical limitations of mobile phones because of the huge dynamic range. The Google Pixel uses some HDR algorithms in their camera app, though it does a pretty good job.
Prepare the space
Remember the photo above where I didn’t remove the wrinkles on the pillow and carpet. It’s the little things that make all the difference, and they usually only take a few minutes to fix. If you have read mine article about editingyou know that this falls under the category of things you can do to avoid editing altogether or at least make it easier.
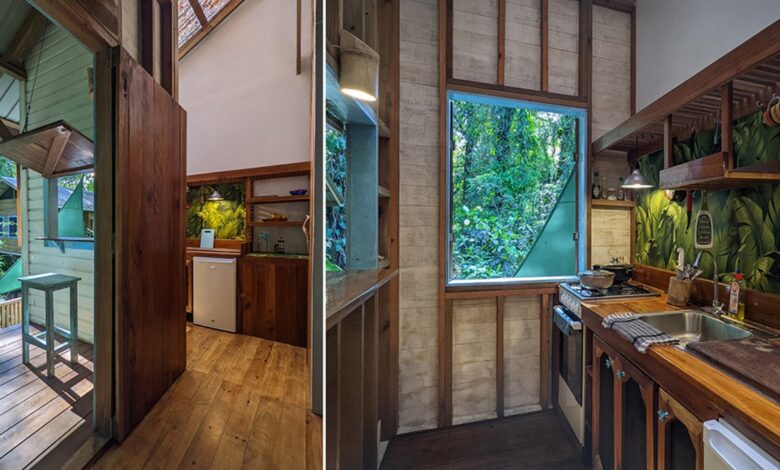
In the kitchen photo below, I made sure to properly prepare the counters and arrange the items so that it doesn’t look too cramped. This doesn’t take long and makes the photo more balanced. For some properties, you may even want to rearrange some pieces of furniture such as chairs to position them properly in your frame. But if you’re on commission, be sure to double check with the owner or real estate agent first. Maybe they want the furniture to be arranged in a certain way and so this is how you have to photograph it.
In the article’s intro video, I show you how I completed the shoot for this apartment. It was a walk through the points I mentioned above.
Mix it up
By mixing it up, I want to say two things. First, you should have a good mix of perspectives, showing the rooms you photograph from different angles. You can also move closer to the rooms to take certain photos, while taking pictures from the doorway for others. While you are in position, make every minute pass and don’t be afraid to take lots of photos, you may end up using only a small selection.
In addition to getting different perspectives, I also often incorporate some vertical frames. Most of the photos I take are in landscape orientation, but since I like to composite real estate photos for my blog, it’s also good to include portrait photos. Depending on the shot, this might even be something you have to do. Just think of a shoot for a magazine where they inevitably need variety in composition and maybe even the cover. And yes, editorial photos are better taken with a camera suitable for use on a tripod. For my travel articles though mobile is enough.