Photographers spend their entire careers mastering the art of composition, gradually honing their skills over the years. For new photographers, learning composition theory from scratch is a daunting task, but you can quickly track your progress by focusing on one technique first: subject separation.
The challenges of learning to compose
Learning to compose as a beginner photographer is difficult. I remember feeling overwhelmed by the multitude of composition techniques when I first picked up the camera. You have the rule of thirds, the rule of odds, the path, the subframe, the layering, the golden ratio, the golden triangle, etc. Even learning the name of each technique is a task, let alone a task. to put them all into practice. When I’m learning something complex, I want to simplify it as much as possible. I want to focus my attention on two or three high-impact fundamentals that will help me make as much progress as possible, as quickly as possible.
After testing every possible composition technique, I set out to figure out which ones I should prioritize. I’m talking about the techniques that every photo needs to work. I’m happy to worry about the others later, knowing I’ll have more experience to use them better once I’m comfortable with the basics. And, by the process of elimination, I realized that practicing a compositional technique included everything I needed to learn first: subject separation.
What is subject separation in photography?
Subject separation is one of the most important compositional techniques in photography. It refers to the object(s) being visually separated from the background and surrounding elements in the frame. It makes the subject clearly visible and defined, drawing the viewer’s attention to the most important part of the image. Separation also adds impact to the subject, making it more prominent in the frame and removing potential distractions.
With poor subject separation, it doesn’t matter how many paths or rules you try to include in the image. The most important element of your composition will lose its impact and your image will be flat. So without separating the subject, you won’t see the benefit of other composition techniques in your photos. In street photography especially, poor subject separation or clarity is by far the most common problem I see in photos.
This was one of my first attempts at street photography (I didn’t know it at the time), and it was a bit messy. Aside from the out-of-focus and exposure, there’s very little subject separation here.

With flat lighting, low contrast, and poor color combinations, the subject almost blends into the background.
Instead of shooting in a hurry, I should have waited for a subject with a stronger color contrast to the wall. This will also give me time to check the focus and exposure settings for a better image. By thinking about subject separation in this one shot, I could have solved some of the other problems and created a significantly better photo.
Now, I’ve mentioned color contrast as a potential solution to the lack of object separation in this image, and here’s the problem: core techniques for achieving subject separation develop some of the most important skills you need to learn as a photographer: space, light, and contrast.
This is why I think focusing on topic separation is an effective learning strategy. Because the methods you will use to improve this composition technique will teach you a lot of photography basics. For me, this also puts all other compositional theories on hold until I’m ready to start integrating other techniques.
Looking back, it’s clear that I struggled a lot to learn to compose before this happened. It’s clear how much faster my composition skills have evolved after this point, and I think the process can really help those just starting out in a similar position now.
How to achieve subject separation in your photos
Photography is a two-dimensional medium that compresses a 3D scene into a flat image. This compression means that anything in front of or behind your subject in the frame interferes with separation.
Here’s another of my early attempts, this time in Vietnam. Although the subjects are interesting enough, the elements in the background are compressed into the same view plane as their arms. This will remove any subject separation in the most important part of the frame.

No amount of paths can save this image without achieving better subject separation.
Luckily, we have a lot of techniques we can use to create separation and add depth to our images. For starters, however, I recommend focusing your efforts on the three most basic techniques: distance, light, and contrast.
These will have the biggest impact on your photography, and once you’re comfortable with them, you’ll be ready to incorporate other techniques.
The space around the object
First, work on getting some clear space around your subject so you don’t have anything overlapping them in the frame. Second, pay attention to your context and choose a scene that either adds to the story or doesn’t add anything undesirable. Keep an eye out for elements directly behind or in front of your subject, as these will be compressed into the same view plane.
Don’t worry if you have trouble with this at first, especially if you’re shooting in an uncontrolled environment. Keep practicing and you’ll quickly learn where to position your subject, yourself, and the camera.
Illuminate your subject
Light is the most important element in any photograph, but it is also one of the most elusive. However, we will not try to master the light in this exercise; We’re going to look at a key application of it and build from there.
In a genre like street photography, one of the easiest ways to use light to separate a subject is to find a scene with interesting lights and shadows. This allows you to use the lighting of the scene to highlight the subject and block out distracting elements.

As you become more confident with the light, you can use it more subtly to bring out the most important elements of your subject and add mood to the scene.
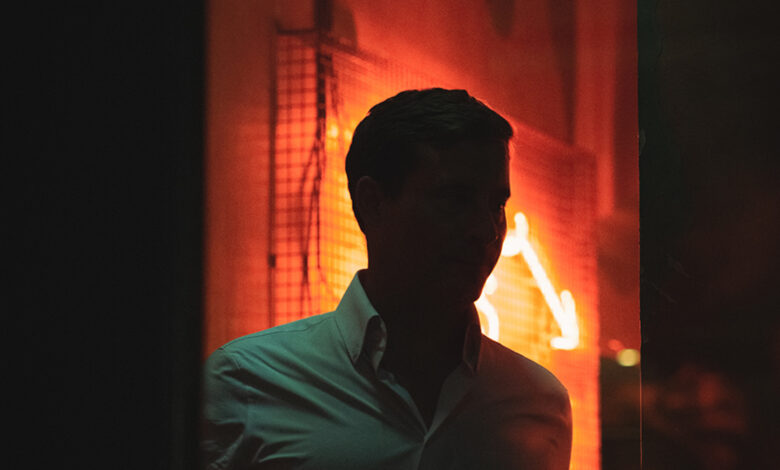
For example, the image below is based entirely on the neon sign behind the subject. This won’t work if there’s no reflection on the subject’s glass to the right of the frame. So I had to position myself to get this reflection and adjust the composition as the objects moved.

Enhance object definition with contrast
Contrast helps you separate your subject from elements in the frame that you can’t make a perceptible space. The most obvious use case for this is separating your subject from the background, and anything behind them in the frame can reduce the object’s clarity. Basically, contrast prevents your subject from blending into the background or other elements in the image.
Color and light contrast are the two most common techniques for achieving this, and they complement each other perfectly. With light contrast, you’re essentially using light and shadow to create separation between highlights and shadows.
In the image below, the neon sign creates a visual space around the subject, while the high-contrast scene allows me to enhance the clarity of the subject with a partial silhouette. Then, when editing, I was able to increase the contrast further by color grading to add shades of green to the neutral tones.

In parts of the frame with lower light contrast, color contrast is the perfect choice to add more definition to your subject. Likewise, if you are dealing with flat or direct sunlight, color contrast can help you create separation in difficult conditions.
Here is another original photo of me from one of the busiest streets in Kyoto, Japan. While it’s not a great picture, to my surprise I managed to capture one without any tourists in the frame. The photo wouldn’t even work without such a clear subject separation, mainly thanks to the strong color contrast.
The white makeup on her Geisha and her purple kimono create a perfect contrast in color with the green tones of the background.

Honestly, I wasn’t thinking about this when I took the picture; I was just trying to focus on the subject without anyone else getting into the frame.
Study process
For me, this learning process started as a coincidence. I happen to realize that a lot of my images don’t work because the subject is not clear enough or is separated in the frame. I wasn’t intentional enough with my placement, composition, and patience to get the right shot. So I started trying to separate my objects as much as possible and I no longer worry about other things like paths.
Are topics clearly defined and segregated? This has become a question that I often ask every time I review images.
First, I focused on getting enough space around the subjects in the frame. Next, I realized that poor lighting still caused layering in some photos, even when there was enough visible space, so I set out to work on this. Then I noticed weak contrast and unwanted color combinations that still ruined some of my images.
With enough practice, I got the separation I felt I needed. This gives me more time to think about other compositional techniques while shooting. I also found myself getting bored of taking the same photos with acceptable separation of subjects and starting to explore other creative ideas.
I started focusing more on details, removing elements from the frame and not showing the whole subject. Over time, I started experimenting with techniques to blur subjects, making them less visible but still retaining all the separation and definition of the subject that I did before.
Now, I’m asking myself another question: how much audience can I present while still creating an impactful image?
This is a much more satisfying question to ask creatively, but focusing on topic separation got me here faster.
Based on the basics of thread separation
Once you’ve mastered the separation of subjects with space, light, and contrast, you can use a variety of other techniques to combine.
For example, you can use layering to block elements in the frame and add depth to your image. You can also use frames to emphasize your subject and direct the viewer’s eye to the most important part of the image.
Going back to the fundamentals, perspective is a powerful compositional tool, and simply changing the position of your subject, yourself, or the angle of your shot can make a big difference. You will often hear the phrase “work in the field” and it is always worthwhile to experiment with different perspectives while doing this.
You can also experiment with depth of field, but always be careful not to rely too much on a shallow depth of field. Blurry, cluttered backgrounds are still a mess, especially if you have unwanted colors and shapes in the frame.
The list is long, but the bottom line is: focus on the core elements of subject separation (space, light, and contrast) and everything else will fall into place when you’re ready.
With a clear subject definition in every shot you take, other compositional techniques — like pathing and subframing — will have more of an impact. You’ll see what works and what doesn’t, because the lack of a clear theme is no longer an issue.
As a result, you’ll learn faster and take bigger steps towards mastering composition.