I’ve been using both standard and programmable shutter release cables for ages. With the built-in interval option in modern cameras, these remote cables have become almost obsolete. Just remember one setting when using the interval option: the length of the exposure.
As the name suggests, an interval setting allows you to take a shot at regular intervals. It’s quite straightforward. Set the interval time and the number of images you need. It’s as simple as that.
As an example, for a time-lapse sequence, you can use an interval of 5 seconds. Set the number of images to 1,000, and the camera will continue to shoot one image every 5 seconds until the target is reached. The event duration you capture is 5,000 seconds, which is 1 hour and 23 minutes.
Keep in mind, this is not the same as the time-lapse option on a camera, even though the interval images can be used for the same purpose. The time-lapse setting itself will produce a time-lapse movie in camera, while the interval setting is just a collection of separate images.
When the Exposure Time Exceeds the Interval Time
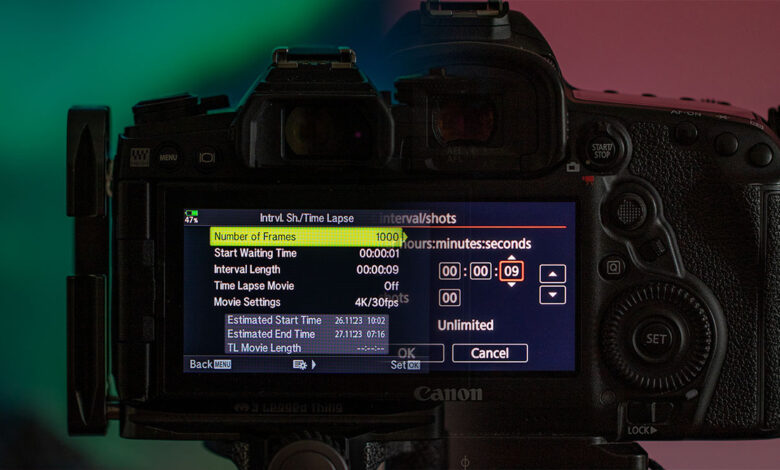
With most cameras, something odd happens when the required exposure time is longer than the interval time. Let’s say you’re taking 1,000 images with a 5-second interval. If your exposure time is 9 seconds, the number of images captured turns out to be less than 1,000.
This may seem strange, but it’s actually quite logical. The timer used for the interval and to trigger the shutter doesn’t account for the exposure time. It only sends a signal to release the shutter every 5 seconds. If the exposure time is 9 seconds, the signal for the next image is sent while the camera is still making the exposure. So nothing happens until that 9-second exposure has finished.
There are only 500 images taken because the interval timer counts the number of shutter trigger signals, not the actual shutter actuations during the interval period.
I mention a 9-second exposure in this example, not 10 seconds, because of the 1-second time needed between individual images. If you use a 10-second interval, the camera will send a second trigger signal at the same moment the 10-second exposure ends. In that case, you end up with approximately 332 images. This can significantly affect the length of your time-lapse movie.
Add the Exposure Time to Your Interval Settings
Confused by these numbers? Don’t be; it’s actually quite straightforward once you understand it. But you don’t need to do the math. Just make sure to add the exposure time to your interval. In the example with a desired 5-second interval and 9-second exposure time, use a 14-second interval. This way, the camera will trigger the shutter exactly 5 seconds after the previous exposure time has ended.
This is the only way to reach the desired 1000 images. Keep in mind, though, if these images are used for a time-lapse, the duration of the event captured will not be 1 hour and 23 minutes. With a 14-second interval, you’ll need to wait 14,000 seconds to get 1,000 images, or almost 4 hours.
In other words, you might want to reduce the number of images you want to capture for the event. I use PhotoPills as an easy way to calculate the interval needed for the event duration. Just input the interval and event duration numbers, and you get the number of images you need to set.
With Olympus cameras, it is not necessary to consider the exposure time when determining the appropriate interval time. This camera only starts counting for the interval again when the exposure time is finished. Still, if you need a certain number of images for the time-lapse, it might be wise to reduce the interval time with the exposure time in mind, keeping the event duration you plan to capture in mind.
Interval Settings for Star Trails
I use the interval setting also for capturing star trails. In this case, I need the interval to be as short as possible, which is 1 second on every camera I know of. Because the exposure time for startrails can be up to 30 seconds, you need to set the interval again at the exposure time plus 1 second. In the case of a 30-second exposure time, the interval needs to be 31 seconds. However, there is an easier way to set up the interval for startrails without needing to consider the exposure time.
Adding exposure time to the interval time for star trails is necessary if you also set the desired number of images in the interval menu. But this becomes unnecessary if you set the number of images to infinity. Often, this is achieved by setting the number of images to zero. In that case, the camera will continue to shoot images until you stop it manually, when the memory card runs out of space, or the battery runs empty.
For star trails, if you set the interval to one second, it doesn’t matter how long the exposure time is; the interval timer will continue to trigger the shutter every second, both during and between the exposure times. And it will continue to do so until you stop the interval manually.
Infinite Number of Images For Your Time-Lapse
Setting an infinite number of images in your interval timer can also be used for normal interval shooting. In this case, if the interval is more than one second, you will need to take the exposure time into account when it exceeds the interval duration. However, if the number of images is set to 0, it will continue to shoot until you stop the interval manually. Although you need to consider the exposure time, there is no need to calculate the number of images for a certain event duration and interval time. Just end the interval sequence manually when you’re done.
How do you use the interval timer yourself? If you have any practical additions to the way of usage I described, I invite you to mention them in the comments below.