Throughout the millennia of human existence, total solar eclipses have been the most spectacular and celebrated astronomical phenomena. As the blue skies faded, I suddenly decided to capture the 2024 eclipse on black and white film with my trusty Hasselblad 500 C/M.
Photographing a total solar eclipse is one of the top wishes of many photographers.
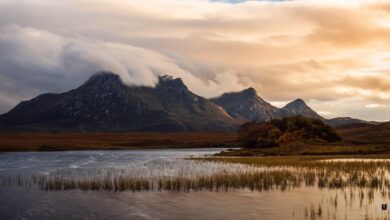
Back in 2017, when the world was pure and innocent, I was lucky enough to witness a total solar eclipse as this scene unfolded over the Appalachian Mountains. It did not disappoint.
Come 2024, I find myself in the southern United States, bordering the path of a total solar eclipse (about 95%). To be honest, I had no plans to photograph the eclipse this year.
You may think I’m cynical, but I’ve “been there and done that.” I have no desire to re-photograph the event.
However, my attitude immediately changed when messages from photographer friends (who assisted in the photo shoot) started to appear, showing off their camera setups as it got dark.
A switch was flipped. The muse sang. I was instantly inspired. There would be regret and gnashing of teeth if I didn’t try to capture the celestial tango of the sun and moon.
But how can we make things a little more interesting? How can we turn this year’s eclipse photography into a personal challenge?
I got what I needed: Alice.
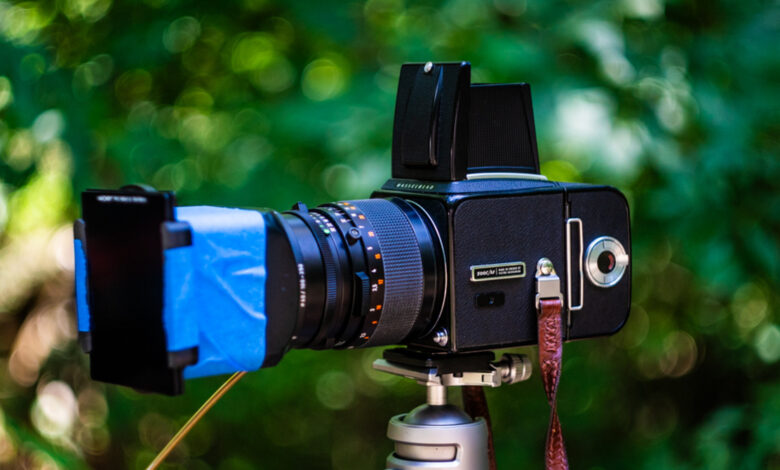
This time, I will try to capture the solar eclipse with the legendary Hasselblad 500 C/M camera.
If I want a challenge, I will definitely achieve it.
You will make your eyes pop out
Don’t play dumb with me, people. We all know that going out and staring at the sun is unhealthy.
So before I dive into the technical details of my Hasselblad eclipse gear, let me reiterate that taking eclipse photos, or any photos using a camera pointed at the sun, can be extremely dangerous to both your eyes and your gear.
Remember when I mentioned the last total solar eclipse I photographed in 2017? Well, I mostly shot it with a digital camera along with my 4×5 large format camera.
Despite my best efforts, I was still able to literally burn a hole into the frosted glass surface of the camera. I removed the filter for exposure, and in the brief 1–2 seconds before I could put the lens cap back on, the concentrated sunlight burned right into the glass.
Imagine the damage if I looked through the scope. Always respect the unforgiving power of the giant fireball in the sky.
Establish
This just goes to show you that where there’s a will there’s a way, and where there’s a way…some eccentric photographers will probably use that way to make things ten times harder than they need to be.
This entire camera system was formed and installed in about 20 minutes.
Always remember: it’s only crazy if it doesn’t work.
Camera
The heart of the setup is the camera. As I mentioned, I decided to use the Hasselblad 500 C/M.
For many, the Hasselblad 500 series needs no introduction. These cameras still hold a reputation as arguably the best medium format film photography systems ever produced. This reputation continues into the modern era with the introduction of Hasselblad digital medium format sensors.
Diane Arbus, Michael Kenna, Richard Avedon, Sid Avery, the list of legendary photographers who favored Hasselblad cameras is long.
Even Ansel Adams, long considered the most famous large-format photographer of all time, shot primarily on medium-format film with a Hasselblad 500 for much of his work in the last two decades of his life.
In our case, my Hasselblad 500 C/M was used in combination with a classic A12 film back. This will produce a 6 x 6 cm negative in a 1:1 square format.
Lens
The longest lens I own for my Hasselblad is the gorgeous Zeiss 150mm f/4 Sonnar.
Keep in mind that when you factor in the crop factor, the 35mm equivalent focal length of this 150mm lens is about 82mm. I prefer lenses with focal lengths above 300mm with this format.
Unfortunately, I don’t have an extension lens to increase the focal length, so I had no choice but to incorporate elements of the natural environment into the eclipse image.
This is something I probably would have done anyway. However, I would have liked to have at least gotten a close-up photo of the corona as the moon passed in front of the sun.
Any donations for the Tele-Tessar 500mm F/8 lens can be directed to my OnlyFans.
Filter
Any kind of solar photography revolves around using (haha) suitable filter. Filtering is necessary to not only protect your eyes and camera, but also to bring creative effects to the final photo.
I wanted to have a serene feel to these eclipse photos. On the day, some might even say I was leaning towards the moody side of things.
With the amount of cloud cover, I decided to base the filtering around #25 Red black white filter. The red filter will add contrast to the sky by helping to separate the clouds from the background. I also left the UV filter on.
Even though #25 Red provides about 3 stops of light reduction, it still doesn’t have the blur effect I need to safely compose in bright sunlight. To do that, we’ll need some neutral density (ND) filters, two ND filters to be exact. I used an ND1000 and an ND64 to provide the necessary protection for my camera and eyes.
Combining two ND filters with a red #25 filter provides a total reduction of about 19 stops.
This is where I ran into my first problem on our little Hasselblad eclipse adventure. You see, Hasselblad V-series lenses (like the Sonnar 150mm) have a bayonet attachment ring as opposed to the threaded, “screw-in” design found on most modern and vintage lenses. They look like this:
The #25 red filter is the native Bay 60 mount size and mounts directly to the front of the lens, but my ND filters are 100mm square. I would need to stack the ND filters on top of the red filter.
Overall, using these square filters alongside native Bay-mount filters on any V-series lens is no problem. I carry a 60 to 67mm Bay-mount adapter for this.
However, that adapter only works if you can find it. Unfortunately, when I needed it most, it was nowhere to be found.
Turns out I still had the adapter attached to a different filter. I still blame myself.
What should I do? It was getting dark. I knew I was running out of time. How could I get two completely different attachments to work together without an adapter?
When all else fails, glue it down
I had no doubt that a special seat had been reserved for me at a quiet corner table near the hellish restroom for the crime I had committed that day.
Yes, I glued the entire ND filter holder along with two ND filters directly to the lens.
Since this lens is a genuine Hasselblad product, it has an inner velvet coating, which greatly reduces light reflections caused by air gaps and innovative stacked filters.
With my camera and poor man’s filters ready, it was finally time to photograph the eclipse with the Hasselblad 500 C/M.
Additional information
It goes without saying, but this type of work requires a stable shooting platform, such as a tripod or the hood of a ’72 Buick. I opted for a tripod.
A cable release is also used. Camera shake is the thief of sharpness. Using a cable release allows the shutter to be triggered with minimal vibration from the shutter button itself.
Speaking of vibration, part of the so-called allure of the Hasselblad is the hypnotic “ka-thut” sound of the shutter. However, this incredibly satisfying aural event is completely misunderstood by the majority of photographers, even some who shoot with Hasselblads.
The physical shutter of the Hasselblad 500 C/M is not located in the camera body but in the lens. This shutter is called a “leaf shutter”.
When fired, the leaf shutter produces a barely audible “click” that causes virtually no camera shake. The legendary Hasselblad sound comes from a combination of the mirror slapping (this is an SLR, after all) and the rear “barn door.”
When the shutter is opened, the mirror will swing up at the same time the barn door opens.
Combined, the medium format mirror and the barn door create a relatively large concussive impact. This can cause surprisingly large amounts of image blur at slower shutter speeds depending on the weight of the lens used.
That’s where this little switch comes in handy. That’s right, the 500 C/M has a mirror lock function.
Once the shutter is wound, pressing the mirror lock switch will push the mirror up and open the front barn door before contacting the leaf shutter.
Making sure the mirror and shutter are up before shooting will eliminate the “slap” effect, thus reducing camera shake and robbing the photographer of the only joy they get from operating a camera like this.
Take a shot
It may sound counterintuitive, but the safest time to observe (or photograph) a total solar eclipse is during the few minutes at the peak of the event.
When the Moon is completely in front of the Sun, lens filters are no longer necessary because the brightness is greatly reduced. This makes metering for a real solar eclipse particularly difficult, especially when accounting for dynamics (cloud movement).
A red filter #25 will be applied to all exposures, reducing the light transmission by about 3 stops, as we stated earlier. Being a minimalist, I’m grateful that the filter factor is a whole number that my brain can digest.
Since I was shooting Ilford FP4 Plus 125 black and white film, I metered highlights on a patch of bright clouds at ISO 16 to compensate for the Red #25 filter. This gave me a base exposure of 1/350 second at f/11.
I would build any subsequent exposures based on this general calculation and compensate for the additional exposure time (to incorporate cloud movement) by zooming out the lens or adding/subtracting an ND filter.
To this end, conscious consideration was given to the potential filtering added by temporary cloud cover, which is inherently unquantifiable. All exposures were therefore adjusted “by feel” at the time of capture.
I shot a single roll of film with the Hasselblad during the eclipse; that’s 12 frames. All came out fine.
Here are some photos of the 2024 solar eclipse taken with Hasselblad 500 C/M film.
Although 12 shots were taken, some of the images looked identical and were discarded. As a rule, film photographers will take the risk and take multiple frames in case something goes wrong.
But why?
I hear you, I really do. Why go through all this trouble to just take a few eclipse photos? It could all be done so much easier, so much better — and so much more reliably — if I just took out Sony a7R III.
Even though Jeff Goldblum from Jurassic Park would disagree, I decided to shoot the eclipse with the Hasselblad 500 C/M not because I should, but because I could.
I enjoy experimentation. I crave the challenge of doing rough creative work.
There’s no denying that these photos could have been taken with my digital camera. However, I can say with certainty that I wouldn’t be that happy.
I really enjoyed shooting the eclipse on film this way. The photos look like something straight out of a Lynchian nightmare to me – in a good way.
I hope you enjoyed your trip with Alice and me. We would love to see any photos you took during last year’s eclipse or any others.
Just click the camera icon in the comments section to share your own photos of the stunning sun and moon scene.