Photographing your cityscape during blue hour is always a safe bet if you don’t get the spectacular light at sunrise or sunset. The deep blue sky provides the perfect color contrast with the incandescent lights in the city and will help you create a stunning result. But what if you get lucky with the light and the weather? Do you take photos while the colors pop in the sky or with the city lights during blue hour? Fortunately, you can get both by applying a technique called timing blending. In this article, I show you how.
I touched the blending time in one Articles about night photography. When I take pictures with the night sky, I use this technique to deal with the technical limitations of my camera equipment. I took the images for the foreground during the blue hour and the images for the stars at night. Then I combine them to create a noise-free image.
You can apply the same principle to create more impactful cityscape photos. Take photos during sunset to capture the colorful sky and leave the camera alone to take more photos after the city lights are on. In the morning, do this procedure in reverse order.
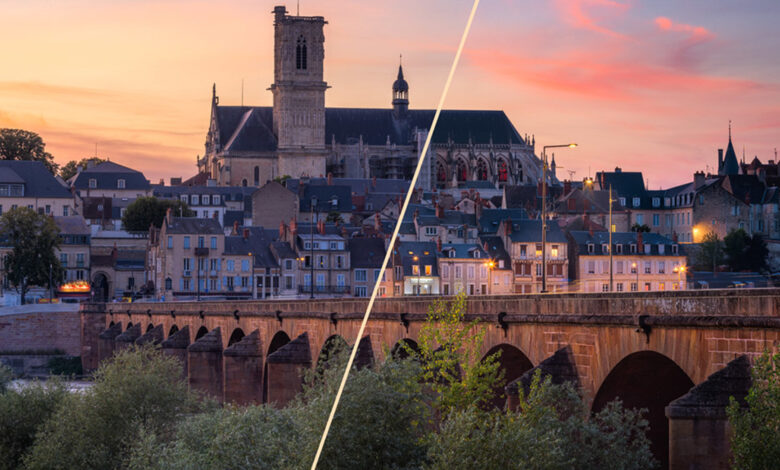
The Nevers image in France that I took a few weeks ago is an example. On the evening I took this photo, I had perfect conditions with a great distribution of clouds high in the sky. Beautiful bright lights right after sunset. By then, much of the city was still dark. Therefore, the resulting image is not interested in the center of the frame, which contains the main subject: the town of Nevers. It’s more about the light in the sky and the bridge in the foreground.
Compare it to the Nevers photo I took about 20 minutes later. The lights in the city and on the bridge dominate the scene while the faded colors in the sky detract from the appeal of the first photo. For me, both photos are compromises.
Time blends to the rescue
Wouldn’t it be great to show the best of both worlds in one image? The sky from the first photo definitely needs to make it into the final one. For the middle part, the city lights of the second photo add interest. What about the bridge? The warm evening light in the first photo gave it enough visual weight; no need to add to it with the blue and orange lights shown in the second image.
After determining what the ideal photo would look like, it’s time to put the pieces together. In the feature video I show how easy this is after some preparation:
-
In the field, use a sturdy tripod and hold the camera in place during time-blend sequence shots.
-
Take multiple photos while the light changes and adjust your exposure time to keep the brightness of those photos within a similar range.
-
Use exposure compensation if the dynamic range of the scene exceeds what your camera can capture in a single exposure.
-
Select the best shots of the sequence to blend and prepare them in Lightroom or the editing software of your choice. The goal is to make the brightness and tone of the image look the same. It may be necessary to change brightness, contrast and white balance to achieve this.
-
Open the image as layers in Photoshop and use Edit – Auto Align Layers to compensate for any deviations. Those things can happen even when you use a sturdy tripod. In order for time blending to work, you need perfect alignment.
-
Set a photo without the city lights as your background and place any photo with an artificial light source on top.
-
Set the layer blend mode of the top layers to Brighten and hide them by wearing a black mask.
Now, let your creativity run wild and do the blending. With the white brush, selectively highlight wherever you want to add visual weight to your photo.
For the Nevers photo, I used this technique to expose the city’s incandescent lights. However, I have limited the addition of lights along the bridge. They were too attention-grabbing. The result is a well-balanced photo that best represents the sunset and the blue hour.
More glow
Editing your ad doesn’t have to end with time blending. Once you’ve revealed the lights in the city, it’s easy to enhance them. One technique is to use dodge and burn:
-
Add an empty layer on top of the layer stack in Photoshop and set its mode to Soft light.
-
Set your primary color to bright orange or yellow. Don’t use oversaturated colors.
-
Choose a brush with a soft border and paint with an opacity of 10 to 30% in Soft light Class. Target areas with light sources and gradually add light.
A more complicated technique uses Camera coarse filter:
-
Make a flat copy of your current edit by pressing Ctrl / Cmd + Alt + Shift + Eor create one Smart object from visible layers.
-
In Camera coarse filter, you get access to all the tools you’re familiar with from Lightroom. Use Exposure, White balanceand negation Dehaze to creates a soft light.
-
Focus on the areas around the city lights and adjust the sliders to create a more dreamy look.
-
After applying your settings, add a black mask to this effect layer or, in case you work with Smart Objects, invert the filter mask.
-
As with the dodge and burn technique, use a soft, white brush and selectively reveal the effect by painting in the mask.
If this description sounds too abstract, watch the introductory video. There, I show how I applied the second technique to improve Nevers photos.
As with all photo editing techniques, it’s important to experiment. There is never a fixed formula. Each photo is a little different and therefore requires other adjustments. Once you start using the time blend feature, you’ll also know that it doesn’t work for every photo. In fact, in most of my cityscape shots, I like the sky from the blue hour. Especially if you have a lot of orange and yellow tones in the city area, you need something to balance them out, and the blue sky does just that.