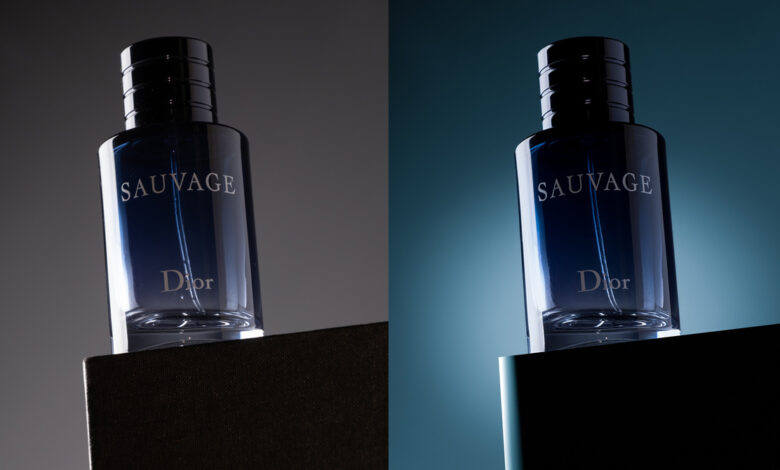
If you have limited resources to create your product images, is there a way you can make them stand out in post-production? In this step-by-step guide, we’ll walk through the editing process used to complete this image. There are different ways to edit images, and you will find your own workflow for that purpose. For this, I chose to edit via Lightroom and Photoshop because I felt the cleanup tools in Photoshop would be the best fit.
A simple setup
For this, the shaving water bottle is placed on a file storage box, lit from one side by a soft case with a fixed led light with a sheet of A4 white paper on the opposite side that reflects the light back towards the bottle. acts as a light. Since the background and surrounding room are black, I am not asking for any flags to help hold the edges of the bottle. I also use the flashlight from my cell phone to illuminate the writing on the front of the bottle, tilting it so it catches the writing but not in a way that creates any particular highlight.
the light
Once an image was selected in Lightroom, I right-clicked on it and selected Edit in Photoshop. At this point, I’m not adjusting the image in any way but preferring to do this until the end after all the editing has been completed.

photoshop
I regularly create a safe layer for all my edits so that if things don’t go the way I want, I can simply remove the layers and still have my original background layer. To create a copy of the background layer just go to Layer > New > Layer over copy or my preferred method is with the layer selected, press Ctrl+J (PC) Cmd+J (Mac) on your keyboard friend.

Duplicate Layer and Spot Healing Brush
There are many different ways to clean up images in Photoshop, and a combination of these can make all the difference to your image. On the duplicated layer, I started by zooming in by holding down the z key on my keyboard and left clicking while dragging the mouse to the right. Use spot fix for all smaller surface imperfections and some of the featured highlights cleaned up the image.

mixing brush
The blending brush is one of the tools I use quite often when working on smooth and reflective areas as it gives the required finish to these surfaces. In doing this, I either create another duplicated layer or work on an empty layer depending on what results I’m looking for.

To emphasize the reflected light, I slightly extended the sweep along the raised edges of the cap after shaving and then softened the characteristic highlights in the center of the cap shown below. For this edit, since it’s simply white light to black, I swept the blend brush from white to black.
Your settings via the blend brush options panel will vary greatly depending on the image you’re editing to get the results you want. If you are not familiar with the blending brush, you can find a more in-depth tutorial here.

Since we were trying to make the product look as good as possible, I needed to fix a bend in the delivery tube. To do this I used the Magic wand to select an area larger than I needed, then copy and paste Ctrl+J (PC) Cmd+J (mac) as this will create a new layer with the area you have selected.

From here, go to Edit > Transform > Warp and adjust the area until you’re happy with the result. You can add different anchor points to the vertical tool via the options bar, but this image is not required.

Now it’s time to create a more polished base for your product. Using the polygon noose tool, I drew around the base and closed the noose. A small ‘o’ will appear next to the mouse indicating that you are about to close the noose and make a selection.
Once selected, I picked the eyedropper tool and picked a color from the image that I wanted for the background layer. In this case, I picked the darkest blue from the bottle and then clicked ok in the pop-up. Then I create a new blank layer and select the paint bucket tool to fill the selected area, then Select > Deselect to break the selected area.

Slope
Adding a gradient to this new fill emphasizes the light coming from the left. First, I select the previously created fill layer with the magic wand and then create a new layer. Then use a gradient tool that applies a linear gradient to create a subtle effect.

After I was satisfied with the first gradient and while the selection was still active, I created another blank layer and added a second, shallower gradient to give a more natural looking fade from the light source. , then I adjusted the opacity of both layers until satisfied with the result.

The mask is not sharp
In Photoshop for this image, I added a de-sharp mask to sharpen the image. First, combine all the layers below into one layer by pressing Shift + Ctrl + Alt + E (PC) Shift + Cmd + Alt + E (Mac) Then I add a non-sharp mask to this layer . You can find the Unsharp Mask in the filter tab > Sharpen > Unsharp Mask. For this image I applied it globally but if you only want to add it to certain areas this can be done by adding a mask to the layer, typically a hidden mask all, then using a soft brush, paint white over the areas you want to sharpen.
Once done, I just clicked save, sending the image back to Lightroom for finishing touches.

Lightroom Mask
After going back to Lightroom, it’s time to do a simple background edit and hopefully give the image a nicer punch. Using the mask tools, I first selected the object and then inverted the selection so that the background was selected. However, the background selection mask also works with this image and gives clean results.

Change color
With the background selected, I simply picked a color from the color tab and applied it to the background. At first I chose a light warm orange that accentuated the blue of the bottle but then went back and changed it to the blue you see in the image below because I feel this matches the image better.

Intersection mask
The next step in the process is to create a subtle glow on the background color behind the bottle. To do this, I first created a radial gradient mask and then intersected it with the background allowing me to add adjustments here without them affecting the bottle.

Choose a theme
With the background now complete, the next step is to refine the product itself. Here I have created a new mask that selects the object ready to be refined.

Adjust the theme
With the subject selected, I made minimal adjustments to best fit the entire image, and in this case, only the temperature, contrast, blacks, and sharpness. The next step for me was to go back to Photoshop for a final edit, so again I right-clicked on the image and selected Edit in > Photoshop

Blur edges in Photoshop
I didn’t want hard edges from the newly created base in photoshop as it would be too prominent in the final image, so using the blur tool I softened them up a bit. To do this, I simply clicked on my start point, then held the shift key and clicked on my end point. This will draw a line from two points and works with many tool options in photoshop.

Complete
For the sake of finishing, I wanted to clean up any areas that I missed and in this case, the left edge of the bottle. To do this, I first select the polygon noose and draw around a clean area of the edge. Then I copied and pasted it in the area I wanted it to cover and with the free transform selected and adjusted it to fit the edges.
My personal favorite is the free converter for this type of editing as it allows you to use more available options to transform your selection. If you hold down the shift key when using the free transform and select one of the exact points, it allows you to individually move that handle away from the rest and behave similarly to anchor points.

Finished editing.


Inference
There are a lot of ways to edit images in Lightroom and Photoshop and I could still be in Lightroom to edit the whole thing but it will take a little longer due to the facility. How you edit your images is entirely up to you, and my advice is to gather all the information you can from a variety of sources and use the techniques that work best for your workflow.
If you’re fairly new to Lightroom and Photoshop, I hope you found this tutorial helpful and hopefully it shows you how you can make your images stand out when you’re limited in lighting and props. to take a photo.
You can find more photo editing and photography tutorials here on Fstoppers.