I’ve never been a fan of digital effects that simulate analog results. I’ve always thought that making a digital image look like it was shot on film was a bit of a scam. Can DxO FilmPack 7 change my mind?
Change my mindset
For the first half of my photography career, I shot film. But like most people, the second half was dominated by digital photography. While I still love analog photography, I love digital photography. The aesthetics of modern sensors and lenses appeal to me. The ability to take pictures that would have been impossible even a decade ago appeals to the smart guy in me. Plus, I find my cameras to be great in terms of ergonomics, build quality, and functionality. But I also love the look of film, the mechanics of a good film camera, and the whole chemistry.
However, I have never really understood the idea of making a digital print look like an analog print. I think it takes away the best of both approaches and creates a copy. Although I have tried adding grain, borders, and textures to my photos, it just doesn’t appeal to me. However, I know that this is subjective, and I am always one to challenge my own opinions.
So, to review this software, I took a step back from my preconceived notions. To start, I ignored the film names and treated the presets as a starting point for developing. I create presets as a starting point for developing photos in the various applications I use, so this will be no different. Plus, while I’m not trying to emulate film, I don’t always create clean, sharp images on purpose.
Preset range
One cannot help but notice that some digital cameras look like their film predecessors. Models such as OM System PEN Product Linethe Nikon ZfcAnd Fujifilm X Series could easily sit among the collection of vintage cameras on the top shelf above me and not look out of place. Of course, Fujifilm is famous for its film simulation programs and is favored by some for that reason. However, DxO FilmPack 7 has far more usable results than any digital camera you’ll find.
In the Presets section there are 58 negatives, 39 slides, 39 designs, 39 digitals, 6 cinema, plus 104 Time Machine presets, for a total of 285 presets. Time Machine is fascinating because it not only matches a build from various points in the past 200 years, but also provides a history lesson with each point.

I can’t claim to be an expert on every type of film ever made, but DxO has clearly done its homework and the results are widely accepted as accurate representations of the original film. When I compared it to images I know from film and paper, the results were true to form.
DxO FilmPack 7 in use
FilmPack 7 can be used as a standalone program or integrated into other software such as DxO PhotoLab, ON1 Photo Raw, Photoshop and Lightroom.
When used on its own, you start with a browser to navigate through your images. Double-clicking an image will open it into the film simulation preset; it can open raw files and apply presets to them.
Another cool feature is that on the left side of the screen it gives you a summary of the film, with the production date including whether it is still being made and a description of the film’s appearance. For example, it tells me that Fujifilm Astia 100 production stopped in 2010, is an older calibration than the 100F, has a finer grain, although the rendering is close. It has a softer look than Velvia but more vibrant colours than Provia.
Clicking on an image will open the preset. A banner will then appear at the top of the image indicating that automatic lens correction is being downloaded. Once the download is complete, the banner will tell you that FilmPack is ready to apply automatic optical and noise correction to the image; FilmPack uses the same unique DxO Precision Optical Module as DxO PhotoLab. Click OK to confirm that.
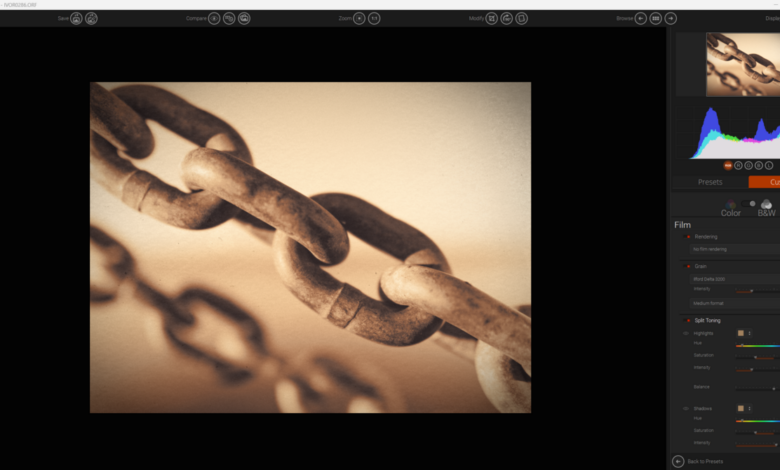
You can then select the desired preset in the Presets tab and make further adjustments by clicking the Customize tab.
The Customize tab has a variety of adjustment options divided into sections called palettes.
The Film palette allows you to simulate different types of film, add grain, and apply split tones. Below that is the Development palette. This palette has the usual color and tone adjustments you find in most raw development programs, and exposure masking.
Graphical Effects allows you to add frames, textures, and light leaks. Meanwhile, Lens Effects allows you to add color filters, textures, and blurs. Texture effects can be adjusted or randomized, so you don’t have to have the same pattern overlaid on every photo. I found applying textures to be the easiest of any program I tried.
Along the top are several grouped buttons: save and create presets; multiple comparison options; zoom and 1:1; crop, rotate, and straighten; browse and navigate; and display options.
One notable feature is the ability to add your own presets, so you can create a consistent look across multiple photos. One odd behavior that caught my eye is the level tool. To use this tool, you click and hold, then drag a line along the vertical or horizontal line you want to use as a level, rather than clicking on each end of the line.
Quick and simple
The software has a simple user interface that is easy to navigate.
Switching between modules is very fast, as is applying presets. When you switch to the Custom palette, the sliders are very smooth and I found that even moving them a long distance gave very subtle and pleasing results.
A couple of features I would like to see as a standalone program. First, it doesn’t support dual monitors; it would be nice to browse on one monitor and apply presets and adjustments on the other. It doesn’t have a database or create sidecar files, so raw adjustments aren’t saved automatically when you reopen a raw file. You can, however, save settings as presets and quickly apply them again later. Second, other than a luminance mask, there are no local adjustments.
Integration with DxO PhotoLab
The good news happens when you activate FilmPack 7 within DxO PhotoLab. FilmPack’s adjustments and effects are unlocked and then fully integrated within that program. All of FilmPack’s features appear under the various adjustment tabs within PhotoLab. Presets appear, along with their previews, when you click the Apply Presets button within PhotoLab. You can apply those settings and cycle through other adjustments within PhotoLab, working on a raw image. This integration adds a lot to the functionality of both programs, increasing their appeal.
This helpful video by Michael Wayne Plant provides a typical workflow in PhotoLab 7 with the FilmPack 7 extension enabled.
What I liked and what could be improved next time
What I like
- Simple to use.
- Works well as a plugin for Lightroom and other apps.
- Great as an extension for PhotoLab 7.
- Very accurate film simulation.
- The film archive is well researched and the show provides interesting historical information.
- The time machine is fascinating.
- Batch processing possible.
- This is a comprehensive raw processor.
- Convincing results.
- This technology is not keeping up with AI trends, so images will not be marked as AI on social media.
- Reasonable price for a quality raw file converter, no subscription fees.

What could be improved next time?
- As a standalone program, it lacks some standard features found in other software.
- This tool does not save the development process of each raw image, so the settings will not be remembered the next time you view the image unless they are saved as presets.
- No dual monitor option unless integrated with PhotoLab.
- No local adjustment.
- Limited number of shortcuts compared to other programs.

In short
Traditionally, I’ve been skeptical of film simulation as a digital effect, but now I get it. There’s a lot of fun to be had with it, and I find the results convincing. After starting out as a skeptic, I’ve become a convert. I’m still wary of fakes and digital images masquerading as film. However, if you adopt the mindset that presets are just turning an image into art and nothing more, there’s no difference between applying film simulation, doing a simple black and white conversion, or making any other rough adjustment. Plus, I can see some photographers needing a historical look in their images.
Although it can be used as a standalone program, FilmPack 7 also works as a plugin or extension for other programs.
Like other software from the DxO stable, FilmPack 7 is a solid application that delivers great results. It is designed to work best as a plugin for other applications, and is great when integrated into PhotoLab 7.
FilmPack 7 is available on the DxO website. There is a free trial and it can be purchased for the current sale price of $109, normally $139. Or you can upgrade for $59.