Are your handheld landscape shots never sharp? Do you have trouble choosing camera settings when you first start experimenting with handheld photography? I have five tips to help you maximize your success with handheld landscape photography.
I tend to do most of my landscape photography from a tripod. I like knowing I have a solid base to work from, especially for waterfalls or low-light scenes. I also appreciate that it makes me approach a scene more cautiously, as long as I don’t set up the tripod as soon as I get to the scene to shoot.
With that said, I also think that being familiar with good handheld technique is invaluable for a landscape photographer, even if you do 75% or more of your work from a tripod. I often carry a second camera body into the field as a backup camera, but I also use it while my main camera is on a tripod, waiting for the light to open. While I wait, I can handhold the second camera, look for smaller scenes where the light is falling, and often come away with some great shots.

This is also a useful skill for times when I want to travel light or maybe on a family trip, when I want to bring my camera but don’t want to carry too much luggage of a tripod. It’s even useful to not bring a tripod when I’m hiking long, strenuous or challenging, when I want to keep the weight down throughout the trip.
I have five tips for handheld landscape photography that will help you feel more confident shooting without a tripod and bring home sharper shots and images to add to your portfolio.
Shutter speed
A key Camera Settings to keep in mind when migrating from tripod for handheld is shutter speed. When we shoot from a tripod, we have a stable base and we can slow down the shutter speed, because the tripod provides the camera with a stable base.
As soon as we remove our camera from the tripod, our own movements are affected. People tend to sway or have difficulty keeping their bodies and hands still for any length of time; there are subtle movements, even breathing, that can cause instability that affects your image.
Therefore, you need to keep your shutter speed high enough to negate the effects of these subtle camera movements. A faster shutter speed will make it easier to freeze the motion and allow you to avoid blurry images due to hand-held shooting.
There are guidelines for your shutter speed to minimize camera shake issues. As with any guidelines, these are just suggested places to start. Some people will be more stable, or you will have people like me who drink too much coffee and know I need to compensate for that.
A general rule of thumb is to shoot at a shutter speed between 1x and 2x your focal length. For example, if you’re shooting at 30mm, your shutter speed should be between 1/30 and 1/60 of a second. If your focal length is 200mm, your shutter speed should be between 1/200 and 1/400 of a second. Generally, a safe place to start is around 1.5x your focal length and then adjust faster or slower from there.
Generally, wider focal lengths are a little more forgiving of slower shutter speeds than longer telephoto focal lengths. For this reason, I highly recommend getting a few lenses and practicing in your backyard to see where you fall within the guideline range. If you’re shooting wider scenes, a 1x guideline might be fine, but as you approach 150mm and beyond, you’ll need to aim for a 2x guideline. Practicing and learning this at home will give you more confidence when you’re out in the field that you’re choosing the right shutter speed.

ISO standards
If we increase the shutter speed to avoid the negative effects of camera shake, we know from the exposure triangle that we need to compensate by changing the aperture to let in more light or increasing the ISO. As landscape photographers, we are often concerned with depth of field, so decreasing the aperture is not ideal. That leaves us with adjusting the ISO.
Increasing the ISO will help counteract the faster shutter speeds we are using. Increasing the ISO amplifies the light hitting the sensor to help maintain proper exposure. Many photographers are reluctant to increase the ISO because we are used to always shooting at ISO 100 for the cleanest image. But a clean, blurry image doesn’t do that either.
Increasing ISO is not a big deal with modern camera sensors these days. I usually default to ISO 400 if I know I’ll be hand-holding the camera. Combined with advanced post-processing software that can reduce noise, higher ISOs aren’t something to be afraid of, especially if they allow you to get sharp images. Don’t be afraid to increase ISO to give your shutter speed a boost.
Anti-shake mode
Image stabilization, or vibration reduction in the Nikon world, will help you cheat the first trick involving shutter speed. Image stabilization can come in lens or camera body and helps stabilize the image through small adjustments in the lens elements or camera sensor to counteract camera shake. If you have the option to enable image stabilization on your camera or lens and are handheld, make sure it’s turned on – the difference is often significant.

Image stabilization is usually measured in stops. For example, let’s say you’ve determined that you need a shutter speed of 1/500 to avoid camera shake, and your camera or lens has 5 stops of image stabilization. In that case, you could take this photo at a shutter speed of 1/15 second and not experience the negative effects of camera shake.
Image stabilization is a great camera or lens feature to get used to if you’re shooting landscapes handheld. Practice in your backyard to see how far you can push it and still get a sharp image.
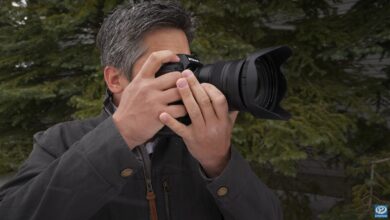
Hand holding technique
How you stand and hold your camera also plays a big part in how steady you keep your camera. Without a tripod, we are the stable base for our camera. There are different ways we can change the way we stand or hold our camera to help create a more stable base for our camera when we are shooting handheld.
When shooting handheld, make sure to stand and hold the camera as steady as possible. When standing, stand in a position that gives you stability. I like to tell people to stand so that if someone bumps into them, they won’t fall.

Keep your arms close to your sides, not outstretched. When possible, I recommend using the viewfinder rather than the back of the camera. This helps keep your arms closer to your body and gives you another point of contact like your forehead or eyes, adding an element of stability.
If possible, leaning against a tree can help reduce sway when standing or kneeling, and you can use rocks or logs to further prop up your camera. It may not be enough to place the camera on the log, but rather to prop your elbows on the log to get the composition you want. Each of these will help you create a stable base for your camera.
Capture mode
The last tip is to use continuous shooting mode when you are hand-holding your camera. Continuous shooting mode takes multiple photos with a single press of the shutter button. Sometimes when hand-holding your camera, the first press of the shutter button will cause a little camera shake, but with continuous shooting mode, you will take multiple photos with a single press. The first photo may be a little blurry, but the next one or two will likely be sharper and in focus.

Go Practice
Practicing these techniques in your backyard or at your local metro park will help you become more confident with your handheld landscape photography. While I don’t intend to shoot exclusively handheld, having the skills and practicing them will help you still get great shots when you decide to ditch the tripod!
What about you? Do you have any tips for handheld landscape photography? Let me know in the comments below!