There are many ways to make a photo interesting. Lighting, composition, and depth of field are obvious. Post-production is also part of the process, whether it’s done in camera or on a computer. Don’t forget to crop, this is an important part of the process.
A good photo is the result of a fairly lengthy process. It starts with choosing the right composition, focal length, and use of light and shadow. It often doesn’t end there, especially if you’re using a raw file format. Carefully considered processing transforms the raw sensor data into a compelling photo.
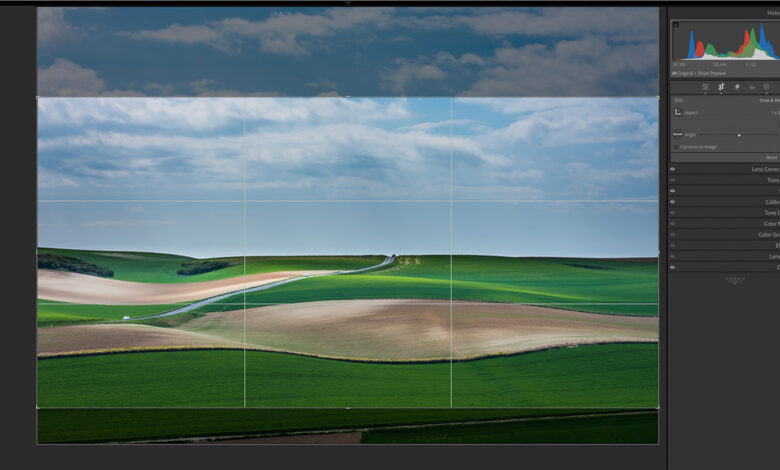
One of the steps in processing is cropping the image. This basically means you choose which parts of the image you want to remove. There are many reasons for cropping an image, which I will discuss in this article.
Cropping images is nothing new and certainly not something associated with digital photography. It is as old as photography itself and is part of the creative process done in the darkroom. A famous example is Photograph of Igor Stravinsky by Arnold Newman.
It is wise to make a deliberate decision about what to include in the frame when taking a photograph. It is part of composing a photograph. The example of Arnold Newman shows that a wider framing allows for a lot of flexibility in determining the final crop. In other cases, even a wider framing may be necessary. It prevents important elements from being lost in the frame when the canvas has to be transformed or rotated.
There is one thing to keep in mind when cropping an image, no matter what the reason. You will lose resolution.
1. Fix tilted horizon
Keeping your camera level is harder than you might think. Even the slightest bit of tilt will be noticeable when the final result is displayed on screen or in print. A tripod can help, but it can be difficult to get it just right.
Correcting a skewed horizon is easy in photo editing software. Rotate the canvas using a grid or use the built-in horizon correction tools in your favorite software. However, this will result in white space at the edges of the canvas. You will need to crop to remove this extra white space.
Many photo editing software offers automatic tools to correct a tilted horizon. This is a process that often involves cropping. You may not even realize that you have lost part of your image in the process.
2. Perspective correction
Wide-angle lenses have the disadvantage of perspective distortion. If you tilt the camera up or down while framing the shot, the vertical lines become diagonals leading to a vanishing point.
Perspective distortion can be corrected in post-production using transformation tools. While it corrects all perspective, it creates a lot of white space around the image. You will need to crop the image to remove the excess.
An alternative to controlling perspective is to hold the camera horizontally. The vertical lines will still be vertical, but you will have a centered horizon and a lot of unwanted foreground. Again, cropping is the solution to this problem.
3. Change the aspect ratio
There are photographers who still believe that the aspect ratio of a camera sensor should remain the same. However, there is no reason to keep the aspect ratio 3:2 or 4:3 if another ratio is a better choice.
Choose 5:4 or 1:1 aspect ratio if it gives a better composition or any other ratio that suits your needs. Or you can break the predefined aspect ratios and choose the one that works best for you. Personal preference plays a big role in this choice.
4. Create a panorama
Cropping the image to a panoramic aspect ratio is probably similar to the previous point. However, this is a good alternative for a true panorama that consists of multiple images.
Unless you need extremely high resolution, cropping a wide-angle landscape photo to a panoramic aspect ratio is a good option. You’ll usually still get enough resolution for general use and even large prints.
However, if even the widest angle lens doesn’t provide the field of view you want, a panorama consisting of multiple images is required. Since perspective correction is performed to merge the individual images, cropping is required to remove the white space surrounding the final result.
5. Eliminate turbulence
There are times when you don’t notice some distracting elements at the edge of the frame. This could be a bright spot that draws negative attention or something that doesn’t contribute anything to the composition.
This part can be removed in the post, maybe even by the help of AI-generated content. While this can be very convenient if the unwanted element is in the center of the frame, it is much easier to use the crop function if the element is at the edge of the frame.
6. Improve the composition
Cropping is a great tool for improving the composition of your photo. Most of the time, composition is done while you are taking the photo, but it is often a good option to incorporate more into the frame. This way, you have the ability to fine-tune the composition.
This photo is similar to Newman’s photo of Igor Stravinsky mentioned above and it also incorporates some of the other points I mentioned in this article.
7. Expand magnification
This is probably the most common reason to crop a photo. It allows you to simulate a longer focal length. This way, your subject will appear larger in the frame. The most obvious situations where this can be beneficial are wildlife and bird photography. But it’s not limited to that.
How much are you willing to cut?
Cropping will result in a lower resolution. You will end up removing part of the image. As mentioned, this is rarely an issue, especially with modern high-resolution cameras.
It’s easy to calculate the resolution you need after cropping. Think about the largest print you’ll need. If it’s A3, that’s 420mm x 297mm or 16.5″ x 11.7″. For a 300 dpi print, you’ll need 4,950 x 3,510 pixels, which is about 17 megapixels.
For A0 prints (1,189 x 841 mm or 46.8″ x 33.1″), 100 dpi is usually sufficient due to the optimal viewing distance. In that case, 4,680 pixels x 3,310 pixels is sufficient, which is within the 16 megapixel range.
Most cameras these days have a resolution of at least 20 megapixels. That means you have some room to crop without having to compromise. However, you have to be careful. If you crop too much to get the maximum magnification, as mentioned in point seven, you will likely end up with a low-resolution image.
However, it’s fine if you’re only using it for small print and social media. But it prevents you from creating large print.
Do you crop your photos and is that part of your workflow? How far are you willing to go? Let me know in the comments below.