There are many good reasons why monochrome photography is appealing. Let’s take a look at what makes a captivating black and white photo and what doesn’t. Also, why Nik 7 SilverEfex might be the best tool for converting color images.
This article has two halves. First, it gives a brief introduction to black and white photography. Then it reviews Nik Collection 7 SilverEfex, which I have long considered the best tool for black-and-white conversion.

Why should you create black and white photos?
You often hear people say black and white photography is timeless. That’s partly true, but there are two more important aspects that are almost always necessary for good photos.
Firstly, it reduces the elements of the image and the human mind finds simplicity more appealing. In other words, color can be distracting, and eliminating it helps us focus on how line, shape, form, space, and texture are affected by the direction and brightness of the light.
Second, thanks to that reduction, monochrome displays a unique and attractive scene in a way that we cannot see with the naked eye.
Objects of different colors do not stand out in Moochrome
It’s important to remember that objects that are obvious in color photos may not be noticeable in black and white photos. For example, complementary colors that stand out from each other may not do so when the photo is converted to monochrome. So in black and white, that red poppy can disappear in the green grass, the orange lifebuoy can be invisible in the clear blue water, and the yellow stamens of the iris The petals can disappear on purple petals.
See how much fainter the caterpillar’s nose becomes in the example after I removed the color.


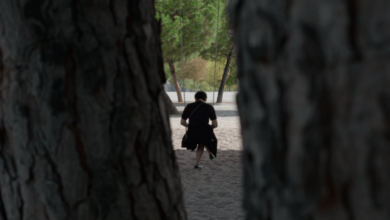
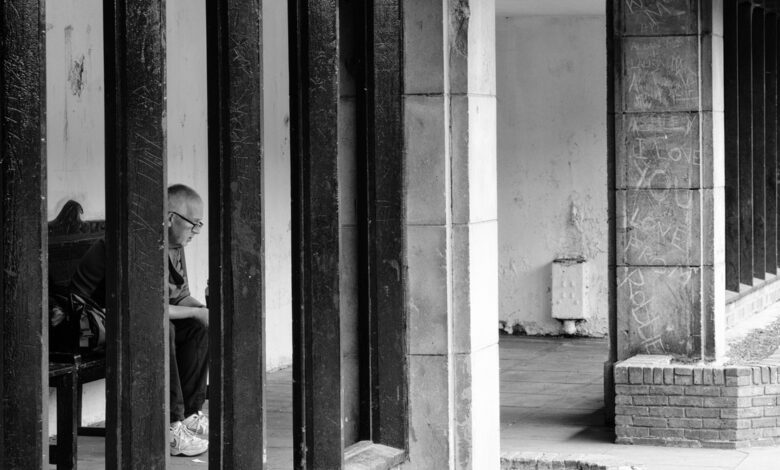
Instead, we’re looking for contrasting tones with bright areas on a dark background.
So we need to be able to imagine what a photo will look like when we take it or process it that way. That’s another advantage of shooting raw and using a mirrorless camera’s viewfinder to see the results before pressing the shutter button.

Avoid mushrooms
Many beginners complain that their black and white images appear as gray paste. That happens for two reasons. First, they haven’t realized that there needs to be tonal separation. Second – before you scream, I know this is an oversimplification of how it works – the camera at default settings will make an assessment of the scene and set the exposure accordingly. So, on average, the image is medium gray. Therefore, deep dark areas can be brightened or bright areas darkened by the camera.
That’s where an understanding of exposure compensation and histograms is invaluable. By increasing or decreasing the exposure, you can highlight important parts of the image. You can also lose detail in uninteresting or distracting areas by making them white or black.
Use the histogram to evaluate your exposure
The histogram is a simple chart that shows the number of pixels at different brightnesses. The higher the peak, the more pixels of that color tone. On the far left is black, then more shades of gray fade down the x-axis (along the bottom) until you reach white on the right. Although your camera may not display the numbers, each shade has a numerical value starting at 0 for black and 255 for pure white. (Sorry, EL James, for photographers, there are 256 shades of gray.) The histogram is viewable with any good camera and software.
If you don’t know how to change exposure, an easy way to demonstrate it is to set your camera to aperture priority mode. Then, press the +/- button and/or turn the appropriate dial to increase and decrease exposure. Watch the histogram move right and left, the image will get brighter and darker accordingly. Even for color photography, I change the exposure for most of my photos, which is why I only buy cameras with both thumb and index finger dials.
Perfect chart
I’m often asked what the perfect shape for a chart is. There is no exact answer to that. However, with black and white photos, I find it helpful to look for large peaks in the histogram, as opposed to a gentle bell curve. This means that the individual areas represented by those peaks will be separate from each other because they have significantly different brightness.
Set the camera to monochrome mode
Although I prefer to convert to black and white during the development and editing stages of my workflow, my camera also gives satisfactory results, as do many other brands, although not all. . Try it yourself to find out if you like the results.
On most cameras, the black-and-white conversion labeled monochrome is found alongside other image adjustments, alongside the natural, vivid, standard settings, and possibly some dedicated settings. for other cameras. Different cameras have their own names for this menu item: Picture Style (Canon), Picture Mode (OM System), Picture Control (Nikon), Photo Style (Lumix), and Picture Profiles (Sony). Fujifilm bucks the trend and monochrome can be found among Film Simulations.


Rough shot
If your camera is set to create JPEG images, all color data will be lost. But if you shoot in raw mode, all that information will be retained even if you set the camera to monochrome mode. This therefore gives you more scope to convert photos to black and white. Furthermore, if you prefer colored images, it’s still possible.

Use filters to lighten and darken colors
Although I have pointed out that the different colors are not distinguished between black and white, you can increase or decrease the brightness of each individual color. Traditionally this would be done using colored glass filters placed in front of the lens and some photographers still do this.
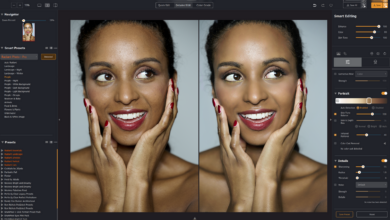
These filters lighten the tones of matched colors and darken their complementary colors. So an orange filter darkens a blue sky and brightens someone’s ginger hair. The red filter darkens green foliage and brightens the blemishes on someone’s face. Meanwhile, the green filter does the opposite and increases the brightness of the leaves, while making any spots and freckles on the face darker.

Use SilverEfex to process black and white images
Today, those filter adjustments can be made digitally during the editing process. This is where Nik SilverEfex comes into play. Look at the following photo of a mallard. See the effect on its head and feet by applying a red filter in SilverEfex on the left and green on the right. I’ve overscaled this image to illustrate the point.


Other adjustments in SilverEfex
Besides adding color filters to images in SilverEfex, you can make many other changes to different tone areas.
Besides the usual tone adjustments via whites (Amplify Whites), highlights, midtones, shadows and blacks (Amplify Blacks), brightness and contrast sliders affect the entire range. microtone, there’s also a Dynamic Brightness slider that does the same but preserves black and white points. You’ll also find a tone curve adjustment.
The texture slider controls the overall detail and texture in your image. This emphasizes small details, enhancing image sharpness and clarity. Meanwhile, Fine Structure is a more subtle adjustment that targets neutral tonal contrast and small details. It allows you to enhance delicate textures and complex elements in an image without adversely affecting the overall structure. Careful use of these features can yield great results, and I find they can be pushed much further than the clarity slider in Lightroom before the image looks too dirty.
The image below shows the Lightroom conversion on the left. This is how much I can increase clarity before the image becomes corrupted. On the right is the version created in SilverEfex. Even though I moved the texture sliders further than usual, there were no unwanted digital artifacts.


Usually, I only use global adjustments in Nik 7 SilverEfex, but sometimes local adjustments are also needed. Nik software does not apply masks like other programs. It uses what it calls a U-Spot to apply precise adjustments to different areas of the image. Instead of dealing with complicated selections, you click where you want to make adjustments and the software automatically creates a mask based on the initial color and tone of the selected area.
Point selections can be zoomed in or out using the square bracket keys on your keyboard. More recently, however, Nik software has become more powerful, allowing selection using control lines, ellipses, and polygons. Furthermore, it can now create luminosity masks.
If simulating the look and feel of film appeals to you, Nik 7 SilverEfex has a wide variety of old black and white film grains you can choose from. Additionally, creative finishing adjustments include adding borders and textures, blurring edges, and adding tones to images. It also has a large number of presets that you can apply to create a great starting point for your edits.
Nik 7 SilverEfex usually works as a plugin but can be used as a standalone program. However, it’s not a raw development tool but a photo editor, and I found it worked seamlessly with DxO PhotoLab, Lightroom, On1 Photo Raw, and other apps.

What I liked and what could be improved next time
What I like
- Outstanding results.
- Adjusting the tone of the original color is less likely to cause unwanted artifacts than other software, even during rough development.
- Works as a plugin for most other editing tools.
- Relatively easy to learn how to use.
- Accurate representation of various movies.
- U Point technology works extremely well once you learn how to use it.
- In the latest versions, local adjustments are also available on the side panel. Historically, they were just small sliders with initials in the pop-up menu next to the control points. Although they still exist, I’ve always found them difficult to use, and the sliders on the side panel are much easier to use.
- At $159 or $89 for an upgrade, the Nik Collection is relatively affordable.
- There is no registration and there are three easy payment options.
- The Nik collection has a lot of other tools besides SilverEfex.
- Stable software.

What can be improved next time?
- I like the accuracy of the U-Point selection method, but I’ve seen people asking for AI masks in the Nik collection. However, no AI masking tool is perfect yet.
- I would be happy to see the option for pop-up menus next to control points disabled since I only use the premium side panel.

In short
SilverEfex has long been my favorite black and white conversion software, even back before Google bought and abandoned it. Acquiring DxO was the best thing that could have happened and they did a great job growing it. I found the files it produced to be clean and to my liking. I can push the conversion further than Lightroom without creating weird artifacts or making the image look washed out.