Have you ever wanted use Photoshop to change the original color of an object to a new color? Or just adjust the color of a specific color range to make the image a bit more balanced and interesting.
In this article, we cover the best ways to change the color in Photoshop of any object or your entire image. I’ll give you an example of when to use the tools in your photos.
Get 12 Free Photoshop Actions for Photographers
1. How to Change the Color Using a Hue/Saturation Adjustment Layer
Step 1: Select and create a layer mask of the object you want to change color
If you don’t want to change all the same colors in the image you need to make a selection first and then apply a layer mask to the HSL layer you will create just below

You can use the Object Selection tool or the Quick Selection tool for this. However, you can use any selection tool to select object if you want to limit the color substitution to a specific area.
With the selection active, you can move on to the next step.
Step 2: Add a Hue/Saturation Adjustment Layer
Create a new hue/saturation adjustment layer. If you made a selection of the object in step 1, a layer mask will be applied as you add adjustment layers, restricting the adjustments to only the masked area.
Step 3: Change colors with Hue Slider
In the hue/saturation adjustment layer properties panel, you can use the Hue slider to change the color of the object. If you didn’t make any masks or selections in step one, then you change the hue and saturation for the entire image.
You can limit colors to affect only specific ranges of colors. Use the Eyeropper tool, next to the text “Master” and click on the color you want to change. By dragging right or left, you change the saturation of that range (i.e. blue/red/green/magenta/cyan.)

After selecting a color with the Eyeropper tool or by clicking the drop-down menu that says “Master”, you can adjust the color slider to change the color.

When done, you can close the dialog box. You can also re-adjust the colors by finding the HSL Adjustment Layer in the Layers panel.
One of the good things about using a hue/saturation layer is that it affects multiple layers. The Color Replace tool only works on the active layer.
+80 Photoshop manipulation because the
NATURE PHOTOGRAPHY
Photoshop’s Color Replace tool, which allows Photoshop to replace or change the color of an object into something completely different. It is probably the easiest tool to use for changing colors in Photoshop.
Step 1: Duplicate the Image Layer in the Layers Panel
The Color Replace tool can destroy and damage the original image layer.
To use the non-destructive method, you need Duplicate the background layer by pressing Cmd / Ctrl + J. This will add a copy of your background layer in the layers panel, this is the copy that is affected when we replace the colors.

Step 2: Open the Color Replace Tool
Go Image > Adjustments > Replace Color.

Here you can select the swatch you want to replace using the eyedropper/box. You can add multiple swatches by using eyeropper + (the selector with the plus sign).
You can remove any unwanted swatches by using the Eyeropper tool – (the color picker with the minus sign).
If you’re adding to a color selection, highlighting localized clusters of colors will make the selection more precise as it won’t pick out stray colors, but only select colors that are similar in your image.
The blur slider expands or narrows the selection by making it more general or more specific. It basically increases the tolerance of selected swatches.
Once you’ve selected the color you want, you can simply change the hue, saturation, and density sliders at the bottom of the Replace Color menu screen to change the color.

Click OK to let Photoshop replace the colors.
As with the other methods, you can press the button to add a layer mask and mask out the areas that you don’t want to affect. Cover the areas that will show the original photo.
3. Change the color using the color replacement brush
The color replacement brush is very well hidden in the brush settings. However, it is an amazing tool to help you change colors in Photoshop.
Step 1: Create a clone layer
With the Color Replacement Brush, you also paint directly on the layer, destroying the original image layer.

Step 2: Activate the Color Replacement Brush tool and Change Color Mode
Select Alternate Color Brush and go to the Options bar. Find the Mode drop-down menu and select Color.


Next to the Mode drop-down menu, you can change the color sampling method if you want. The default is continuous and it works pretty well and samples a similar range of colors below the diagonal while brushing.
Step 3: Choose target color
Click on the foreground color, to open the color picker dialog and adjust it to the color you want.

Step 4: Paint on the colors you want to change
Start scanning for the colors you want to change in your photo. Photoshop will change the colors that match those under the crosshairs around the brush.
The actual painting technique is similar to using the regular Brush tool, although you want to make sure that the crosshairs stay on all areas of the image that you want to recolor.
As you brush, the color will change to the same color as the foreground color, not changing the details but only the colors under the crosshairs.

Lightroom Preset Package:
Necessary things
$ 19.00
4. Change the color using Blend Modes
The next method to change colors in Photoshop that we cover is to use the Hue blend mode.
Step 1: Create a new layer
Click New class at the bottom of the Layers Panel.

Step 2: Change the blending mode
Change the new layer’s blend mode to Hue. You can also use color blend modes. However, if you want to keep both the saturation level and the brightness values of the object, then use the Hue blend mode.

Step 3: Brush again to replace the color
Select Brush and start brushing over the object where you want to apply the new color.
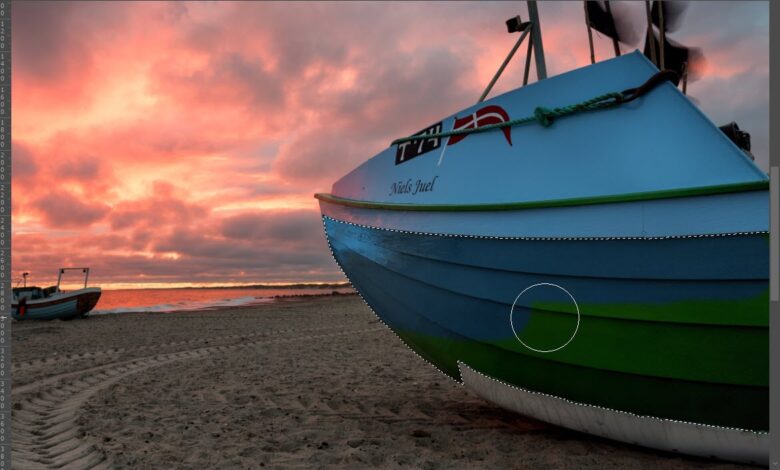
You may want to combine this method with some selection or masking tools to ensure that you only affect the specific object and not other areas of the photo.
In our example, we only want to affect part of the boat.

5. Change the color using a fill layer
You can also change the color of objects in your image using a fill layer.
Step 1: Create a fill layer
Select New Fill Layer from the bottom of the Layers panel. Set the color of the layer (i.e. blue), to your target color. Make sure the fill layer is on top of your pixel layer.

Step 2: Change the blending mode
Next, change the blend mode to color. This will colorize your entire image, but don’t worry, we’ll fix that.


Step 3: Create a black layer mask
Hold down Option/Alt while using the left mouse button to click the Add Layer Mask button. This will add a layer mask of black, hiding all fill layers.

Step 4: Paint color
Use a brush on the mask (paint white), and paint it with the new color you want in your image.

Alternative Methods in Photoshop
Photoshop has a lot of different ways to get things done. You can also use the Gradient Map tool, Color Channels, or Adjust Color Balance, to name a few alternative methods in Photoshop.
However, I prefer to use the hue/saturation adjustment or blend mode approach, as they are fairly straightforward and provide great control over the photo editing process in Photoshop.
Epilogue
With the wide range of tools in Adobe Photoshop for changing colors, you can achieve anything and get professional results. However, if you can get a realistic result also depends on your photograph and the amount of effort you put into the whole process.
How do you change colors in Photoshop? What’s your favorite Photoshop tool for this task? Do you prefer the hue and saturation approach or a completely different approach to adjusting the colors in your images? Let us know in the comments below!
Hey, I’m Peter. I am the owner and editor of Photography-RAW. I guarantee that you will get the best articles on photography. Personally, I prefer landscape, nature and macro photography.
I hope you like the site