One of the first pieces of equipment I bought for my office when I started with photography, aside from a proper monitor, a calibration device. Editing photos with accurate color and brightness has always been a priority for me. And the use of a colorimeter and screen calibration software is a requirement to get there. In this article, I explain how to use such a calibration system.
Without a calibrated monitor, handling color and contrast during photo editing is nothing more than guesswork. Especially if you license and print your photos, it won’t be out of question that you need to have exact colors. And while you can never be sure that your image will look the same on other people’s screens, that’s beyond your control. A calibrated monitor still gives you the right base for photo editing and will make the colors in your photos look good on most screens and in print.
Calibration system available
There are different systems available to calibrate your monitor. The most popular options come from Calibrite and Datacolor, and you can achieve precise calibration with instruments from both brands. In the featured video, I walk you through the calibration process using Calibrite ColorChecker Display Pro with iProfiler Software from X-Rite – now known as ccProfiler from Calibrite. If you own a Spyder from Datacolor and using their software, the process should be similar. In addition, there is also open source software available called DisplayCalworks with colorimeter of both Calibrite and Datacolor.
Prerequisites
With links to equipment and software, let’s quickly talk about other prerequisites. First of all, you also need a good monitor capable of displaying a large enough color space. Otherwise, the calibration software will not be able to create a suitable profile. At the very least, you should have a monitor that can display colors of the sRGB color space. For most use cases, this should be enough. It’s the standard for the web and even many print labs that use sRGB. But since wide color gamut monitors have become much more affordable in recent years, you should consider such a monitor, if you plan to do a lot of photo editing. When my 10 year old EIZO monitor finally breaks down, I will definitely upgrade to a wide color gamut monitor.
But even for monitors with a sufficiently large color gamut, there are significant differences when it comes to color accuracy and consistency. For laptop screen Check the notebook is a good source for information on the quality of used monitors. For external display, German site Prad has excellent tests covering everything you need to know to make an informed buying decision. If you open Prad in Chrome, the automatic translation into the English language works pretty well.
Assuming you have a good monitor, colorimeter, and calibration software, you need to do two more things before starting any calibration: Give your monitor a few minutes to warm up and turn off any options. choose which auto exposure compensation is in your system and leave it has stopped working.
Quick Monitor Calibration Guide
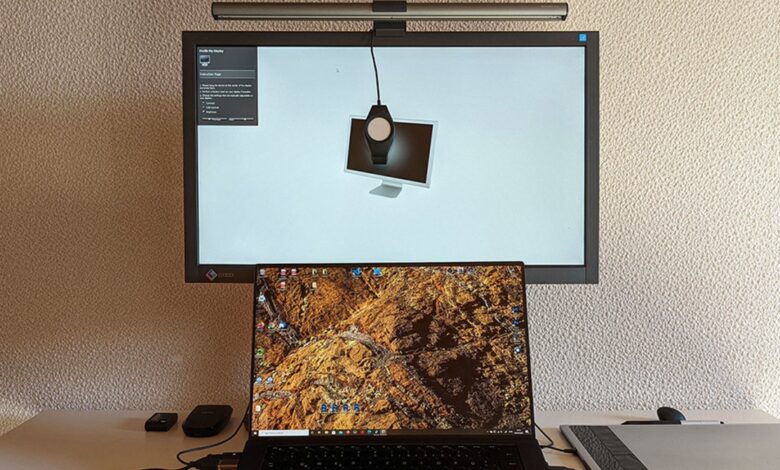
I quite understand that not everyone wants to dive deep and watch my 27-minute video on monitor calibration. That’s why I also provided a quick guide. In the screenshot above you see the configuration settings that I made for the calibration in the iProfiler software. Similar settings are available in DisplayCAL and in software from Datacolor. For most use cases, you only need to worry about technology type, white point, and brightness. All other settings will remain at their default values.
If you don’t know what technology your monitor uses, please overview of display technology can help you find out. The most common settings are white LED, RGB LED, CCFL, and CCFL wide color gamut. As white point, 6,500 Kelvin will be the right choice for photographers. In the iProfiler software, it is selected via the CIE Illuminant D65 setting. And for brightness, you should choose a value between 100 and 120 depending on the brightness of your editing environment. That is if you work in a room with normal lighting, not too dark.
In general, I wouldn’t recommend editing in a dark room. We’re no longer developing movies, we’re doing digital editing, and I personally like to keep my eyes fresh. But by all means, if you like dark rooms for editing, adjust the brightness accordingly. You’ll want to go lower than 100 to avoid all of your images ending up too dark.
Also, avoid any direct light other than the light of the monitor in your direct field of view. For me, soft light from a large window works well during the day. In the afternoon I will add some fill light through BenQ ScreenBar Plus. A dimmable day light can also be a good investment to keep the proper brightness in the room.
Once you’ve called everything, it might also be helpful to use the app named Light meter Lux to check the ambient light in the room as you edit. While it’s not 100% accurate, it can help you notice changes in your lighting environment so you can compensate for it by adjusting the lights in the room.
Ultimate Monitor Calibration Guide
If you want to know more about the different settings and how to make sure the monitor is properly calibrated over time, follow me as I calibrate my EIZO monitor in the feature video. In this detailed guide, I walk you through the entire process and explain every setting I make. In addition, I provide tips on how to set up your work environment and how to test your color profile. The last part is especially important as there will normally be some variation in the way a monitor displays color and brightness over time and regular testing and possibly recalibration is necessary.
What is your screen preparation method? Share in the comments section below.