Every toddler has a first phobia. For me, it’s dinosaurs. For others, trains, elephants, monkeys, solar system, bugs. For my son, it’s the sharks. He is a lunatic who has a deep love for sharks. So naturally, as a photographer, I started thinking of ways to document this important period in his childhood. Through each of these “photography projects,” I use the creative process and ultimately develop my photography skills.
Here’s what happened this time and how you can do similar creative shots.
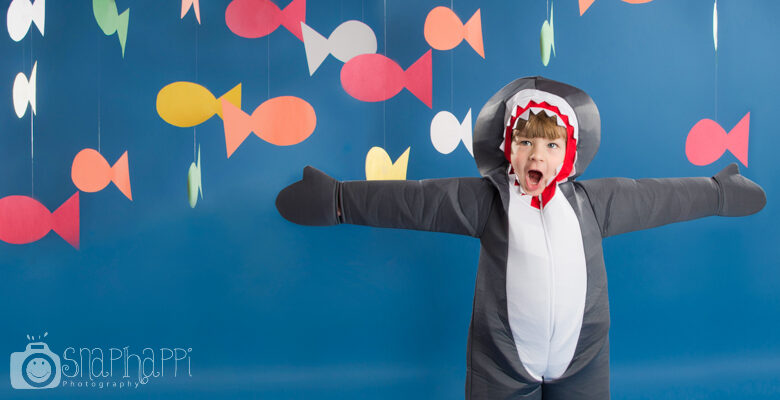
At some point it hit me! The $65 shark costume that my husband and I bought him for Halloween this year is going to be the perfect prop – especially since he hand picked it. I love shooting with personal props. From that point on, I could see the footage in my head. And this is my first time trying build a shot from such a particular pre-visualization. If you haven’t tried doing this yet, I definitely recommend it. Not only was it fun, it pushed me outside of my comfort zone – never a bad thing.
Prepare
I have a headache over the shade of Savage Seamless paper to choose. I knew I needed the blue Savage Seamless and ended up ordering a sampler. But in an attempt to save a few bucks, I bought a 53-inch instead of a 107-inch. This proved to be a time-consuming mistake – more on that later. I spent a few days cutting fish, too much fish (oopsie). It took me several hours to hang them from the ceiling. I was thinking of gluing them to the drop to eliminate problems with shadows, but I see him standing in the middle of the fish, not in front of the fish stuck in the background. So I put them together and started thinking about lighting.
Light
My main concern with lighting is the fish throwing shadows in the background. My first thought was to have the main light shine to the side and the front light at a 45-degree angle. This has the effect of removing the shadows, but it has the undesirable effect of making some fish look flat against the background – exactly which I try to avoid by hanging fish instead of gluing them to the background. Check out how the fish looks here:

Because edge lights can separate the subject from the background, I thought I would create that with my fish. My instinct is that the light shot from the back will both eliminate shadow issues and create some depth. But there are a few challenges. First, I don’t have the best modifier to control the lighting for something like this. To properly disperse and control the light, the best modifiers would be the large strip boxes on either side of the drop. Instead, I used what I had – two reflector discs. Not ideal. I placed them on either side of the background, about 5 feet high, facing the center and slightly down. I used a 47 inch octabox for the immediate photo as my main light.

And here’s my test shot, with the shark costume hanging from a light stand, about the same height as my toddler. Note the tiny lights around the edges of the fish and the edges of the dress.

This is a close-up shot of one of the fishes, so you can really see the small outline of light. That little rim makes all the difference to add size.

Now the darkness is no longer a problem and fish still retain their depth, as opposed to looking at the background. The second issue I can see is that the setup would be unforgiving for a toddler. I tend to have a little flat lighting for kids this age, because you never know where they’ll roam, and you generally want the light to look good no matter where they roam. So I put a mark on the floor for him to stand, and hope for the best. I’m willing to accept some unwanted shadows as he moves out of position, in exchange for the depth added by the rim light.
Result
I adore the results I got from this shoot, but I made some mistakes that kept me working for hours in Photoshop. Remember that option to buy seamlessly is less expensive? I had to do a lot of patching around the edges of the photo – a painful process that not even MCP Actions can help with. So trust yourself with decisions like these. I know that drop is a bad idea… I wish I would listen.
So after some tough Photoshop, this picture:

Become this photo:

The second problem is that I don’t intend to let him sit. The fishes are hung according to his height when standing. And my little shark decided to sit down with his books. It was cute and I kept shooting, even though I knew most of the fish were too tall for how I wanted to compose the shot. This leaves me with some seemingly uneven compositions. I had to crop a large portion of the background in Photoshop and move the fish down to the empty space.
So again, after some controversy in Photoshop, this picture:

Become this photo:

The easy part of the posting process was that after cutting and patching, I used Baby Steps Pick Me Up (Pop) for a slightly more vibrant color.
Working with this footage was so much fun and it pushed me to develop more to solve problems. Conceptualizing the shoot adds another impetus to the process. So the next time you have a confusing idea about a shoot, give it a try. First, let’s start the creative process. You might learn some new tricks and you might like the results.
Aubrie Wancata owns Snaphappi Photography and she specializes in capturing the joys of childhood through custom portrait photography. She provides newborn, toddler, and child photography services to families in Cleveland, Ohio. You can see her work at www.snaphappiphotography.com and on Facebook.