I wrote two articles on focus feature here. The first post covers how I use autofocus marketing in this area, and in the second post, I shared focus stacking workflow in Helicon Focus. To give you even more tools, I now show you how I combine focus stacking with exposure blending.
In Field Workflow
I have to do this often because in addition to capturing everything from the foreground to the background as sharp as possible, I want to show the full full dynamic range that a scene has. And for many scenes, it’s impossible to capture it with a single exposure.
The Canon R5 I can usually capture the foreground and mid-ground dynamic range of my landscape shots in one image without much of a problem. But for the background, multiple exposures are often still needed.
Unfortunately, the R5 and other modern cameras do not yet allow for a combination of autofocus and exposure. So my workflow, which I show in the video above, is as follows:
-
I take a series of images that are focused at different points in the scene using the Canon R5’s autofocus feature, which many other modern cameras include, or I can manually change the focus. work for a series of images.
-
I focused on the horizon and shot three different exposures, two stops apart, to capture the full dynamic range. This is usually sufficient to achieve a clean mixing result in post-processing.
The above order can be switched, depending on the scene. For example, you can capture a glorious sunset, where you want to first capture what is happening in the sky and then focus.
I’ll also adjust the workflow if I need multiple exposures for other parts of the scene. If that’s the case, I don’t use bracketing autofocus. Instead, I manually focus and keep the exposure active.
Photo editing process
At the end of the video above, I show my old focus stacking workflow in Photoshop. But for a few weeks now I focus on Helicon Focus, it is faster and gives me better results. But how can I incorporate exposure matching into this new workflow?
Helicon Focus does not support exposure blending, as it was not designed for it. So I still need Photoshop for this part. In Lightroom, I first apply my typical coarse adjustments to a single photo and then synchronize the settings across all the stacked and in-frame images. Then I tried to balance the brightness in the three different exposures so that the shadows and highlights looked similar to the other photos in the series. It makes blending much simpler as I show in the featured video.
Blending Exposures in Photoshop
Next, it’s time to blend the exposure for the background. I selected three pictures, right clicked on one of them and went to Edit In – Open as Layer in Photoshop, where I use a mixture of standard masks and if needed, luminosity mask to perform exposure blending.
Then I flattened the three layers down to one and saved the result. Since I opened the photo directly from Lightroom, the saved photo will automatically appear in Lightroom.
If you don’t want to use Photoshop, you can also try Lightroom’s HDR feature. For architecture and cityscape photos, it can work quite well. But beware: I’ve noticed that combining HDR in Lightroom can produce artifacts at high-contrast edges. If I try to extract all the details there, sometimes I notice aliasing. On the other hand, in Photoshop, I have more control over such areas, that’s why I like to do the blending there.
Combining Focus Stacking and Exposure Blending
Now, it’s time to stack. Helicon Focus allows me to do stacking on both DNG and TIFF files. Since I saved the blend image as a TIFF, I also had to do the stacking with the TIFF files. That’s different from the DNG workflow, which I covered in my last Helicon Focus article.
I load the exposure compound image and the shots taken with different focus into Helicon Focus by right clicking on one of them and then selecting Export – Helicon Focus (TIFF). Inside Helicon Focus, I usually use Method B to superimpose pictures by clicking Rendering. You can see my access settings in the screenshot below.
Once the render is complete, I do a manual edit, which is very important. Here, I combine the result of exposure blending with the result of the superposition.
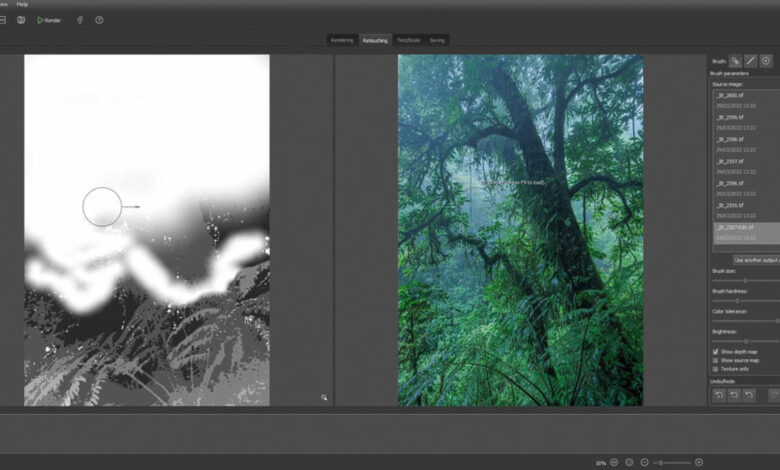
The algorithm chose which areas to end up in the final blend based on the detail and sharpness of the image, and it probably used parts of the image that were blended during the stacking process. Now I can paint in the additional areas I want in the final image. The retouch brush makes this very easy by providing a preview and smoothing the blend as I paint.
When I do a manual blend, I look for a transition between the middle background and the background. After I found it, I filled in the rest. Here, it can be useful to toggle the depth map display. It shows how the images of the series are merged using distinct shades of gray. When it worked, I was able to find where to look for transitions and what areas of the background I might have missed in my painting.
End of touches
When I’m satisfied with the results, I go to Save , save the image, close Helicon Focus and switch back to Lightroom, which will automatically re-import the photo. Now I can apply additional settings in Lightroom or reopen the image in Photoshop where I want to apply some finishing touches.
Then the final step is to prepare the image for the web. Here, I have one more tip for you: Use Web Sharpener by Andreas Resch. This is a free plugin for Photoshop and it ensures that your photos will look great at your targeted web resolution. After spending a lot of time on blending and stacking, we don’t want to lose the details in the finishing line now.