The Nikon Z 9 is designed for speed. These are the first customizations that I chose to make me even faster.
I am an impatient person. Not only do I want things to be exactly how I want them to, but I also want them to happen that way as quickly as possible and with as little fuss as possible. While this may be a flaw in one’s character, it is still such a fundamental feature of my personality that I find it unlikely to change anytime soon. Predictably, the desire to get from point A to point Z as quickly as possible permeates my work as a photographer and videographer. In a profession where there are almost always 1,001 different ways to get to the same destination, I almost always choose the most efficient route.
The reason why Nikon Z 9 was the camera that finally allowed me to confidently switch to mirrorless not because of the headline specs, but because of the efficiency. As they say, a camera is a tool. The only reason to exist is to allow me to turn the creative ideas in my head into real-world art. It is a necessary part of the process, but it is not the same as the artistic process itself. Therefore, what I want my camera to do becomes invisible. I wanted a camera that did its job quickly and efficiently while still allowing my mind to focus 100% on the art without the technology.
One development that seems to correspond with the rise of mirrorless cameras is the sudden importance of custom function buttons. It’s not that these things didn’t exist before. It’s just that I never paid much attention to them before I broke into the various mirrorless bodies. One would think that my love of efficiency would make me more inclined to adapt to a lot of custom settings. Logically, this makes sense. But, since another trait of my personality is my complete inability to memorize fingers for more than one or two buttons at a time, I never spent much time setting them up. After all, I’m the type of person who hasn’t played video games since the Nintendo days with two-button controllers. After video games evolved into these new jagged controllers with 48 buttons on each side, I was pretty disappointed with the game. For me, too many custom buttons on the camera yield the same results. I wouldn’t be able to remember any point in setting things up.
But, like most things related to the Z 9, I seem to find the customization process much easier to remember and much quicker to do than with previous cameras. So even though it took me more effort than the average person to remember which custom button does what, I seem to have reached a photographic system that allows me to create a camera Images that are already fast work even faster. .
Naturally, what you choose to customize will depend a lot on what you’re shooting and your personal preferences. But here are a few options that have added more punch to my fuel injectors.

Shooting Bank menu
A lot of cameras, including the previous Z cameras, have custom shooting modes that can remember different settings. However, the Z 9 elevates it by bringing it back to a function many more advanced Nikon camera users will be accustomed to with their DSLRs: the shooting menu bank.
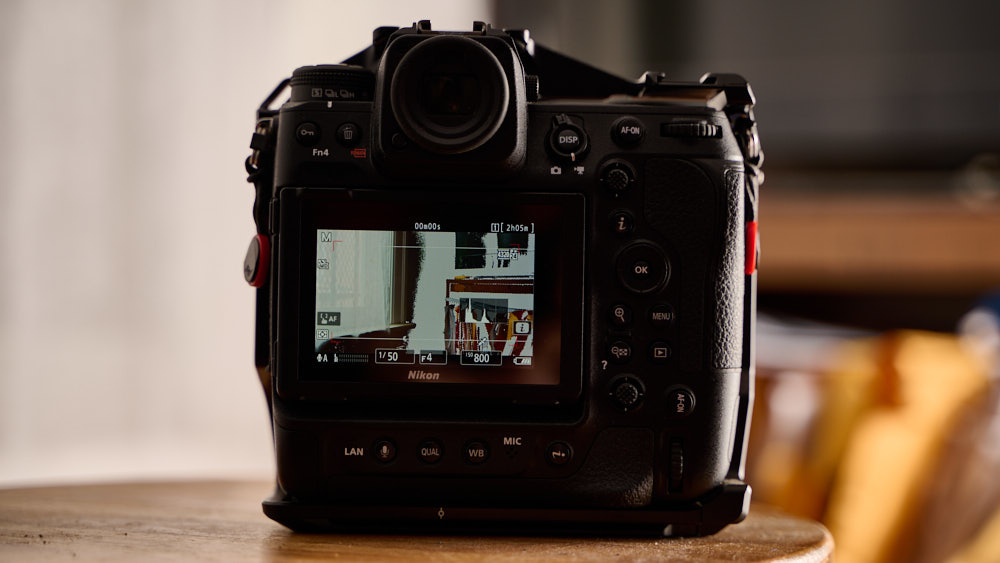
These are basically just presets that let you pre-program your camera to set it up the way you want with a single turn of the knob. You can have it remember menu items and pretty much anything else you consider an upcoming action that will help you quickly switch between shooting situations without fear of forgetting a setting or two along the way. The Z 9 offers four image banks, all of which can be programmed completely independently. I have four of my banks set up for common scenarios. The first is for general daytime walking photography. The second is set to take pictures with the flash. The third is for dimly lit interiors or night photography. And the fourth is for auto ISO and what I call mock mode (that’s just what I call it and hopefully not an indication of my choice to use it), that’s what I switch to when I need to take a quick shot and don’t have time to manually dial in the settings. I’ve set the Fn2 button to pull up the capture menu bank option, which I can then scroll through with the back spin button.
These four would be great enough, but since the Z 9 is also one of the best video cameras on the market, I find myself shooting motion with it as often as stills. Well, the good news is that you can also set up four completely different banks of video menus in the camera. So in the end, you’ll have eight all-in-one cameras, the four still cameras mentioned earlier, plus another four video cameras. I’ve set up a video capture menu bank for 10-bit 8K 24p and 4K 60p at ISO 800 (until 8K 60p comes with a firmware update). I then set up a third video bank for low-light video with a higher ISO. Then, like with stills, the final mode is my Auto ISO mock, where I let the camera do the exposure for me by automatically adjusting the ISO while keeping the same frame rate. shape and aperture.
One thing to keep in mind when setting up your menu bank is that you need to go into the photography menu and right under the spot that says “Shooting Menu Bank” you will see an option for “Extended Menu Bank”. Extended menu banks are what store your display settings. Seems to me this should be on by default instead of off. However, Nikon requires you to enable that setting. So if this is your first time using the shooting menu bank, you’ll probably want to turn it on so your favorite exposure settings move with your bank selection.
Zebra
While I like to keep my custom buttons consistent between static and motion, to make it easier to remember, my Fn1 button has a separate personality. In video mode, my Fn1 button is for turning the zebra on and off. If you’ve never used zebras, they’re basically a visual representation of your display value in a video. You preset them at the desired IRE to indicate when the target is exposed at the specified level. Once you reach that level, you’ll get a zebra on the target in your viewfinder. This can be helpful in many ways. I have set up zebra patterns for both highlights and mids. Pretty much the hardest and fastest rule for displaying video in the digital world is to never lose your highlights. You can restore the ball. But once the highlights are out of the digital world, they often disappear. So I set my tick zebra to make sure that anything on a given IRE shows me a zebra pattern. I put that below the clipping level. That way, I know before I shoot that, at a minimum, I haven’t blown up any highlights. You can also judge this from the chart, but I see the zebra as a double confirmation.
But, what about your midtones? If your scenes often involve a human subject as well as mine, I find that setting zebras in the middle can also be helpful. So I set my midrange to an IRE that I wanted my skin tone to tone down. Just as the prominent zebra pops up when I’m in danger of being cut, the middle zebra pops up when the subject’s skin tone is within my desired range. The camera doesn’t display the highlight zebra and mid-tone zebra simultaneously (at least I haven’t figured out how to do this), but I’ve set the Fn1 button to toggle between highlight zebra, mid-tone zebra average or no zebra at all. This helps me quickly reduce the exposure in the video and ensures that I have something to work with in the post.
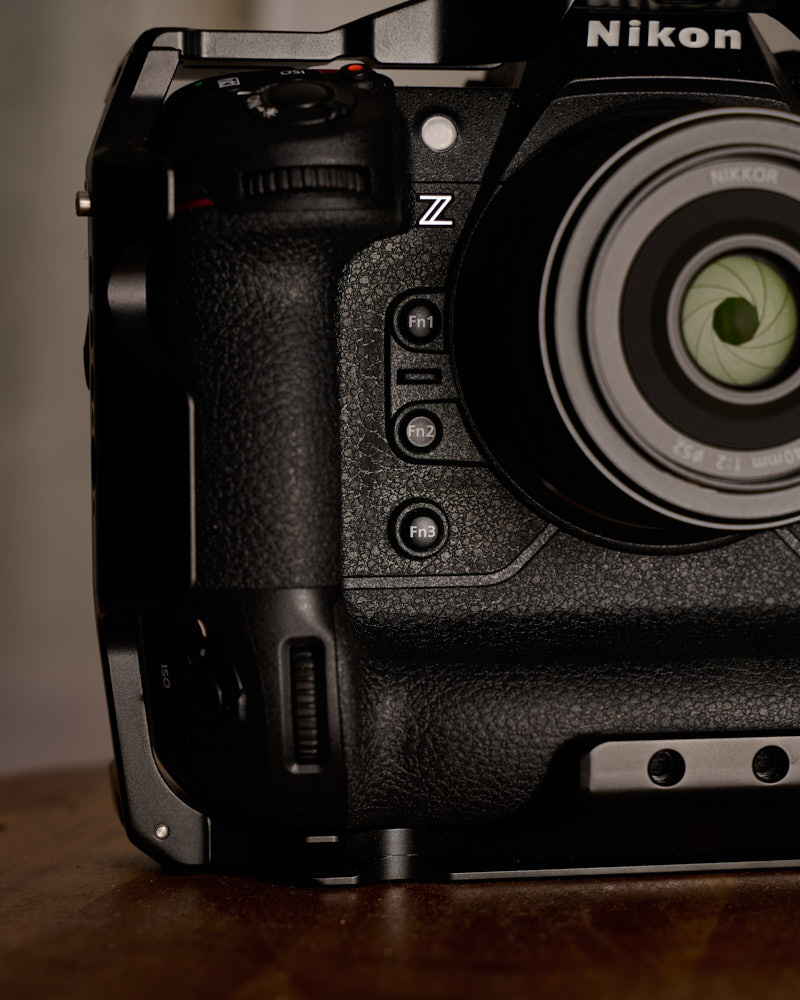
AF area mode + AF ON
In still photography, I have set the Fn1 button for a different function. All in all, auto-area AF with automatic subject detection handled 95% of the shooting situations I encountered. Most of my images have the human subject as the main point of interest, and the camera does an amazing job of identifying and sticking to its subject. But, now and then, I need to fix my camera’s hunch to focus on something else in the frame.
A dedicated AF mode button on the left side of the camera allows you to quickly change modes. But the Z 9 brought back one of my favorite options from my DSLR days, allowing me to set up function buttons to not only change focus mode but also activate autofocus. S, o I can put my camera in Auto Focus mode with Auto Subject Detection, then instantly switch modes and activate autofocus with the press of a button. I have the Fn1 button when shooting still images, set to automatically trigger single-point AF. So if I’m shooting a single rock through a bush, for example, I can pinpoint the rock right away, without having to formally change my menu settings. Why do I want to capture that single rock? That, I have no opinion. But I can. And that’s great.
Just in case, I’ve also set up a thumb selector so I can push it in and automatically trigger 3D tracking. And I’ve set up the L-Fn button on the lens to automatically activate Wide Area AF. So I basically always have access to four different focus modes simply based on which button I press.

Focus focus
While autofocus is all that stands out in still photography, when it comes to movie shooting, manual focus is a necessity. What you choose to focus on tells your story. So while you can let the camera decide, you often want complete control of the situation. This is when the focus peaks.
The highest focus essentially highlights the area of the frame that is in focus. You can choose from a variety of colors or intensities, but the idea is to give you a quick visualization of your focus point when using manual focus. I have it set to blue and the highest intensity level. So when I focus from one subject to another, all I have to do is watch the little blue model move from face to face to make sure I’m in focus. .
Since I’m pretty much blind as a bat and don’t trust my eyes at all when it comes to the all-important focus, this extra point of confirmation was key for me when I was operating the camera. So I have set the Fn3 button to toggle the peak focus on and off. Right before shooting, I will focus on my own ability and eyesight. Then I’ll move on to the peaking focus for confirmation. Then I’ll usually flip it over so it won’t distract me while shooting unless there’s a stand or constant movement that I need to track during a shot.

My menu
Assigning the Fn4 button requires less explanation. I just set it up to take me straight to my Menu. The menu button at the bottom right takes me to the last menu item I viewed. The Fn4 button takes me to the My Menu page, where I’ve put quite a few settings that I use. As I mentioned earlier, I’m not too good at remembering all of my customizations or the location of each and everything on the menu. So, to keep things simple, I put all the things that I change semi-regularly into my Menu. Then I know that even if I forget where the setting is for a while, I can always quickly jump to My Menu and find it there quickly.
These are just examples of how I set up my custom function buttons on Z 9. These reflect my priorities, photography habits, and ability/lack of ability to remember certain settings. But every photographer is different and what works for me may not be right for you. So, how have you set up your camera to maximize your speed in the field?