
What is fashion photography?
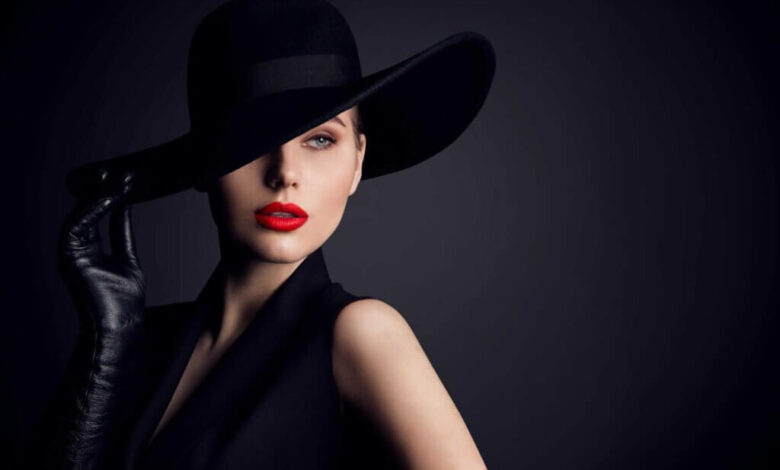
Fashion photography covers a wide range of subjects, including runway shows, brand portfolios, model portfolios, advertisements, editorial shoots, etc. The main goal of fashion photography is to showcase clothing and other fashion accessories.
The success of a fashion brand depends on the quality of the images they use in their catalog. Photographers are asked to enhance fashion items in a way that elicits an emotional response as this is a genre dedicated to display.
This post will cover different aspects of how a beginner can get started with their fashion photography, as well as provide some fashion editing method photography.
Fashion photography Photography tips
Location
When choosing a location, think about the clothes you will be photographing, the story you will tell, where will the story take place, how and where should they be worn?
The studio is a very versatile location for fashion photography as it usually has all the necessary lighting equipment, such as fonts, umbrellas, softboxes, dishes and beauty dishes. However, when filming outside, the atmosphere can be more difficult to manage, so be prepared for anything that could happen.

Camera and suitable equipment
For a novice, a digital camera is an ideal choice due to its ease of use and ability to capture a large number of images. As your knowledge of fashion photography grows and you begin to attract editorial or commercial clients, you can invest in a high-quality digital camera.
Use a tripod to take sharper fashion portraits. The tripod will assist with image stabilization and avoid blurred images. Moreover, you can use it to choose the ideal shooting angle.
Use manual mode
If the camera is on a tripod, use Manual Mode. If you are shooting handheld, select Aperture Priority. When you shoot in Manual Mode, you have full control over your settings, which will not change under any circumstances. It turns out that the exposure will be consistent from one frame to the next.
Adjust ISO
Choosing the right ISO is one of the most useful fashion photography tips. It can be placed anywhere between 100 and 400. If you’re shooting in low light, in the dark, or indoors with only window light, start with ISO 400.
Adjust the aperture
Instead of using f/2.8 aperture, try using f/4 aperture for fashion photos. f/2.8 provides a blurred background, but since the model is always in motion, it’s not enough to get a sharp image. You can use a smaller aperture and a higher f/stop number to create a thicker DF.
Use the correct shutter speed
If you want your photos to be sharp, make sure the shutter speed is correct. Consider the slowest shutter speed you can use when shooting with your camera in hand versus the slowest you can use with a tripod.
Bring props
Props aid in creating a more cohesive subject in your photo. So don’t be afraid to try new things. You can even use strange objects to create weird scenarios. They will draw the viewer’s attention to the most important point.
Try different angles
Experiment with angles and shoot from the top, bottom, or tilt the camera slightly for unique couture shots.
Photo editing tips

For photographers, it’s always good to know some shots Photoshop editing techniques or Lightroom, as they are the most popular.
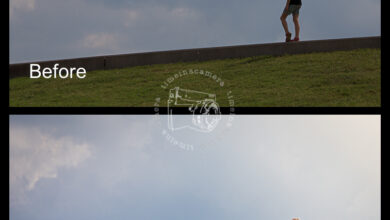
Edit photo
To get great fashion photos, it is essential to edit photos to clean both the model and the product. It is important to fade blemishes and smooth the skin, remove wrinkles and ensure that everything is presented in the best possible light.
While the photographer or photo editor has full control over the appearance of the image, it’s important that you don’t go against the wishes of the company you work for.
White balance
The white in your photo doesn’t have to be pristine. Pictures may look better in warmer or cooler environments. A small splash of color in the green or magenta direction can also work.
Using the When Shooting or Auto modes, you can adjust the white balance of the photo. These modes should not be used as an end destination, but as a starting point for editing. You can also use the Eyeropper tool to do this. Then drag the tool across the entire image, selecting the white balance point.
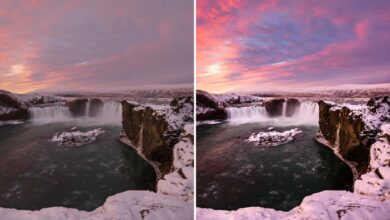
Global tuning
The Basics tab in Lightroom’s Development module is a good place to start. In Photoshop, you can also use the Camera RAW filter.
Starting by changing the exposure slider between stages while following the Histogram is a great way to learn how to edit.
Now change the Exposure slider to compensate for any changes you make to the Highlights, Shadows, Whites, or Blacks sliders. This will allow you to maintain a neutral exposure while making the adjustments you want to see in the photo.
To modify the color locally, use additional sliders like HSL (Hue / Saturation / Luminance) / Color.
Image mask
Simply select the layer you want to mask and hit the layer mask tool below your layers panel to create a layer mask in Photoshop, allowing you to make local changes within its layer. It’s a gray square with a white rectangle.
Search and burn
Dodge and burn is a technique of contouring the face with light to make it look more attractive. To make parts appear less or brighter, more vivid and contrasting, you can dodge and burn them.
In Photoshop, you can access your Dodge and Burn brushes by pressing O. To switch between the two, right-click the brush you’re currently using. Choose between Shadows, Midtones, and Highlights from the menu at the top of the window to determine what you’ll dodge or burn.