Learning how to create good headshots is no easy task. With so much advice on the internet available, it can be hard finding a good place to learn professional headshot photography. This is why we here at Fstoppers created this comprehensive article that answers some of the most frequently asked questions.
What Camera Should I Use for Headshot Photography?
There are plenty of choices these days, and this depends on the ecosystem you are in. Basically, headshot photographers are looking at the resolution of the camera. If you will be doing headshots both in the studio and on location, look no further than the Canon EOS R5 or its equivalent in a different brand. If you want to save some money, check out the trusty Canon 5D Mark II, as it’s a studio workhorse and will deliver amazing results if used properly. 
What Flash Gear Should I Use for Headshot Photography?
Headshots can be done with anything from a few speedlights from Amazon to high-end studio strobes. If you will be working in the studio, my personal recommendation is to pick up 2-3 Profoto D1s, a 4’ Octa, and two 1×4 strip-softboxes. If you are on a tight budget, the minimum is a speedlight with a shoot-through umbrella. 
What Focal Length/Lens Should I Use for Headshot Photography?
The most common lens used for headshot photography is the 70-200mm lens, as it allows one to get pretty close to the face without being uncomfortably close to the subject. It is also the lens that allows photographers to create a shallow depth of field and separate the subject from the surroundings if necessary. Dylan Patrick is known for his cinematic headshot style. This look would be hard to achieve without such a lens. Therefore, if you are after a perfect lens for headshots, look no further than the 70-200mm f/2.8. 
Another option to consider is the 24-70mm. This lens is much wider and won’t be the king of bokeh, but it will allow you to work in tighter spaces, capture half-body shots, and it will weigh less. That said, if you use your camera on a tripod, just go for a 70-200mm.
What Background Should I Use for Headshots?
Backgrounds for headshots can vary depending on the assignment, however, the most standard options are white, gray, and black. A trick I learned is that you can make all three looks with a white background given you know the principle of inverse square law. Simply don’t expose the white background, and it will be black, expose it partially and it will be gray. Another option is to use the office space itself for headshot backgrounds. It is recommended to use a wide aperture to keep the focus on the subject, as well as mix ambient and flash carefully. Usually, I keep my aperture at an f/4 and use a single umbrella or softbox for lighting the subject in such scenarios.
What Camera Settings Are the Best for Headshots?
If you are working in the studio, it is advised to keep your settings at ISO 100, 1/160 s shutter speed, and f/8-f/13. However, this, of course, will vary depending on the studio you are using, the flash power available, and your need for background blur. The situation changes even more outside, as you are working with ambient and flash. Still, keep ISO to a minimum, shutter speed in sync with your flash, and set the aperture depending on how much background blur you want. If your flashes support high-speed sync, use that to capture sharper images.
 How Do I Light a High-key Headshot?
First, let us see what high-key means. Usually, high-key implies a bright image with a white or otherwise bright background. The most common type of a high-key headshot is, of course, the classic “white background” picture. Lighting these is pretty simple, as you don’t need to sculpt the light as much as in a low-key headshot. There are several ways of going about lighting a high-key headshot. 
The first way is by using a single light setup and placing the subject close to the background. Simply bounce the flash in the ceiling, and enjoy a quick and good-looking result. Another way is to do it using two, or possibly three lights. One light will be used for the background, while the other will be the key light for the subject. If you have three lights, point two at the background to give an even white, and make sure to not overexpose. As for the key light, an octabox above the head is usually a good starting point.
How Do I Light a Low-key Headshot?
Low-key headshots are much harder to light as they require more light sculpting and control. Low-key implies a darker image, with more prominent shadows, and even a black backdrop. Lighting a low-key headshot should be done with at least two lights, one for key and one for fill so that you retain shadow detail. Using enough distance, you can turn a white wall into a gray or even black background. 
Should I Use Soft or Hard Light for Headshots?
This depends on your personal taste. Usually, hard light is created by a small source, which brings out more skin detail, however, is much less flattering to the subject than soft light. To produce soft light, you need to use a modifier that is fairly large compared to the subject, for example, a 3’ or 5’ octa. 
Should I Use Flash or Natural Light for Headshot Photography?
This depends on what is available to you. If you happen to use a basement as your studio, then flash is the only way to go, however, if you have large windows and your space is fairly bright, you can make do with a living room and some windows. Don’t forget to make some white and black v-flats to cut and bounce light. A shower curtain placed on the window will turn hard sunlight that is generally unflattering to a much better-looking soft light.
Should I Use Constant Light or Flash for Headshot Photography?
Constant light and flash in theory deliver the same result, as light is light. In practice, however, things are a little different, and each photographer has their own reasons for using either flash or constant light. Peter Hurley is able to use both to create stunning results. His usual setup consists of three LED panels sold by Westcott and designed in collaboration with Peter himself. If you’re after the “Peter Hurley” look, get this kit and look no further. As you experiment, you can create a variety of different looks on top of it with this three-light kit.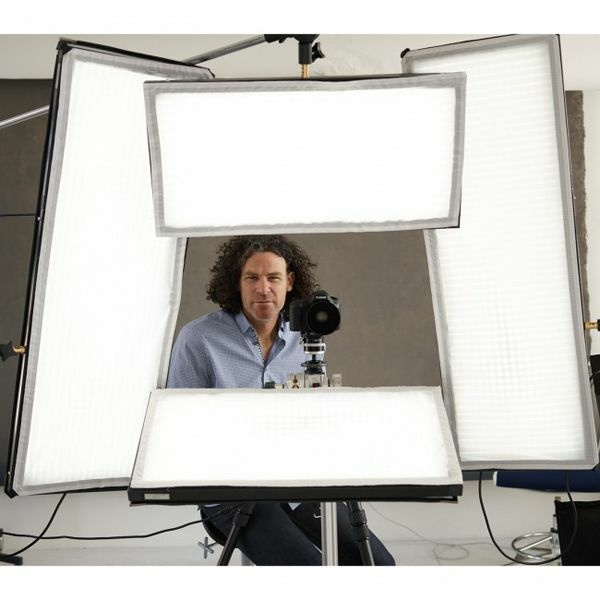
What Modifier Should I Use for Headshot Photography?
The choice of modifiers for headshot photography is both only limited by and open to your imagination. Strictly speaking, you can use anything from shower curtains, to white ceilings, to homemade softboxes. However, to get the most consistent results, it is suggested to use strip softboxes, octa boxes, and lastly rectangular softboxes for headshot photography. They will give a soft and diffused light, which will be flattering to the subject. Additionally, you can add white and black v-flats to brighten up the shadows. 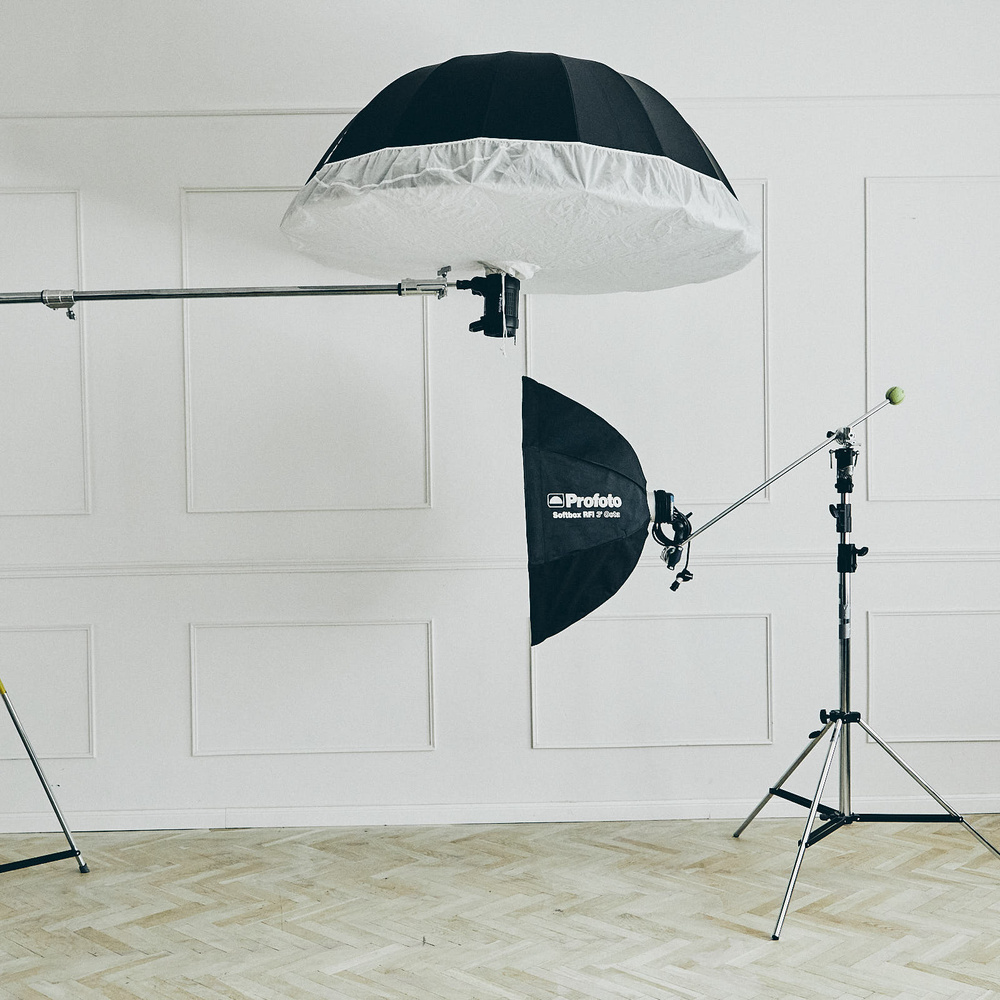
What Is the Best Lighting Setup for Headshots?
There is no such thing as a best or worst light setup for headshot photography, as the details of your lighting scenario will vary from shoot to shoot and subject to subject. Peter Hurley’s three-light setup is a great starting point for people who have no idea about lighting and want to get a good result in no time. Another effective setup is with two lights: one octabox positioned slightly above the subject, and a second light filling in the shadows.
What Is the Inverse Square Law?
The inverse square law is the correlation between light brightness and distance. Known as light falloff, it will be strongest closest to the light, and weakest far away from the light. Translated to photography, if you place your subject close to the light, you will get bright highlights and dark shadows, resulting in more contrast and sculpting to the face. Place your subject further away and the light will become more even, hence reducing contrast.
What Is the Difference Between a Large and Small Modifier in Headshot Photography?
Given that the subject remains in the same spot, a small modifier will give a harder light, resulting in sharper shadow edges, while a large modifier will give a softer light, resulting in smoother shadow edges. Critically, if the modifiers are the same shape, the light spread will be exactly the same shape, regardless of the size. 
How Do I Use V-flats for Headshot Photography?
V-flats are essentially white and black boards. The white surface is used to bounce light, while the black absorbs light. Hence, if you place a white v-flat next to a shadow, it will brighten it up. If you place a black one, it will enhance the shadow. A common way of placing white v-flats is opposite the key light to create fill. As for black v-flats, they are commonly used to cut light that is bouncing from the background and create sculpting around the face by placing them on either side of the face.
What Types of Lights Are There for Headshot Photography?
There are three most common types of light for headshot photography: flash, constant, and natural. Flash is the most powerful but hardest to control. Constant is less powerful but easier to take charge of. Natural is a gamble that is impossible to control. If you are feeling confident with lighting, use flash, but if this is your first time, opt for constant light.
What Is the Right Distance Between the Light and the Subject?
This depends on what you’re trying to achieve. The best way to find the right distance is to refer to the inverse square law and see how much light falloff is right for you. Peter Hurley tends to place his subjects close to the light, which enables him to create structure and sculpt the face using light falloff. 
What Is the Difference Between Lighting Men’s and Women’s Headshots?
Generally speaking, women’s headshots are lit much more softly to show smoothness in the skin and beauty. It is best to use a large soft modifier to show beautiful, smooth skin and filled-in shadows. As for men, harder light is preferred, as men want to look more masculine, and dramatic, and show more skin detail and facial features. Men’s headshots have darker shadows usually. Peter prefers to add “roughness” to men while taking out the same roughness for women. At the same time, on corporate jobs, both “men’s” and “women’s” lighting works perfectly as well. If anything, using a different setup for different people on corporate jobs will have a negative effect on the consistency of the work. 
How Do I Hide Bad Features of the Face Using Lighting?
Lighting is the best way to hide imperfections in the face. Often, each subject will have a strong profile and a weak profile. The way to discover which one is is by checking which way their hair is styled. If the subject prefers their hair on the right side, their right profile is stronger. You need to be able to adjust your light in accordance with this and play around with light position. One of the best ways to hide imperfections is by using shadow. Simply place your light on the other side and see what it does to the face. 
How Do I Use Reflectors for Headshot Photography?
Reflectors are some of the most affordable and effective tools that you can use for headshot photography. They act like a second light source and can be used to light the subject, bring out shadow detail, lift up the neck shadows, or for any other purpose you might see fit. Simply place the reflector next to the surface you want to brighten up and see it do its work. There is a myriad of reflectors, from golden, to sun-silver, to silver, to white, and black. In short, a golden reflector will cast a warmer light on your subject, which will make their skin appear tanner. A sun-silver one will cast a fairly neutral light, while a silver one will be cold. Keep in mind that such reflectors are a specular light source, meaning that they will cast a direct and usually hard beam. If you are looking for a more soft and natural effect, opt for a white reflector, as it will provide a diffused soft bounce.
How to Balance Flash and Ambient Light for Headshot Photography?
The key to a successful headshot on location is the ability to balance ambient and flash together. The best way to do this is first to expose the scene only for ambient light. This way, you will find out what the background will look like without flash. Then, add in flash on relatively low power, and see what that does to the scene. Adjust the flash accordingly. Also pay attention to light direction, color, and softness. For example, a cold flash will look unnatural in an otherwise-warm room. Ultimately, if you are looking for an image that will look natural and appear like it was lit with ambient light, make sure that the flash matches exactly the characteristics of the ambient light in the room. 
How Do I Compose a Headshot?
There are essentially two ways of composing a headshot: landscape and portrait. Peter Hurley tends to use the landscape and crop the head slightly, which makes the image more cinematic. Dylan Patrick also tends to shoot landscape, but instead of using a plain background, his style is characterized by incorporating background elements such as lights, buildings, and walls. Therefore, the way you compose a headshot depends entirely on your preference. 
How Do I Pose My Subject for Headshot Photography?
Peter Hurley has his signature way of asking the subject to squinch, which is a combination of squinting and pinching the lower eyelid. Secondly, it is important to show the jawline. This is done by lightly moving the head forward, which immediately removes any double chins and pops the jawline. You should also pay attention to the shoulders and make sure that the neck is not hidden. Lastly, don’t forget to make the subject laugh and show emotion. There is only so much you can do by simply placing body parts in the right place. 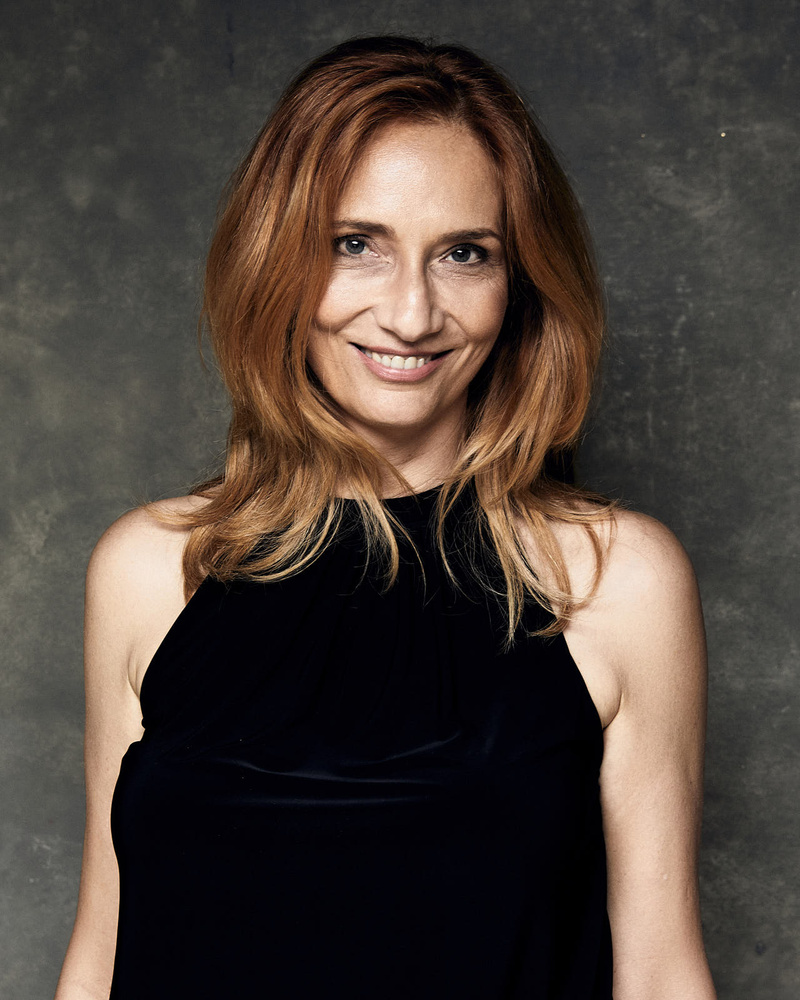
How Do I Create Expressions in the Subject?
The best way to create expression in the subject is by having it come out naturally. There are people who will pull a fake smile because they want to do a good job for you. Tell them to shut their mouth, and start building a more natural reaction. A subconsciously driven smile is the most beautiful smile we can have. When you start a session, you start with conscious control of the face, and as the subject leans, they get comfortable in the good-looking poses. Once that happens, you can start improvising, telling jokes, and so on. Use a direction that throws the subject off and cracks them up. Expressions come from the mouth, eyebrows, and eyes. The best way to get expression is to talk to them from behind the camera.
How Do I Connect With My Subject?
The same way you connect with a person. This is much more of a human thing, rather than a photography thing. Connection with the subject is based on trust, and trust can be built. Despite the weird directions that you will give your subject, showing them the result of this “weirdness” will build confidence and help you connect with the subject. 
What Are Some Jokes I Can Tell to My Subjects?
Peter Hurley has his famous list of Hurleyisms. Here are some practical jokes and odd directions that are bound to crack the subject up. Be sure to tell them with confidence and flair, don’t butcher it by stopping to think what it is, just say it naturally. Here are some of my favorites:
Women
- Give me a look like you are impersonating an evil dictator in a past life.
- Give me a look like you just exfoliated.
- Give me a look like you were just slapped in the face by a monkey!
Men
- Tilt your head to the Statue of Liberty.
- Look delighted.
- Look like you’re about to sneak up on the King of England.
Kids
- Tilt your head on the same exact angle as the leaning tower of Pisa.
- Give me that look you did like five shots ago that was so good. (They will never remember, but get them to try.)
- Point your toes towards Fort Knox.
How Do I Pose Overweight People?
Taking successful images of people with a few extra pounds is a vital skill. 39% of adults are overweight, so it is investable that you will have to learn to shed a few pounds with light and posing. Remember that you can’t make the obvious things go away, but you can work to minimize the weight. One of the best ways to minimize excess weight is by using shadows. Another thing to look at is low-hanging clothes. They will drag the image down and make the person appear larger than they are. Lastly, ask your subject to drag their head forward and chin down. A strong jawline is going to play a crucial part. Experiment with shoulder placement and head tilts.
It is important for you to see everyone as beautiful. Every single human being has beauty inside them. It comes out not when the person is in front of the camera; it comes out when they are playing, having fun, relaxing, and so on. People are quite tough on themselves sometimes and complain about how they look. The way to get over that is simply by asking them to show a picture of themselves that is better than what they got with you today. They never can do it, and if they can, you need to coach them to get to that point.
How Do I Photograph People With Glasses?
The problem with glasses is that the lights will produce unwanted glare that is very hard to clean up in Photoshop. Therefore, you need to use careful light placement and direct the subject in a way that will minimize glare from the glasses. Preparation is key. If your subject wears glasses, ask them to bring every pair. Different glasses will behave differently. Usually, more expensive pairs will have less glare, while the cheaper ones will glare like crazy. To figure out the best position for the subject, turn on the modeling or constant light, and ask the subject to move around. Find a place where there is no glare or minimal glare. Next, pose the subject and move the light into a position where there is no glare. A trick that often works is angling up the glasses a little. Lastly, it is advisable to keep the light source large to keep the glare out. It will be easier to figure this out if you shoot continuous light, as you see what’s happening right away. 
What Hair, Makeup, and Styling Should I Use for Headshot Photography?
As a fashion photographer, I love all sorts of editorial hairstyles for the subject. We can wet the hair, go crazy on volume, add product, and experiment with wind machines. Headshots are a different game. The hair should look classical, natural, and beautiful at the same time.
There are several rules with hair. Take care of stray hairs, make sure it’s not hidden behind the shoulders, and lastly, make sure that the client is happy with the hair and how it looks.
Makeup is an unfamiliar area. It should not take over the image, and it is best if it remains fairly nude. Leave the fake lashes, smokey eyes, and red lips at home. Another one to look out for is fake contacts. There have been subjects who wore them to look prettier, but on camera, it looks obviously fake.
As for styling, keep it simple and minimal. Leave out the large jewelry, or really flashy textures. The attention must go to the face, not the excessive Versace coat they are wearing. Replace it with a white shirt from H&M. 
How Do I Take Headshots of Children?
Kids have amazing energy, but there is a gamble as you don’t know how long that energy will last. If there is a parent that is telling them what to do, try to minimize their influence to let the child act naturally. Once you start having the energy of the kid, shoot some great pictures and show them to the parent. This will set them at ease, tell them you know what you’re doing, and ultimately allow you to do your thing.
Once you get the energy, try to set the child at ease, and calm them down a little. Perhaps pose them against an apple box, table, or some flat surface. Having them do something with their hands will stop them from running around, but also let you get the same energy—just with more control.
Lastly, bring the parent in and shoot them with their kid. It takes only a few moments to do, but they will love it a decade down the road.
How Do I Discover Unique Facial Features of Each Subject?
The second you see someone, you start watching them. Watch behavior, eyes, approachability, style, and so on. What kind of expressions are they making? Read the person, watch how their behaviors change over time and get obsessed with this. People will make expressions when they are talking to you that they will not make when in front of the camera.
Next, go into seeing their perceived flaws. Maybe their nose is crooked or their smile is not symmetrical. You need to be aware of the perceived flaws, and make sure they are fixed in Photoshop or with lighting.
Lastly, move to the process of discovering the face. Shoot both sides of the face, turn the head both ways, and find that perfect sweet spot. Nobody knows what their strong side is. Figure it out with the subject, and shoot it! 
How Do I Take Headshots at Night?
Taking headshots at night requires solid skills from you as a photographer. You will have to almost certainly use an off-camera flash to light up the subject. The key to a successful nighttime headshot is proper ambient and flash mix that looks natural and not flashy. This includes managing things such as ISO, aperture, light power, composition, and many more. For example, if you shoot on a rooftop, against a city backdrop, you are more likely to get a nice cinematic bokeh. Nighttime headshots and portraits are in high demand. Therefore, being able to take a beautiful image, even in the most challenging conditions, will be beneficial to your business. To master night-time cinematic headshots, check out Dylan Patrick’s tutorial over in our store. 
How Do I Get a Shallow Depth of Field for Headshots?
A shallow depth of field is created by using a wide aperture and a long lens. If you want to replicate Dylan Patrick’s style, go for a 70-200mm lens and use it at f/2.8-f/3.2 at 150-200mm. That way, you will get a lot of background compression and shallow depth of field. If you are using such wide apertures at long focal lengths, you are risking having parts of the subject out of focus. You can also experiment with using a shorter focal length such as 85 or even 50mm. Fast primes are a popular choice among many photographers. One hidden gem is undoubtedly the 135 f/2 lens. It provides the a great balance between depth of field, focal length, and price.
How Do I Find My Niche in Headshot Photography?
Finding your niche in photography will do two things: reduce the number of clients you have and increase your price per shoot. Ultimately, finding your niche should be one of your long-term goals for photography for you. Based on Peter’s and Dylan’s example, you can see how they both managed to create an authentic style of work that represents them. The best way to do this is by shooting a lot of work and experimenting with lighting and emotion. Ultimately, there will come a time when you will see something you will like, find an approach you enjoy, and use it for work. It all comes down to the way you’re able to translate your vision of the world in real life. For example, as a model, Peter Hurley always wanted to have dark shadows, so for his work as a photographer, he uses these shadows for men.
What Marketing Strategies Should I Use for Headshots?
There are several marketing strategies you can use to promote your work as a photographer. The most effective one is, of course, word of mouth, but it takes years to develop a good standing with clients. A much faster way of landing your first clients as a headshot photographer is through Facebook and Instagram ads. While this won’t land you any corporate jobs, it will certainly make it easier to get revenue and experience doing headshots.
The best advertisement from this point is your work and your personality. If you do a good job with one person, they are bound to have a friend who also needs a headshot. From then on, it’s a snowball effect.
It certainly won’t hurt your business if you make yourself seen by going to networking events, talking to people, and putting yourself out there.
Another idea to try out is a “headshot day.” Set up an Eventbrite event, make people book 30-minute time slots, and make easy cash. Don’t forget to advertise it properly, and make sure that you need to do minimal work to deliver the images. This means that the client will pick the ones they want after the shoot, or even better, will get a final sent to them. These are super-cheap events with 3-4 pictures as finals, and costing no more than $50 per session (price depends on your market). This is one more quick and easy way of marketing your services, and will leave you with some cash at the end.
What Software Is the Best for Editing Headshots?
Editing headshots is best done with Photoshop, as this software has long been the industry standard for many things. The only real drawbacks to Photoshop are that it requires a subscription, and it is not the easiest software to use. However, on the other hand, no other software that this many features and abilities, AI integrations, as well a reputation for being the software for post-production. Frankly, there is not really an alternative for such software, as it is both powerful and user-friendly.
Photoshop is only suited for editing individual pictures. It won’t be the best place to go to select photos. For that, you can pick between Lightroom and Capture One. I myself am a Capture One user, and I swear by it.
There is one other option you can have while editing headshots: AI. Retouch4me is an excellent option I myself use for post-production for smaller projects. What is more, this software is a great match for those who are new to photography and don’t want to spend time retouching. 
What Is the Best Retouching and Editing Workflow for Headshots?
The software that most photographers recommend for culling, color grading, and tethering is Capture One. Capture One is much faster when it comes to working with a tethered setup, and tethering is by far the best way to help your subject succeed and see the result right away. Capture One wins over Lightroom for many photographers who shoot headshots simply because it has the speed that Lightroom does not. As a photographer who shoots tethered even in the most demanding of locations, I swear by Capture One.
However, Capture One is not my go-to software for retouching. If I need to edit the fine details on an image, I tend to go for Photoshop. While it is horrible for working on a lot of photos, it is irreplaceable when I need to work on one image at a time. Photoshop really needs no introduction, as most photographers are aware of its features, and think no further than Photoshop really.
How Do I Remove Stray Hairs in Headshots?
Perhaps the best way to remove stray hairs is by using hairspray on set and making sure that the hair is perfect. If you haven’t done that, then you can work on this problem in Photoshop by using frequency separation via the median.
To do this, copy your base layer twice, name one layer low and one layer high. Then switch off the “high” layer, and go over to the noise section, where you will select median. Blur out your layer to the point where the texture separates from the color. Next, go to the “high” layer, and select “apply image,” and choose substract in the menu, as well as layer “low.” Afterward, go to the blending mode and select linear light.
How Do I Edit Blemishes Out in Headshots?
This can be done in several ways. The most simple one is by using a clone stamp tool in Photoshop. Just define a source point, and paint away the blemish. Another way to do this is by using the Content-Aware fill tool. Lastly, you can also use frequency separation to do this job.
How Important Is Post-production for Headshot Photography?
Post-production can make or break the image, therefore, you should pay extra attention to what you make in post. A headshot without post-production can lack volumes, show imperfections in the subject that were visible on the shoot day, and other nasty details they would rather hide. For example, things such as spots on the subject should be removed, as one day they’re there and the other day they’re not. Larger things, such as eye color, head shape, the distance between eyes, and so on, should be left as is, as they make the subject into the unique human they are.
What Is the Best Retouching Workflow for Headshot Photography?
The way I go about retouching is first of all evening out the image in Camera Raw, adjusting color temperature, exposure, contrast, and doing a basic color grade. Next, I proceed to Photoshop and work on the small things such as blemish removals and face enhancements. Then, I move on to making sure the clothes look good and fix any imperfections there. Next, I apply dodge and burn as well as frequency separation to give the subject a perfect look. This is followed by another layer of dodge and burn to make volume in the subject’s face. Lastly, a final color grade, as well as some sharpening will make your image the best it can be.
Should I Retouch Images Myself, or Should I Hire a Professional Retoucher?
I, just like many more photographers, outsource retouching to an external editor who is able to do the job much better and faster. Retouchers think slightly differently from photographers, and the best are able to make almost any image into a masterpiece. This is not to say that you can’t work without a retoucher. Peter Hurley and I work with a retoucher, while Dylan Patrick does not. Both are great photographers, and their retouching work reflects it. Consider retouchers as an investment. If you find a retoucher that enhances your work and makes it look next level, it is a worthy investment. However, a retoucher who just does basic adjustments and leaves the bulk of the task for you is not worth investing in. Another factor is the number of jobs you have and their rate.


What Is the Difference Between Editing and Retouching?
Editing is a broad term, with retouching being a part of the editing process. Editing may encompass things such as color grading, cropping, and adjusting contrast and exposure levels, while retouching is a process of adjusting the subject’s appearance in Photoshop. This may mean removing blemishes, adjusting posture, smile, eye distance, fixing stray hairs, clothes, and so much more. A common way of seeing retouching is simply enhancing the subject. Retouching is a world of its own and an art by itself. It takes many years to master retouching at the highest level. Retouchers and photographers should eventually get to a level of understanding which doesn’t require much explanation. For example, if I send a raw file to my retoucher, I will, in most cases, get something that I am fully happy with. The color grade as well as retouching is taken care of; hence, my photography work is also my retoucher’s work. At the end of the day, each image is a collaboration between your subject, team, and yourself.
Closing Thoughts
This piece goes hand in hand with our tutorials on headshot photography, taught by some of the best instructors in the industry, such as Peter Hurley and Dylan Patrick. As much as we tried to answer as many questions as possible, it is still just a small slice of dozens of hours of recorded photography tutorials you can purchase from our store.