This retouching technique is something every landscape photographer should learn. It can be especially useful when you are approaching an image that has a few technical flaws.
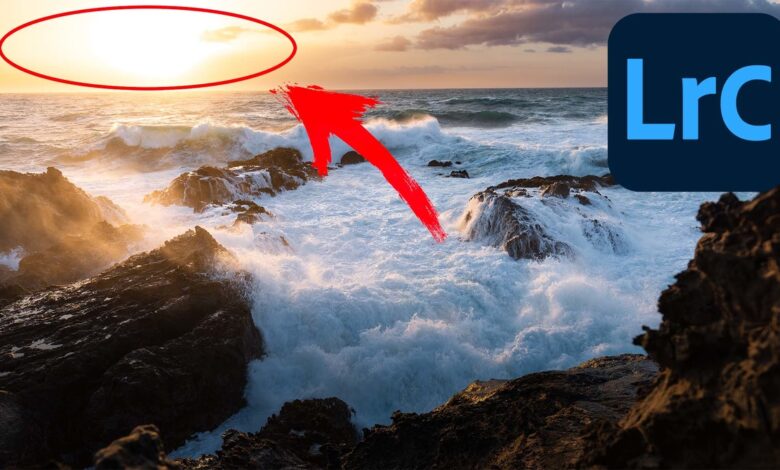
Landscape photographers focus a lot of energy on capturing scenes with as much technical detail as possible: multiple exposures, stacking focus for high sharpness, or even using a tripod head to perfect panorama. The reality is that many times you do not have time or conditions do not allow to set up. Through this tutorial we’ll be using an image I’ve taken that would greatly benefit from being able to use a tripod or even attempt to create an image with a handheld stand. High winds combined with being so close to the ground made it almost impossible for me to keep my camera steady to get a sharp image. The result is an image that has a lot going for it, but it contains a completely blown away portion of the sky that cannot be recovered.
We’ll cover my entire editing process through this image, but this guide isn’t specifically about your editing suite’s techniques, tools, or features. It’s about something bigger that you’ll find yourself using in all your editing.
How to start any editing
Looking for advice on how to approach and start editing is probably the most frequent question I get in regards to landscape photography. There are tons of tools and techniques for your retouching process, but only a small group of ideas for approaching your images in one edit. Start any editing by asking yourself “what does this image need?” This is something I recommend and remind myself constantly, but also realize the answer is not necessarily simple. However, the more you practice this technique, the more challenging images you will come up with in the future.
Ironically, the problematic images are a lot more accessible in answering this question, which is exactly what we’ll be addressing in this edit. Above is the raw image with just some color adjustments. I start every edit by adjusting these settings first, but will come back to change them as I see fit.
Once done, I would check to see exactly how clean the data I have in the image by increasing the exposure to +3 and checking the details of the shadows, then reducing the exposure to -3 to see my highlight data. As mentioned above, this image is overexposed, which is the foundation for how we will approach this correction. Let’s edit around that limitation and use it to our advantage knowing that we have to edit around that overexposed area in the image.
First, I’ll create a linear gradient (M on your keyboard) applied to the sky. This gradient will add dehaze to our sky, but can also be used later to adjust color temperature or other specific settings. Dehaze has a nice effect on gradations in the sky, but I also added this first to see how much I need to correct in the area where we are missing data. Note that if I reduce my highlight with this selection, it will make our sunspot stick out, so we need to be more creative.
Next, we’ll create a radial gradient (Shift + M) around our sun/hidden area. Select invert so we’re manipulating all areas outside of the sun and adjusting accordingly, in this case reducing only the highlights. You’ll notice this is reducing our highlights throughout the image which we need to fix.
To fix this, we’ll select “subtract” in our mask tool and choose a linear gradient. We’ll drag that linear gradient as if we wanted to apply it to the sea. What this will do is subtract that portion of the image from our mask, thus creating a mask that affects only the part of our sky that we’re trying to adjust.
Our final mask will be added to adjust our foreground. This is done by adding one more linear gradient (M) to the entire bottom half of the image. I increased the exposure by a small amount along with the whites. I can return to this selection to adjust opacity and clarity if I feel like those need it later in the editing process.
That completes the local adjustments and works around the problem areas of the sky, but keep in mind that you may need to go back and re-adjust these once you add the global adjustments. . Editing is a jump, and sometimes, you have to work around specific points after each change you make.
We’ll lighten the whole image by adjusting the whiteness and add contrast to the highlights by slightly reducing the highlights. Increase the shadow by a considerable amount to get the details in the rock. They will darken when we add contrast back to the image. I removed a bit of transparency to help get the ethereal and soft feel of the shoreline that I enjoy. Finally, we’ll add a bit of dehaze to the whole image to give it a little pop.
Next, we’ll add a bit of contrast back to the image using a medium contrast select tone curve. Once I do this, I’ll go back to making some of our local adjustments and global adjustments to make sure the sky stays bright.
My final adjustment is always saturation. Almost every slider you manipulate will inadvertently adjust the color of your image, whether it’s contrast, white, dehaze – you name it. So I save this balance for last. I started removing a bit of the blue saturation from my HSL adjustments. Then I reduced the saturation for the entire image, adjusting to my own preferences for the particular image. I also add sharpness before exporting, usually around ~70 depending on the style of the image and what I’m exporting for.


The cropping for this final image depends somewhat on the medium in which it is being shared, such as print or social media. Above you will see our before and after images with a small cut and the horizon straightened. This edit can take less than 10 minutes when I know what the image needs, something happened in reality.
Edit another issue
Let’s quickly look at another example, but I won’t cover the entire editing process, just reiterate the process of asking what the image needs and providing a solution to that question.
This image does not lack any data, but it lacks the light on the flower, which is not representative of what I have seen in the field. So let’s create a fake light source and really bring this image to life.
If you want the full analysis of this technique, you can find it thisand it will explain everything you need to know. Normally I would darken my entire image and add light back using a radial filter, but in this case our image was already dark, so all we need to do is add a radial filter. You will want to shrink your image until it is close to the thumbnail size, which you can do by holding shift and dragging the cursor to the left or by selecting about 12% on the navigation panel yours.
Next, we will add a large radial filter (Shift + M) that aims to mimic the light source entering the image. Drag its center to the outside of the image; you can adjust this option according to your preference. Then lighten your image accordingly. In this case, I increased the whiteness, increased the exposure, and adjusted the shadow and black values. Finally, I removed the dehaze to create a more hazy view; this is fully explained in the entire tutorial.
You’ll notice the top half of the image is a bit too bright, so we’ll repeat the same technique from our previous edit by removing a bit of this effect using a linear gradient. With your mask selected, “subtract” a linear gradient but apply only the hairy area and adjust for a nice look to your image.


This is the final edit against the unedited image when I’m done. This is not a portfolio image, but it is a great example of one that I’m sure many of us have captured in our work and just can’t figure out what to look for. do when we sit down to edit it. Knowing it takes a bit of light and having the tools to do it makes it much easier to reach.
Inference
I started this tutorial with the intention of approaching imperfect images and editing around them. What I’ve found is that you can approach nearly any of your edits like this if you just need to repeat the practice. At first you will probably find yourself not knowing the answers to some of your images, but as you continually practice and develop more solutions, it will gradually become easier to correct. Sometimes I still struggle to know the answer. What I usually end up doing is staying away from an image until it comes to me.

The above is a great example of having more data than I needed but didn’t use it because I wanted the image to look like it. I’ve framed this image and have plenty of data I could use in the dark, but I really like the low-light presentation of this image. So in my editing, I worked around the light and didn’t worry too much about the underexposed parts of the image. I wanted darker results and I based my entire edit around that.
It’s important to know that not every image you take will be perfect. Sometimes you’ll get decent shots but there are limiting factors, but that doesn’t mean you can’t make them work. We are surrounded by what looks like the perfect picture: perfect exposure, every little detail in focus or once-in-a-lifetime conditions. I hope this is a good reminder that no matter where you are on your journey, sometimes, things won’t be perfect. My portfolio is filled with images that aren’t perfect and sometimes, just knowing what they need can really make them come true in one edit.