 Coffee, collagen, and chocolate? Those are three of our favorites in one recipe!
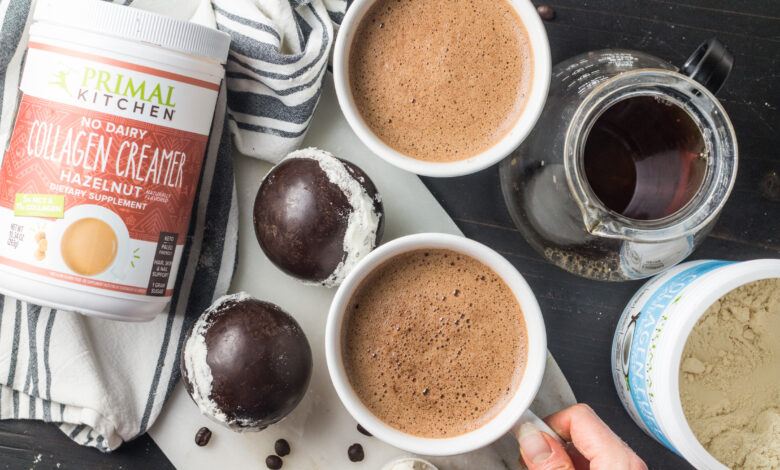
While this chocolate bomb recipe sounds too good to be true, you can make this decadent coffee at home using your collagen coffee ice cream maker from Primal Kitchen. Enjoy brunch for guests or add a touch of luxury to a weekday party with Collagen Coffee Chocolate Bombs. All you need are a few ingredients and a hot chocolate bomb mold.
Made from aged chocolate, these “bombs” melt into hot coffee and infuse your cup with a rich, velvety taste… plus, all collagen protein benefits from one scoop of Collagen Fuel®. Add a touch of elegance to your coffee with this coveted coffee bomb recipe!
What is a chocolate bomb?
The Chocolate Bomb is a hollow sphere made of aged chocolate and filled with unexpected flavors – in this case, Collagen Fuel! When you drop it into hot coffee, the chocolate melts, releasing the delicious stuff inside. From there, you can stir or use an immersion blender or whisk to blend it all together. Voila, your ordinary coffee is now a luxurious coffee drink worth bragging about!
How to make collagen chocolate bomb
Work for: 4 collagen coffee bombs

Ingredient
- 200g chocolate 85% bar (see notes for chocolate varieties)
- 1/4 cup coconut milk powder
- 4 scoops Primal Kitchen Vanilla, Hazelnut or Chocolate Collagen Fuel
- 24-32 oz. your favorite coffee
Additional options:
- Coconut cream
- Vanilla extract or powder
- Milk of choice
- Liquid stevia or monk fruit
Direction
Step 1: How to brew chocolate
Start by shredding your chocolate. For incubation with a double boiler:
- Pour a few inches of water into a saucepan and place on the stove over medium heat.
- Place a heatproof bowl on top of the pot. It should be slightly larger than the pot and the bottom of the bowl should fit inside the pot. Pour about 2/3 of your chopped chocolate into the pot.
- Use a spoon to stir the chocolate as the chocolate melts in the bowl. When the chocolate is almost melted, use a food thermometer to check the temperature of the chocolate. When the melted chocolate reaches 115 degrees F (46 degrees C), quickly remove the bowl from the oven.
- Place the remaining chocolate in the bowl one at a time, stirring constantly until the rest is melted. This will also help cool the molten chocolate a bit.
- When all the chocolate has been added and the temperature of the melted chocolate reaches 80 to 82 degrees F (26 to 28 degrees C), return the bowl to the pot.
- Stir until melted chocolate reaches 88 to 89 degrees F (31 to 32 degrees C), then quickly remove from heat again. Now your chocolate is tempered and ready to use!

Step 2: Make your coffee bomb in hot chocolate bomb mold
I recommend using a 2 inch or 2.5 inch silicone mold for the coffee bomb.
Use a silicone brush to brush the chocolate onto the inside of each round pan. This recipe will make 4 or 5 coffee bombs depending on the size of the molds you use and the amount of chocolate you use in each mold, so you will need to “paint” the insides of 8 to 8 total. 10 molds. I recommend starting with 8. You can always make one more if you have extra chocolate.
Once you’ve made the first layer of chocolate, place the mold(s) in the fridge for 5 to 10 minutes to harden.

Take the mold out of the fridge and repeat the process of brushing the chocolate inside the mold, really focusing on building the chocolate near the edges. Place the mold back in the refrigerator.
At this point, you can try to get the chocolate out of the mold or paint the chocolate in the mold a third time. I recommend doing it 3 times total to make sure your chocolate is thick enough and still intact. Put in the fridge for the last time about 15 minutes.
Once cooled and set, carefully remove each halve from the mold.
Step 3: Fill up the coffee bomb
In a small bowl, mix the coconut milk powder and collagen powder. Ladle the mixture into 4 (or 5, if you make 10) chocolate halves.

Brush some melted chocolate over the outer edge of the hollow chocolate half, then carefully press it over one of the filled halves to create a sphere. If you’d like, you can brush some chocolate around the outside of the border seams and roll it with some collagen powder or coconut milk powder, as shown in the image below.

Repeat with the rest of the chocolate. Store collagen bombs in the refrigerator.
Step 4: Enjoy a Chocolate Coffee Collagen Bomb!
Make your favorite coffee. Pour some into the cup and then add the collagen coffee bomb. Pour more coffee on top until the chocolate sphere is melted and the inside is melted. Use a little immersion blender or ice powder to blend everything.
Optionally, add your favorite milk to the coffee and/or top it with whipped cream or coconut cream. Enjoy immediately.

Note:
- I recommend using a chocolate bar rather than chocolate chips for this recipe. Chopped bars will melt better and be more successful at annealing. I used a dark chocolate bar. Using a low-carb chocolate bar (such as Lily’s) can also work.
- If you can tolerate dairy, use regular milk powder instead of coconut milk powder.
Learn more about the benefits of collagen protein:
Description
These chocolate bombs melt into hot coffee and infuse your cup with a rich, velvety flavor… plus, all the collagen protein benefits from one scoop of Primal Kitchen Collagen Fuel®.
200g 85% chocolate bars (see notes for chocolate varieties)
1/4 cup coconut milk powder
4 scoop Primal Kitchen Vanilla, Hazelnut or Chocolate Collagen Fuel
24–32 oz. your favorite coffee
Step 1: How to brew chocolate
Start by shredding your chocolate. For incubation with a double boiler:
- Pour a few inches of water into a saucepan and place on the stove over medium heat.
- Place a heatproof bowl on top of the pot. It should be slightly larger than the pot and the bottom of the bowl should fit inside the pot. Pour about 2/3 of your chopped chocolate into the pot.
- Use a spoon to stir the chocolate as the chocolate melts in the bowl. When the chocolate is almost melted, use a food thermometer to check the temperature of the chocolate. When the melted chocolate reaches 115 degrees F (46 degrees C), quickly remove the bowl from the oven.
- Place the remaining chocolate in the bowl one at a time, stirring constantly until the rest is melted. This will also help cool the molten chocolate a bit.
- When all the chocolate has been added and the temperature of the melted chocolate reaches 80 to 82 degrees F (26 to 28 degrees C), return the bowl to the pot.
- Stir until melted chocolate reaches 88 to 89 degrees F (31 to 32 degrees C), then quickly remove from heat again. Now your chocolate is tempered and ready to use!
Step 2: Make your coffee bomb in hot chocolate bomb mold
We recommend using a 2 inch or 2.5 inch silicone mold for the coffee bomb.
Use a silicone brush to brush the chocolate onto the inside of each round pan. This recipe will make 4 or 5 coffee bombs depending on the size of the molds you use and the amount of chocolate you use in each mold, so you will need to “paint” the insides of 8 to 8 total. 10 molds. I recommend starting with 8. You can always make one more if you have extra chocolate.
Once you’ve made the first layer of chocolate, place the mold(s) in the fridge for 5 to 10 minutes to harden.
Take the mold out of the fridge and repeat the process of brushing the chocolate inside the mold, really focusing on building the chocolate near the edges. Place the mold back in the refrigerator.
At this point, you can try to get the chocolate out of the mold or paint the chocolate in the mold a third time. I recommend doing it 3 times total to make sure your chocolate is thick enough and still intact. Put in the fridge for the last time about 15 minutes.
Once cooled and set, carefully remove each halve from the mold.
Step 3: Fill up the coffee bomb
In a small bowl, mix the coconut milk powder and collagen powder. Ladle the mixture into 4 (or 5, if you make 10) chocolate halves.
Brush some melted chocolate over the outer edge of the hollow chocolate half, then carefully press it over one of the filled halves to create a sphere. If you want, you can brush some chocolate around the outside of the seams and roll it with some collagen powder or coconut milk powder.
Repeat with the rest of the chocolate. Store collagen bombs in the refrigerator.
Step 4: Enjoy a Chocolate Coffee Collagen Bomb!
Make your favorite coffee. Pour some into the cup and then add the collagen coffee bomb. Pour more coffee on top until the chocolate sphere is melted and the inside is melted. Use a little immersion blender or ice powder to blend everything.
Optionally, add your favorite milk to the coffee and/or top it with whipped cream or coconut cream. Enjoy immediately.
Note
We recommend using a chocolate bar instead of chocolate chips for this recipe. Chopped bars will melt better and be more successful at annealing. We used a dark chocolate bar. Using a low-carb chocolate bar (such as Lily’s) can also work.
If you can tolerate dairy, use regular milk powder instead of coconut milk powder.
Nutrition
- Serving size: 1 chocolate bomb
- Calories: 213
- Road: 5.5g
- Sodium: 247g
- Fat: 11g
- Saturated fat: 6g
- Carbohydrates: 29g
- Fiber: 8g
- Protein: 3g
- Cholesterol: 5mg
- Net carbs: 21g
Key word: Coffee, Collagen

Information about the Authors
If you want to add an avatar for all your comments, click here!