Instructions on how to use a 1-light setup for portrait photography are universal, and rightfully so. There are a number of ways that a single light source can be positioned to produce more beautiful light on a subject. You might think that switching to a 2-lamp setup would be doubly complicated. This is not the case. There are several 2-lamp arrangements that are easy to understand and quick to set up. Using 2 lights can make it easy to switch between clear front-facing shots and dramatic portraits.
All the photos for this article were created using two LED panels from Westcott Flex Cine 3-color two-color luminaire. Each board measures 1’x2′ and is supported by a lightweight shield Matthews . expandable inversion sole.
Clamshell lighting
Clamshell Lighting is a setup in which one light is placed above the subject’s head and another below. The top light is close to the face and angled at 45 degrees to provide soft light on the forehead, cheeks and chin. Since this light is placed above the subject’s head, shadows are created below the nose, cheeks, and chin. The second light, placed below the subject’s face, is used to fill these shadows to whatever extent you see fit.
When arranging the lights in the Clamshell orientation, your top light is the main light. Position this light first. Adjust the angle of the light so that it illuminates as many faces as possible. Pay attention to the light reflected in the eyes and place this light as low as possible so that it is only a few inches above the top of the subject’s head. This will ensure that the light on the face is as soft as possible and that there is light in the eyes. It is important to avoid making the eyes look dark or empty.
To determine the source settings for this light, lock the shutter speed and aperture settings first. If you don’t know what camera settings to use, try 1/160 and f/5.6 at ISO 100 as a starting point. Next, turn on your main light and start taking a test shot with the light on the lowest wattage setting. Intensify the light with each subsequent photo until the exposure on the face matches your eyes. You’ll notice shadows underneath the subject’s nose, cheeks, and neck. Position the bottom light so that it fills in the shadows. Repeat the process of incrementing the power setting with each frame you shoot until you have determined the correct power output for this lamp. You can choose to remove all shadows from the face this way
Parallel lighting
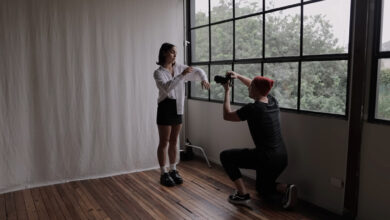
Parallel light is great for close-ups because it produces even and smooth light. For this setup, we placed 2 strip boxes or softboxes at a 45 degree angle on each side of the subject. The output power must be the same or nearly the same for both lights. Our goal is to remove shadows under the nose and cheeks. Depending on the length of the lamp, you can light up to 3/4 of the subject’s body, making this setup suitable for both frontal shots and partial body portraits.
It is important to place the subject where the light from the 2 light sources intersect. This is called the convergence point. If the subject is too close to the lights and camera, she will be in front of focus. This will be evident by the shadow running down the center of her face. If she is too far from the lamp, the reflected light will be very small in her eyes and the light will be flat and uninteresting.
Once you have determined the correct exposure for a subject at a particular distance from the lamp, you can capture multiple subjects quickly. You may have to increase or decrease the height of the light to accommodate different people, but the angle and distance of the light from your subject will not need to be adjusted. Parallel lighting systems are easy to install and do not require the use of a crane. Because the lamp has no angles, you can use a small, light base without fear of the lamp base falling.
key and kick
For this setup, we intentionally cast shadows on the face. This setting is suitable for people who are young and do not have wrinkles on their faces. The Key and Kick arrangement may not look good to older people unless you’re intentionally creating a dramatic portrait that draws attention to the contours of your subject’s face.
For this setup, we will place the main light as close to the subject as possible. This light is positioned at a 45-degree angle so that one side of the face is in shadow, except for the triangular highlight under the eye. The second light is used to highlight the hair. This stand must be arranged so that it does not cast any additional shadows on the face, otherwise the image may not make sense to the viewer’s eyes. A second light can also be placed behind the subject to separate the subject from the background. Subtlety is key regarding the placement of this second light. The wattage of this lamp should not be so high that we have a pure white glow on the subject. We wanted to define the subject’s hair, shoulders, or face in a way that didn’t give these elements too much visual volume. The key is to create a portrait that uses shadows to define the face without becoming a dramatic portrait.